How to merge text, merge Mail Merge messages in Word 2016
When making a Mail Merge, you will need a Word text document (you can start with an existing text document or create a new text) and a recipient list, usually a file Workbook in Excel - Excel spreadsheet.
Check out the video below to learn more about how to use Mail Merge mail merge feature in Word 2016 :
How to use mail merge - Mail Merge:
1. Open an existing Word document or create a new document.
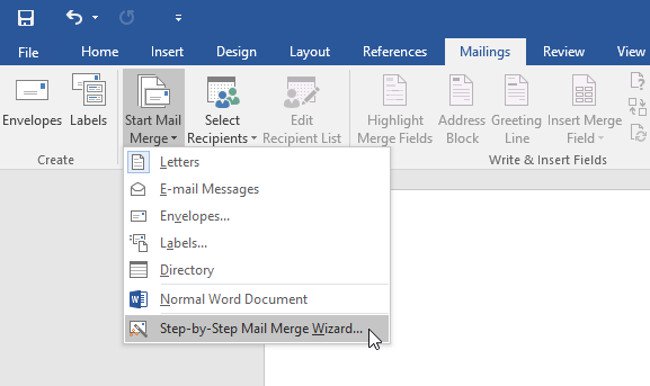
2. From the Mailings tab (Mail), click the Start Mail Merge command and select Step-by-Step Mail Merge Wizard from the drop-down menu.

- The Mail Merge box will appear and guide you through the six main steps to complete the merge. The following example will illustrate how to create a letter template and merge the message with a recipient list.
Step 1
- From the Mail Merge task pane on the right side of the Word window, select the type of document you want to create. In the example, we will choose Letters . Then click Next: Starting document ( Next: Start the document ) to go to Step 2.

Step 2
- Select Use the current document , then click Next: Select recipients (Next: Select recipients) to move to Step 3.

Step 3
You will now need an address list so that Word can automatically place each address in the document. This list may be in an existing file, such as an Excel spreadsheet , or you can type a new address list from within the Mail Merge Wizard .
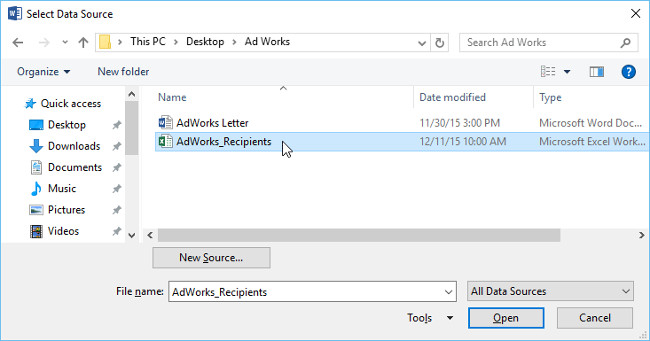
1. Select Use an existing list (Use the existing list ), then click Browse to select the file.

2. Locate your file, then click Open .

3. If the address list is in an Excel spreadsheet, select the spreadsheet containing the list and click OK .

4. In the Mail Merge Recipients dialog box, you can select or uncheck each box to control the recipients included in the merge. By default, all recipients must be selected. When done, click OK .

5. Click Next: Write your letter to move to Step 4.

- If there is no existing address list, you can click the Type a new list button and click Create , then manually enter the address list.
Step 4
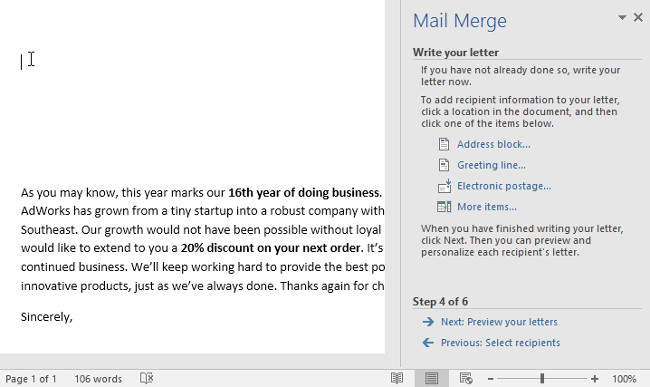
Now you are ready to write. When it is printed, each copy of the letter will basically be the same; only recipient data (such as name and address) will be different. You will need to add placeholder part holders for recipient data so that Mail Merge knows exactly where to add data.
To insert recipient data:
1. Place the insertion point in the document where you want the information to appear.

2. Select one of the placeholder options. In the example, we will select Address block .

3. Depending on your selection, a dialog box may appear with different customization options. Select the desired options, then click OK .

4. The placeholder will appear in your document (eg, "AddressBlock").

5. Add any other placeholders you want. In the example, we'll add a placeholder to the Greeting line above the body of the letter.

6. When finished, click Next: Preview your letters ( Next: Preview your mail) to go to Step 5.

- For some letters, you just need to add an Address block and Greeting line . But you can also add more placeholders (such as recipient names or addresses) in the body of the letter to further personalize.
Step 5
1. Preview the letters to make sure the information from the recipient list appears correctly in the letter. You can use the left and right scroll arrows to view each version of the document.

2. If everything is correct, click Next: Complete the merge to move on to Step 6.

Step 6
1. Click Print to print the message.

2. A dialog box will appear. Decide if you want to print all the messages, the current document (profile), or just one group, then click OK . In the example, we will print all.

3. The Print dialog box will appear. Adjust print settings if necessary, then press OK . Documents will be printed.

Having fun!
You should read it
- ★ How to merge letters and documents (Mail Merge) in Word 2016
- ★ How to merge mail (Mail Merge) in Word
- ★ Word 2016 Complete Guide (Part 3): Get familiar with basic text manipulation
- ★ Full Word tutorial 2016 (Part 4): Formatting text
- ★ Improved email performance with the Microsoft Word Mail Merge feature