How to merge messages that contain images in Word 2016
Teach you how to merge letters containing pictures in Word 2016 to help you create student, student, staff cards ... quickly and accurately.
The following article will guide you in detail how to merge letters containing images in Word 2016 to help you create student, student, staff cards . quickly and accurately.
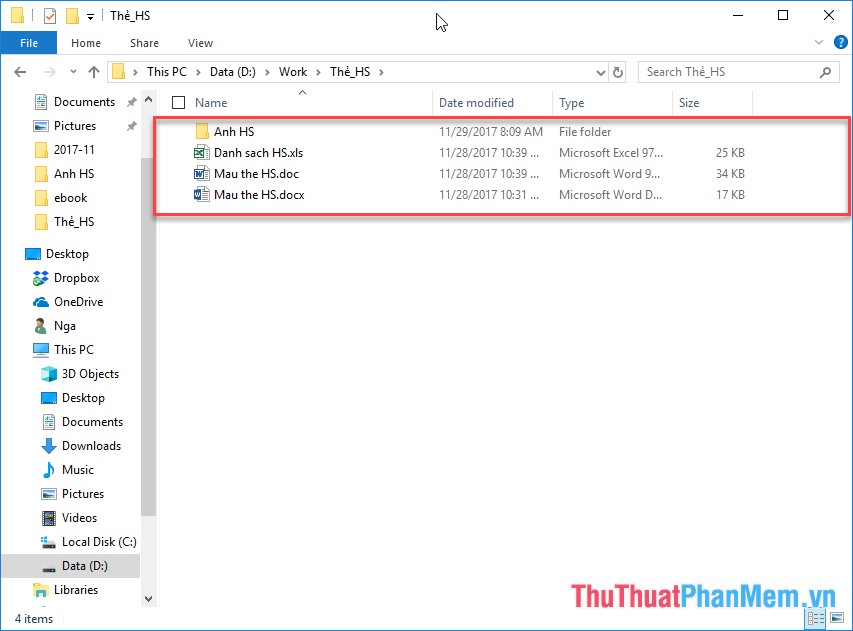
To be able to merge mail from an Excel table you need to prepare 3 data files:
- Mail merge template file with Word 2003 format
- The Excel file contains a mailing list
- Folders containing Photos for mail merge
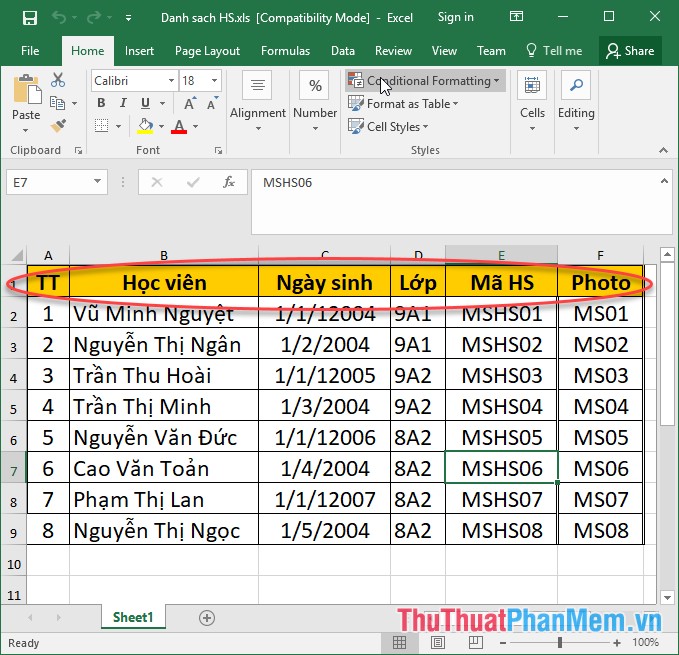
Note that the data file from Excel containing the list of header rows must be the first row on the top, so you do not insert any of the above content:
The Word file contains the content of the form you need to merge:

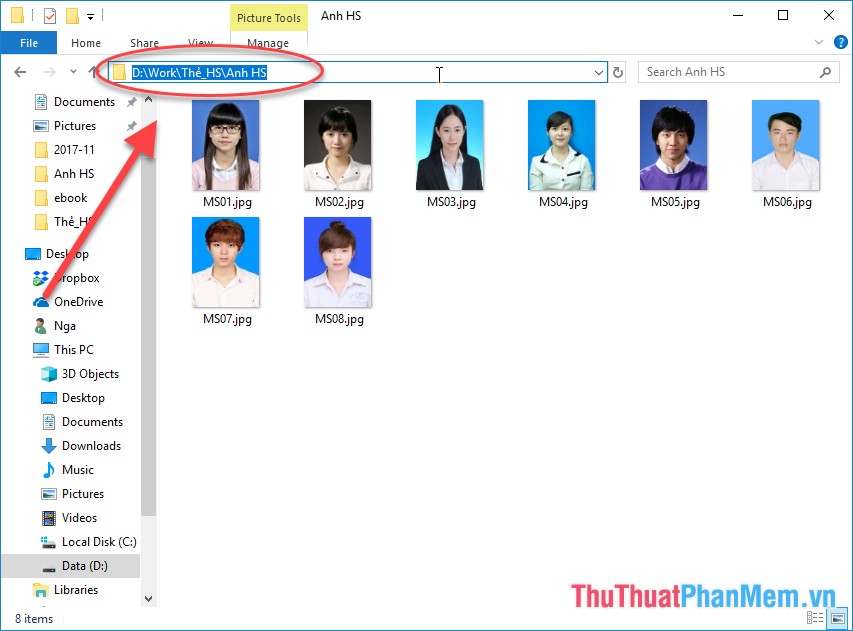
The folder containing the images, note the image file name must match the name entered in the Photo column in Excel file:

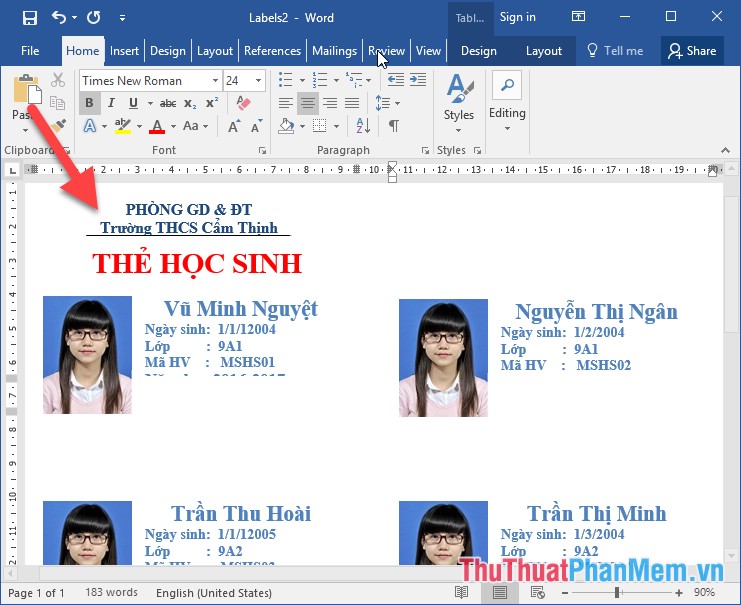
For example, to create a student ID card, follow these steps:
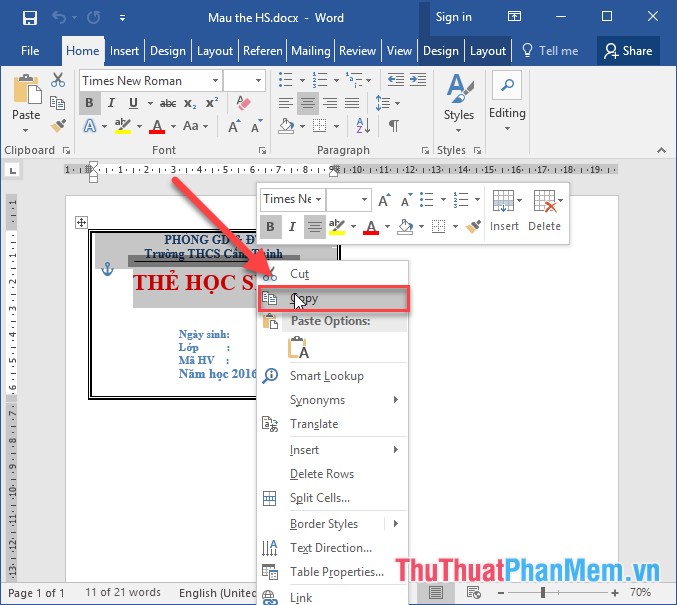
Step 1: Copy the content of the board containing student information and photos by selecting the content -> right-click and choose Copy:

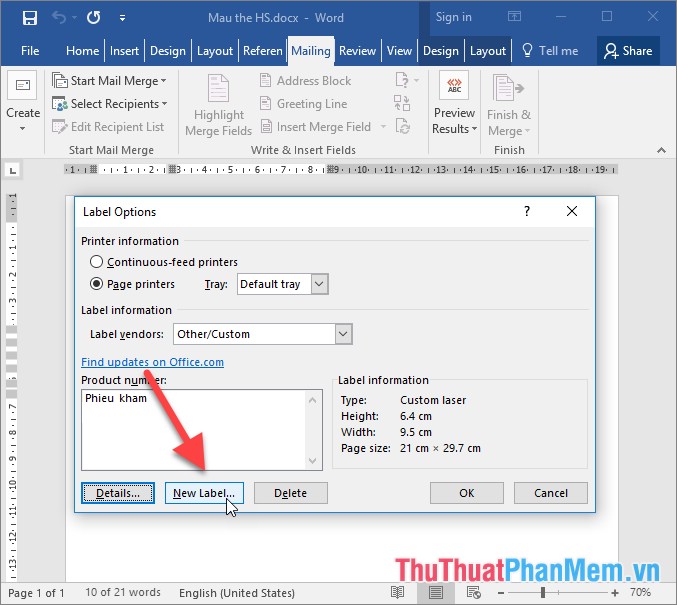
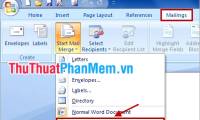
Step 2: Go to Maillings tab -> Start Mail Merger -> labels:

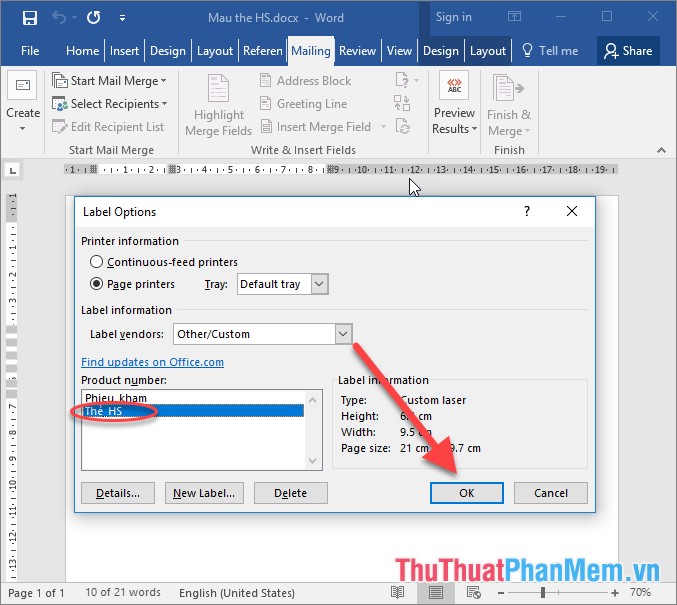
Step 3: The Label Option dialog box appears, click New Label .
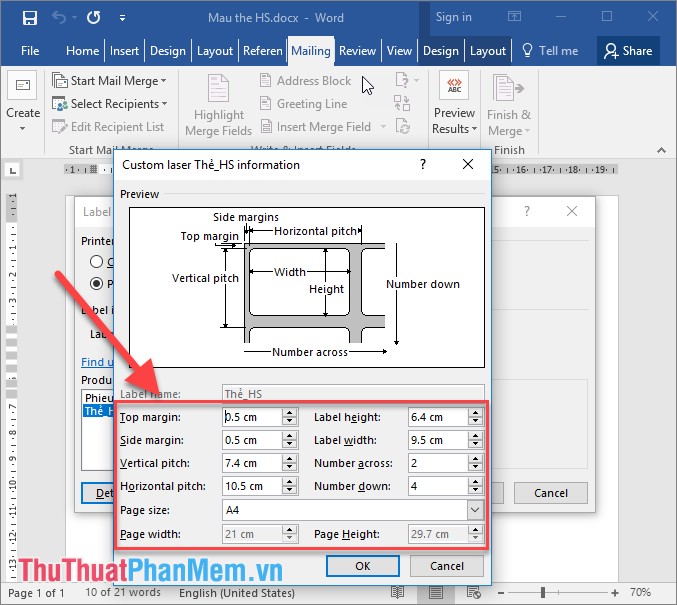
Step 4: In the Label Detail dialog box make the following options:
- Page Size: Select a vertical A4 paper size (depending on how you create the letter to select a paper size)
- Number across: Select the number of columns of labels on a page to select value 2 (the number of mailing labels on a page horizontally consists of 2 columns)
- Number down: Number of labels selected value 4 (number of letter labels on a page arranged vertically 4 letters)
Note: Number across = 2, number down = 4 => On a page there are 8 letters divided into 2 columns on 1 page.
- Top margin: Choose the upper margin for the label, here choose 5mm
- Side margin: Select the left margin for the label here choose 5mm
- Label height: Select the height for labels, you need to calculate the height as follows:
+ A4 paper size 29.7cm high, in the upper section choose Number down = 4 ie 1 page contains 4 letters or 4 labels => the height of each label = (paper height - upper margin - lower margin): 4 = (29.7-0.5-0.5) = 6.4cm
- Label width: The width of the label, above select a page with 2 columns (number down = 2) => Label width is calculated = (paper width - left and right margins): 2 = (29.7- 0.5-0.5): 2 = 9.5cm
- Vertical pitch: The distance between the labels vertically = the height of the label + the top margin + the bottom margin = 6.4 + 0.5 + 0.5 = 7.4cm
- Horizontal pitch: The distance between the labels horizontally = the width of the label + left margin + right margin = 9.5 + 0.5 + 0.5 = 10.5cm
Note that the above values are calculated depending on how you selected the number of labels per page.
Step 5: Click OK -> select the label name just created -> click OK:
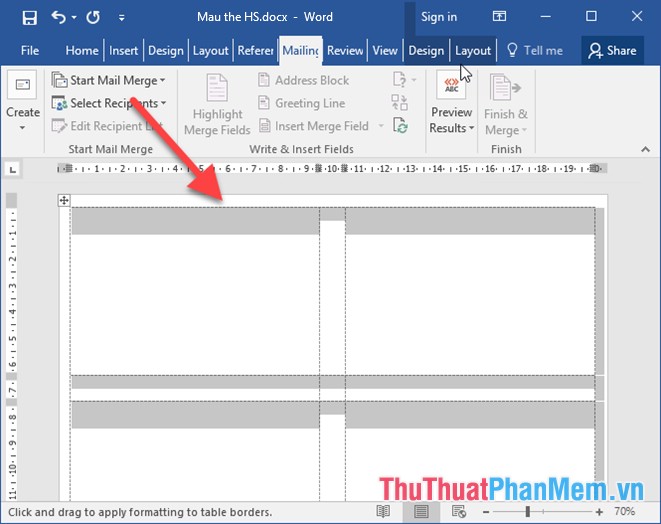
Step 6: After selecting OK the dialog box to use the label -> system to delete data on the page -> click OK:

Step 7: The result has created a label with 8 frames on 1 page divided into 2 columns:
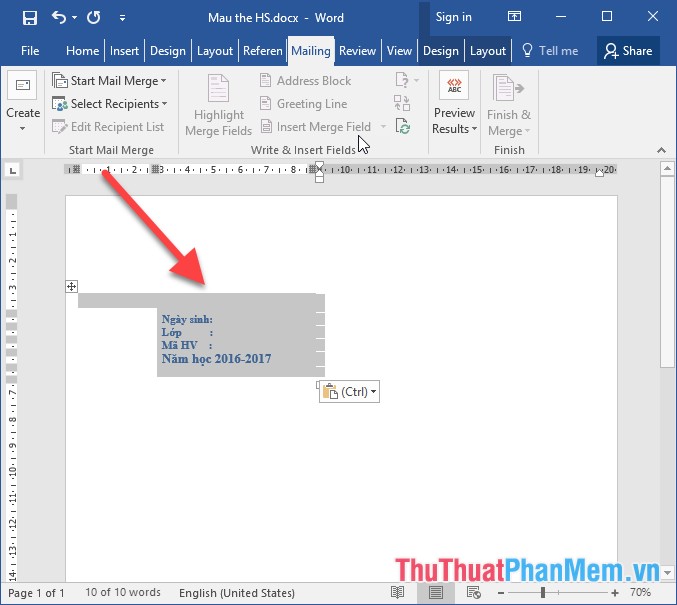
Step 8: Click on the first label to paste the content copied from step 1 -> get the results:
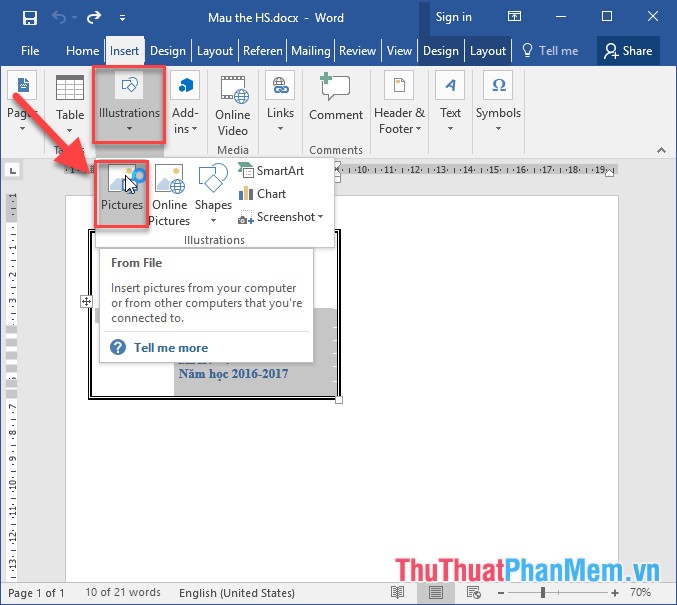
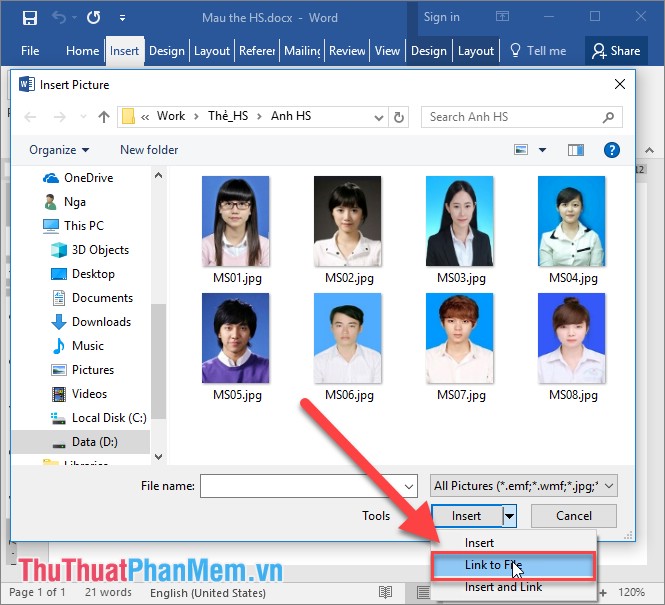
Step 9: Put the cursor in the position to insert the image of the first label -> on the Insert tab -> Picture:
Step 10: Select the path to the corresponding image file to be inserted -> pay attention to select Link to File without selecting Insert if not mixed the error message:
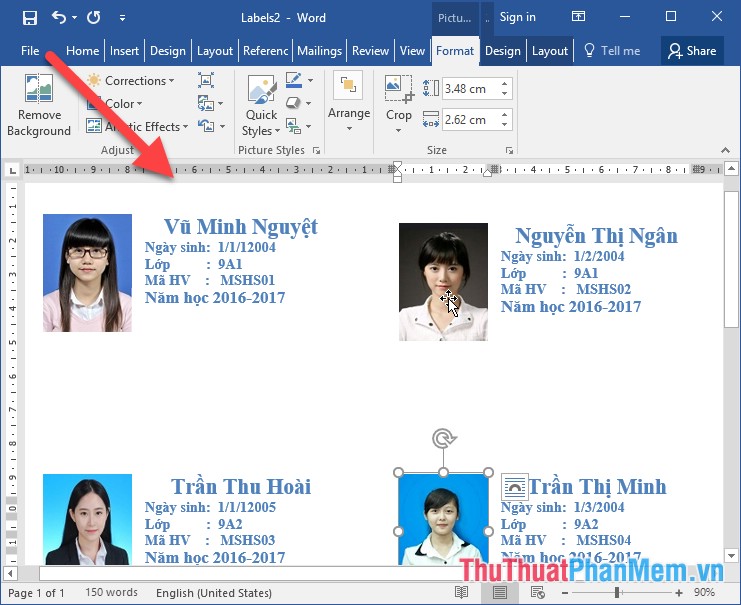
Result of inserting the image into the card:
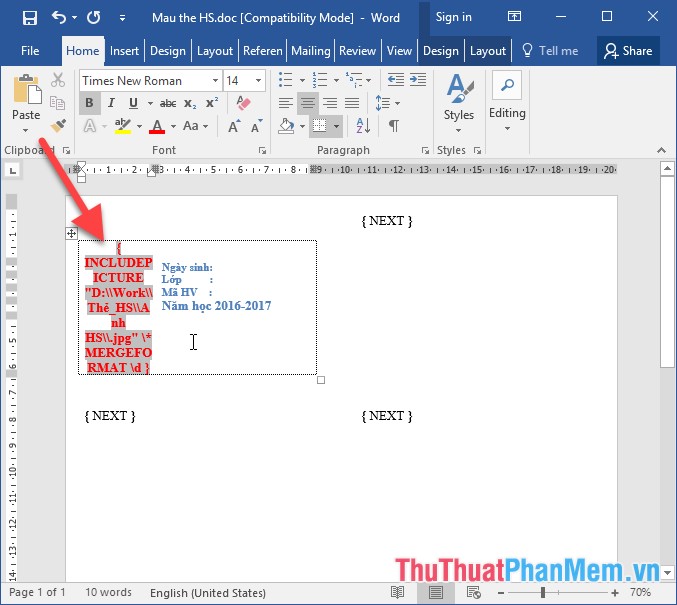
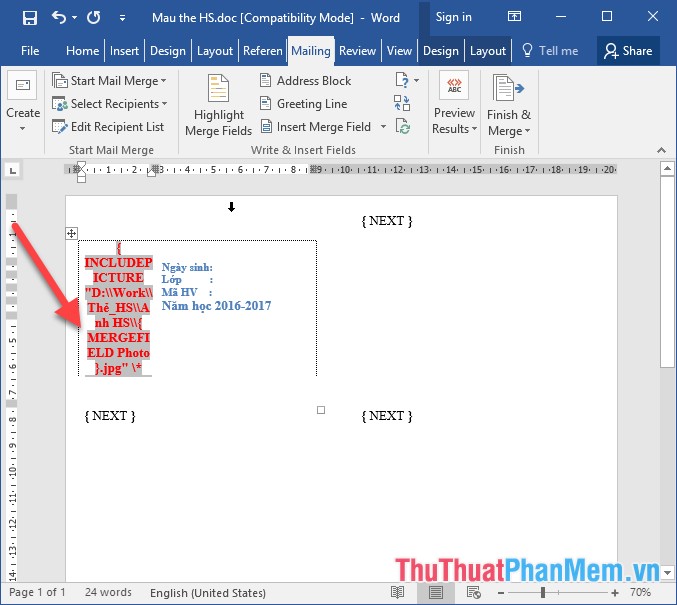
Step 11: Press the key combination Alt + F9 to open the code window for the image:
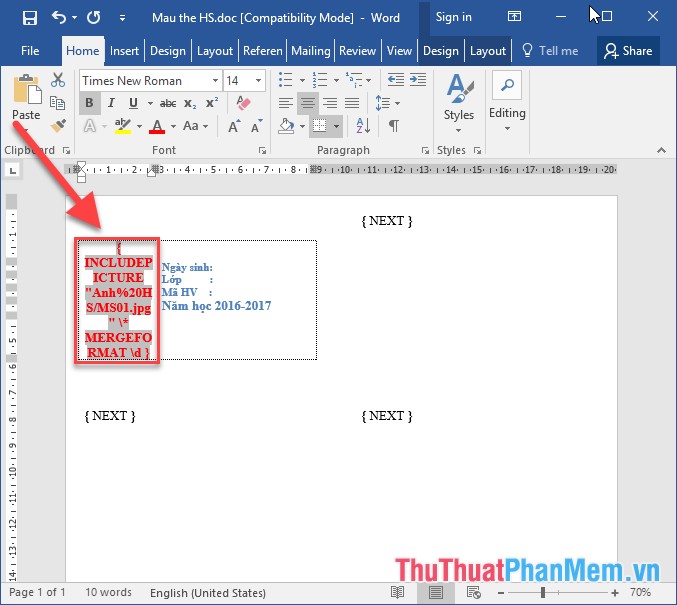
Step 12: Go back to the folder containing images -> Copy the path to the folder:
Step 13: Replace the path of the image file with the path of the copied folder:
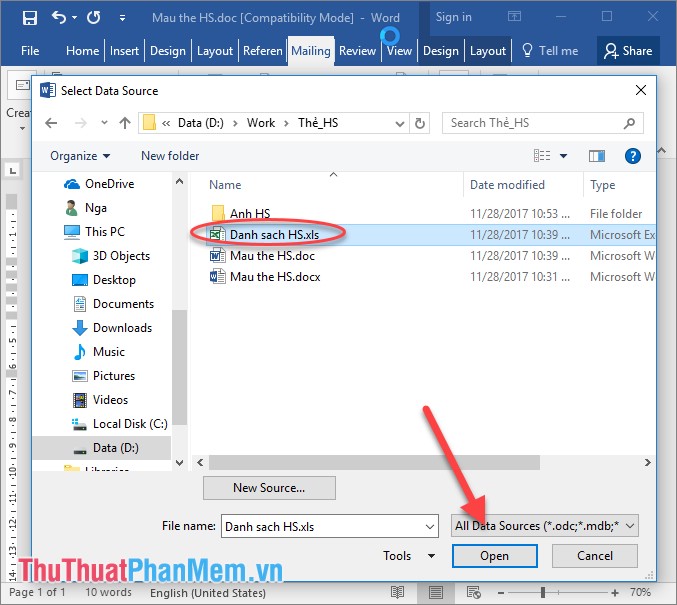
Step 14: In the Mailings tab, click Select Recipients -> Use an Existing list ( to select the Excel file containing the list to insert) -> The dialog box will appear and select the path to the Excel file containing the list:
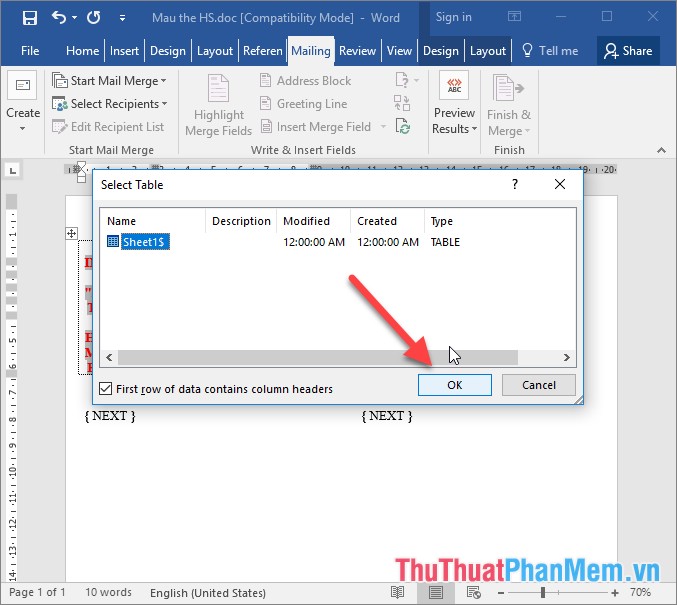
Step 15: Select the sheet name containing the list -> click OK:
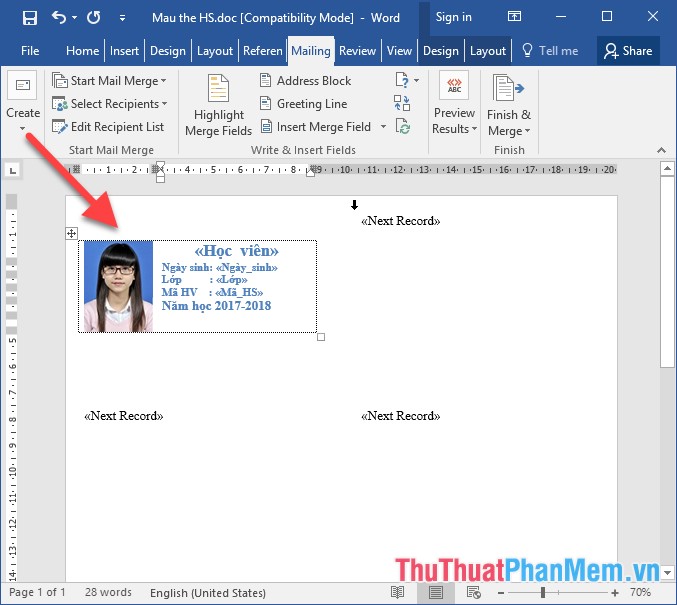
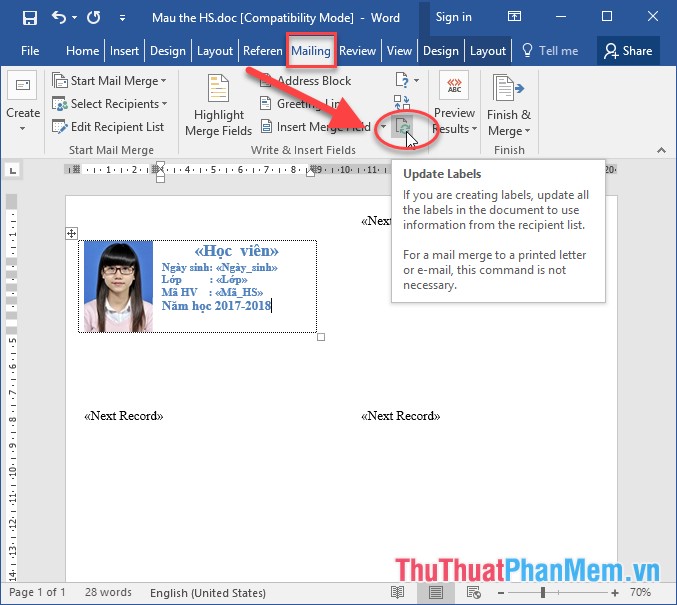
Step 16: Place the mouse cursor at the location containing the file name of the image -> Click the Maillings tab -> Insert Merge Field -> select the photo field corresponding to the image file name:
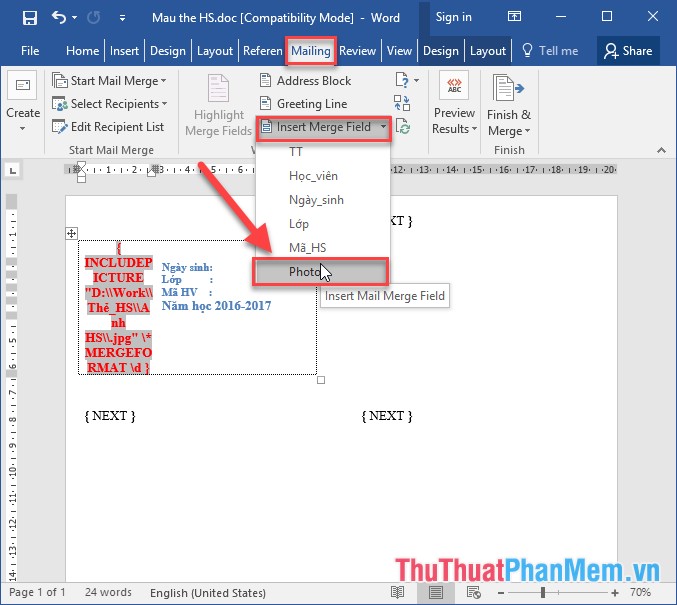
The result of inserting the Photo field into the image:
Similarly select the corresponding school for student name, date of birth .
Step 16: Press the key combination Alt + F9 to return to the original mode -> click the Update labels icon :
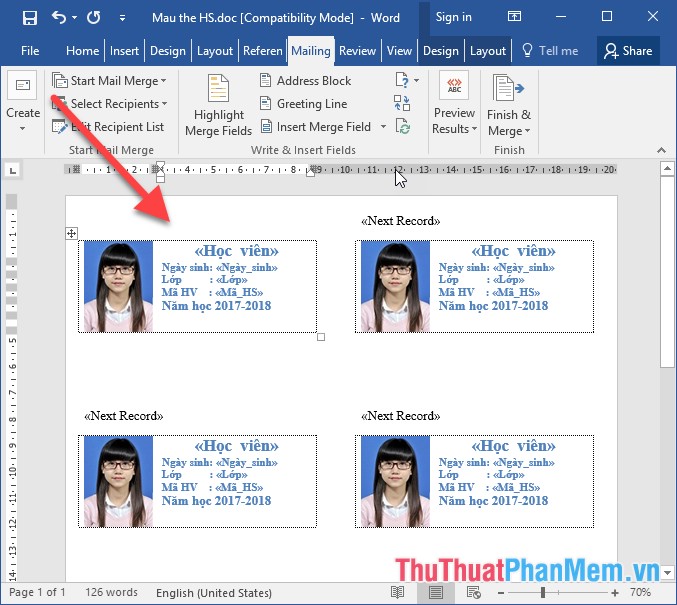
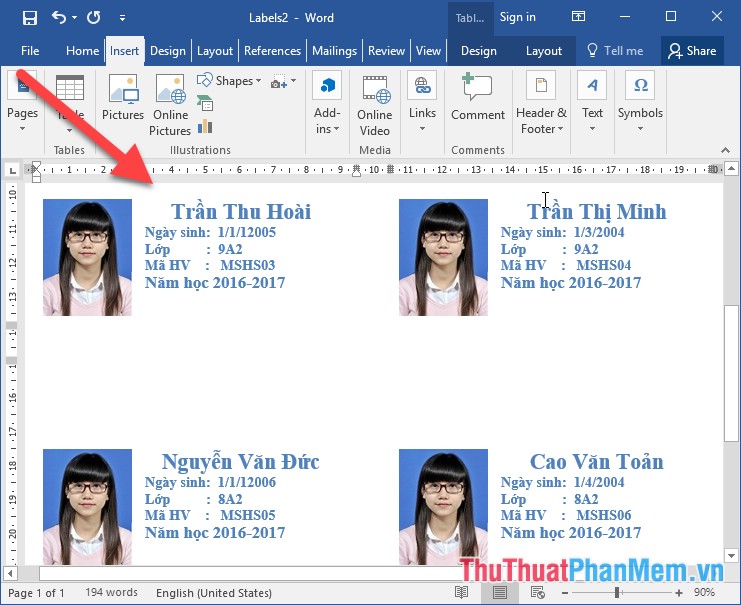
After Update labels all labels are updated:
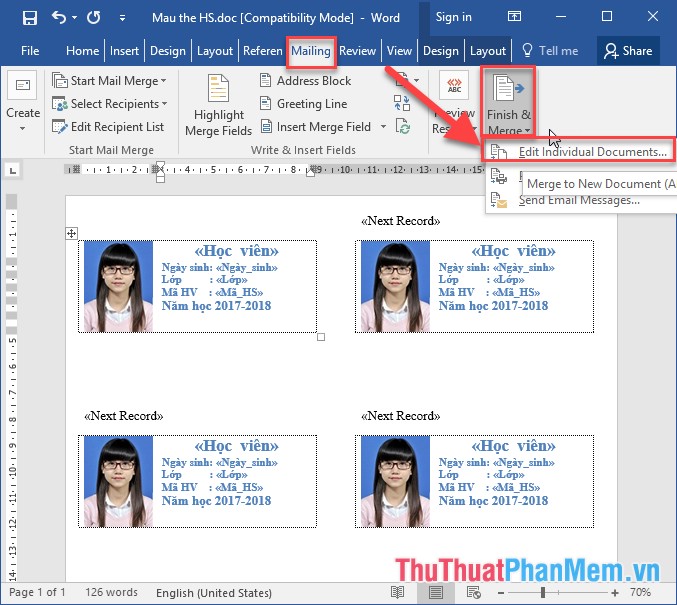
Step 17: Click Finish & Merge -> Edit Individual Document to check whether the image mixing process has been successful:
Step 18: Click the All button to preview all the labels:
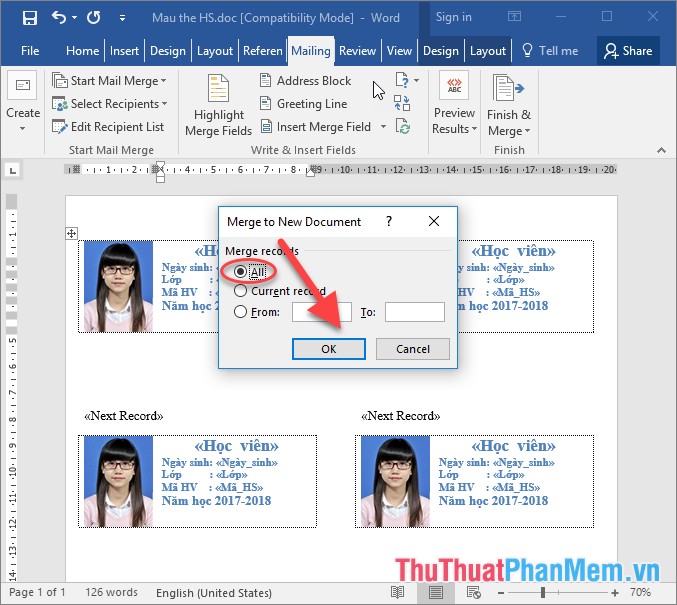
Results of updating all labels:
However, the image field has not been updated -> press the F5 key to refresh -> get the results:
If you press F5, the image has not been updated, please check the image file path again, in the process of inserting the selected image Link to file or not, the file containing the sample letter is in Word 2003 format or not.
Step 19: Go back to the .docx file to copy the title to create student cards:
Step 20: Paste the contents of the first mixed card:
Step 21: Update the Labels for all the resulting labels:

So you've successfully merged the mail containing images, the rest you just need to Save the newly created file into your drive.
In the process of mail merge containing images you should note the following:
- File containing mail merge template must be in Word 2003 format (.doc)
- The name of the image file to be inserted must match and match the student order in the Excel file
- At the image insertion step, select Link to file mode without selecting Insert.
Above is a detailed guide on how to merge letters containing images in Word 2016. I wish you success!
Was this article helpful?
Your feedback helps us improve.
Related Articles
 How to merge text, merge Mail Merge messages in Word 20165 minutes read
 Mix text, merge messages, mix Excel tables into Word 2007 documents2 minutes read
 How to merge 2 images into 1 frame in Word6 minutes read
 How to merge multiple messages on 1 page from an Excel table in Word 20165 minutes read
 How to fix number formatting errors when using Mail Merge in Word12 minutes read
 How to merge mail (Mail Merge) in Word3 minutes read
Reader Comments 0
Sign in with email or Google to join the discussion.