'Mail Merge' in CorelDRAW
When working with a specific design, sometimes you have the need to print the final product with a design but there are many different content. Staff cards, invitations, business cards, promotional cards, etc. are specific examples in this case.
A lot of you wonder how to solve the problem in CorelDRAW, is it possible to do this like Word's Mail Merge function? The following guide will clear your questions.
This tutorial is illustrated on CorelDRAW X5, but you can still apply on X3 and later versions.
PREPARE:
- First of all, create a template design that contains general content and the component will change. The illustration here is a type of employee card:

- Prepare data in the following form by using any text editor (illustrated using Notepad program):

The first line declares the number of items to change, the second is the name of the item, the next line is the corresponding data.
MANIPULATION:
- Open the created design> go to File > Print Merge > Create / Load Merge Fields .
- Check the Import text from a file or an ODBC data source > click Next .
- Choose where to store the file name.txt > click Next . At this step, you can add more fields if you want> click Next .
- Check data, modify and add (if necessary)> click Next .

- Click Finish to complete the step of putting the data into the program. At this point, the Print Merge tab will appear> select each item in this toolbar's Fields box> and then click the Insert button> immediately the items will appear in the design page.
- Now re-arrange the location, and format these fields as desired.

- At this step, you should save the design file for future use. Note: although the design content has been saved, but when printing, you must repeat the above steps to connect the data to the list.txt file.
- Go to File > Print Merge > Perform Merge menu (or click the Print button on the Print Merge toolbar)> click Print Preview, now you will get the Record , each Record is a design with the content taken from the file private directory.txt.

- If you go to File > Print Merge menu> select Merge to New Document then CorelDRAW contains finished content into each new file page (instead of each Record as above).
PRINTING PRODUCTS:
If you leave the default print mode, there will be a lot of extra paper. We should re-arrange to take advantage of those redundancies. Do the following:
- Resize the printed page a bit larger than the size of the card to create a space between the cards when printing.
- Go to File > Print Merge > Perform Merge menu> select Print Preview.
- Click on the Imposition Layout Tool (allow to customize the page layout )> select Next Template / Document Preview > specify the column number and line in a printed page> into Print Option (Alt + O) set Make a vertical page ( Portrait ).

- Once completed, you can press the Print button to print the finished product> and then cut off the cards and put on the nameplate strap. It's done!
ADDING EMPLOYEE CODE:
So we have finished the product. Suddenly, you get a request to add employee codes to the designs. Maybe . have to start over again?
Do not worry! CorelDRAW allows you to add additional fields during the design process.
- Click the Edit Field button on the Print Merge toolbar (or go to File > Print Merge > Edit Merge Field . ).
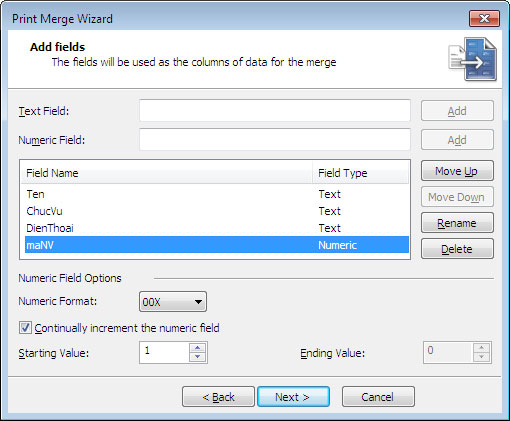
- The Print Merge Wizard window appears> enter the content you want to add (here is maNV) to Numeric Field > and click the Add button next to> set the display format in Numeric Format (here the author chooses 00X )> Set the value to start in Starting Value .

- Click Next to continue. At this point, you see that the values of the VMS will be set automatically> click Next > Finish to finish.

- Perform Insert add Field maHV into position and format as you like.
- Go to Print Preview mode to see the results.

You should read it
- ★ How to fix number formatting errors when using Mail Merge in Word
- ★ How to merge letters and documents (Mail Merge) in Word 2016
- ★ How to Mail Merge in Microsoft Word
- ★ Improved email performance with the Microsoft Word Mail Merge feature
- ★ Get familiar with CorelDRAW 12 - Lesson 1: Set up the drawing page