How to Format a Word Document
Microsoft Wordhttps://products.office.com/en-us/word is the world's most popular word document program. Depending on what kind of legal, formal, or personal paper you're writing, each of these will need its own formatting guidelines. If...
Table of Contents
Method 1 of 3:
Formatting Document Layout
-
 Explore the Word user interface. Familiarize yourself with the interface elements that hold all of your formatting tools. You may need to enable tools on your tool bar. You can do this by selecting Toolbars from the "View" tab and choosing "Standard."
- The Menu bar is the area at the top of the screen where you will find File, Edit, View, and other important menu commands.
- The Toolbar is directly below the Menu bar and displays common tasks like saving, printing, and opening a document.
- The Ribbon is at the top of your workspace, below the Toolbar and organizes features of Microsoft Word into categories, like the Home tab and Layout tab.
-
 Adjust the alignment of your document. Different types of documents call for different text alignments. You can choose whether to align your entire document to the left, right, or at the center, by clicking the Alignment buttons in the Paragraph section in the Ribbon.
- These are the buttons that look like a small version of a document, with small black lines according to their buttons alignment function.
- You can find the alignment buttons toward the center of the Ribbon, after the Underline button and before the Bullets button.
-
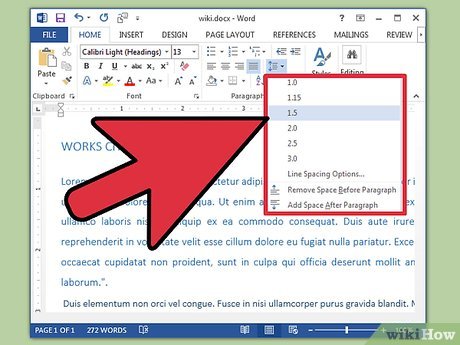 Set the line spacing of your document. Adjust settings by clicking the Line and Paragraph Spacing button. Every text you type after using this tool will follow the spacing you've set.
- Find the Line and Paragraph spacing button on the Ribbon after the Alignment buttons. This button looks like a row of lines with vertical arrows to the left of the lines pointing upward and downward.
- If you want to edit the spacing of an existing line or paragraph, highlight the context and click the Line and Paragraph Spacing button to edit it.
- You can also edit line and paragraph spacing by clicking on the Format tab on the Menu bar at the top of your screen, selecting 'Paragraph' from the list, and selecting your desired spacing.
- Many professional documents like college essays and cover letters should be double-spaced.
-
 Adjust the page orientation. If you need to write the document in a different orientation, click the 'Orientations' option in the Page Layout section on the Menu bar, and select either Portrait or Landscape form from the drop-down list.
 -
 Change the size of the paper on the Page Layout section on the Menu bar. If you need to print the document on a specific paper size, click the 'Size' button, and select your desired size from drop-down list.
- This will change the virtual size of the document you're writing.
-
 Adjust the document headers and footers. A header contains details that will appear on every page of the paper.
- To set the header of your document, double-click on the topmost part of the page and the header field will appear.
- Adjust the document footers. Footers are just like document headers. All text in the footer will appear at the bottom of each page of your document.
- To set the footer of your paper, double-click on the bottommost part of the page and the footer field will appear.
- You can also format your headers and footers by selecting the 'View' tab from the Menu bar at the top of your screen and clicking 'Header and Footer' on the list. This action will open the headers and footers on your page and allow you to create them.
-
 Adjust the margin. Click the 'Margins' button on the Page Setup section of the Page Layout tab and select a margin from the pre-defined margin settings listed on the drop-down list.
- If you want to use your own margin measurements, click 'Custom Margins' at the very bottom of the drop-down list to set your own.
-
 Add columns. If you need to create a newspaper-like document, you can do so by adjusting the format of the document to columns. Select the 'Columns' option from the Ribbon and choose the number and alignment of columns you desire from the drop-down list. You will find the Columns button on the top row of the Ribbon. This button has a green icon showing a small rectangle divided in half.
- If you want to create one, two, or three columns, you can do so from the preset options. If you'd like to create more, you'll need to choose "More Columns."
- Note that this column option is different from the columns you get when you insert items like tables on your document.
-
 Add bullets and numbers. Highlight the text that you would like to be numbered or bulleted and click the Numbering or Bullets button on the Ribbon.
- These buttons can be found side by side on the Ribbon, after the alignment buttons. The Numbering button displays three small lines with numbers to the left of the lines and the Bullets button displays three small lines with bullet points to the left of the lines.
-
 Format your document style. All documents have standard built-in styles (for example, Normal, Title, Heading 1). The default style for text is Normal. The template that a document is based on (for example, Normal.dotx), determines which styles appear on the Ribbon and on the Styles tab.
- Before you apply a style, you can see all of the available styles and preview how they will appear when applied.
- On the Home tab or under the Format tab on the Menu bar, under Styles, select a style and click your desired style.
- You can also click the Modify button on the Styles tab to create your own style.
- By default, Word applies a paragraph style (for example, Heading 1) to the entire paragraph. To apply a paragraph style to part of a paragraph, select only the specific part that you wish to modify.
Method 2 of 3:
Formatting Font
-
 Adjust the font settings. On your Ribbon, you will see drop-down menus for font and size. To make changes to text you first have to select the text that you want to work with. You can select individual characters, specific words, or entire paragraphs. After you select text, you can format it. For example, you can change the font, size, and color.
- Click on to the left of the first word you wish to select and hold the cursor while dragging the cursor over all the words you wish to select.
-
 Change size, color, and highlighting. Navigate to the drop-down section on the Ribbon to choose your desired font, size, color, and highlighting. You will see the font button first, to the left right after the Style button. Next, you will find the size button with your default size (usually size 12 font).
- Always consider the formatting guidelines of the document you are writing when choosing the font style and size.
- The standard font for most college and professional papers is Time New Roman size 12 font.
-
 Choose the text emphasis formatting you want to use. Besides setting the font style and size, you can also adjust the emphasis of words and lines in your document. Beside the size button, you will see the Bold, Italics, and Underline button. The Bold button is a bolded capitol B, the Italics button is an italicized capitol I, and the Underline button is an underlined capitol U.
- Just click the buttons on the Ribbon once you have selected the font you want to modify.
-
 Set the text highlights and font colors. If you would like to add colors and highlights to your document, you can do so by selecting the part of the document you like to add colors to and clicking the Text Highlight or Font Color buttons on the Ribbon.
- Navigate to the far right of the Ribbon to find the Highlight button, a blue ABC with a white bar underlining it, and the font color button, a letter A with a black bar underneath.
Method 3 of 3:
Adding Pictures and Graphs
-
 Drag an image into your text box. Place your image exactly where you want it. Once you drop your image, it may be a little difficult to move it to the precise place you want it. There are a few ways to more easily manipulate your image:
 -
 Enable text wrapping. Text wrapping changes the layout of your document, allowing the text to flow around the image no matter where it is placed.
- Right-click on the image and hover over Wrap Text. Select the alignment that bests suits your document. You will see a preview as you hover over each option.
- Select the image and then hold the Ctrl key. While holding the key, use the arrow keys to move the picture around the document.
-
 Add a graph. Click the 'Insert' tab, and then click the "Chart" option. When you select Chart, a new toolbar will appear on your ribbon displaying a range of graphs to choose from. Choose your preferred type of graph, such as a pie.
 -
 Modify your graph. Scroll to that section of the window, and then select from the different types of graphs, such as 'Exploded pie in 3-D.'
- Click 'OK' to have Word insert the graph onto your Word document and pop up the 'Chart in Microsoft Word – Microsoft Excel' window.
Was this article helpful?
Your feedback helps us improve.
Related Articles
 How to keep Word format when sharing documents4 minutes read
 How to Create Documents in OpenOffice That Will Work With Other Software3 minutes read
 Full Word tutorial 2016 (Part 4): Formatting text5 minutes read
 Align text, adjust font in Word 20138 minutes read
 How to Save Microsoft Word Documents3 minutes read
 Word 2016 Complete Guide (Part 10): Page layout4 minutes read
Reader Comments 0
Sign in with email or Google to join the discussion.