How to Wrap Text Around a Picture in Publisher
When creating Microsoft Publisher documents like catalogs, brochures and newsletters, it is important to know how to wrap text around images and graphics. Since Publisher uses text boxes for entering text into a document, the method for...
Table of Contents
Method 1 of 2:
Insert and Format a Text box in Publisher
-
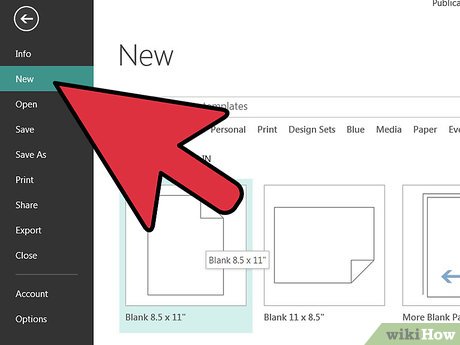 Open a new Publisher document and choose a template. Click on the publisher shortcut in the MS Office folder, located in the All Programs menu. Choose a template from the Publication Types menu on the far left side of the application window. Click the Create button in the lower-right corner of the application window. A new Publisher document has been started.
 -
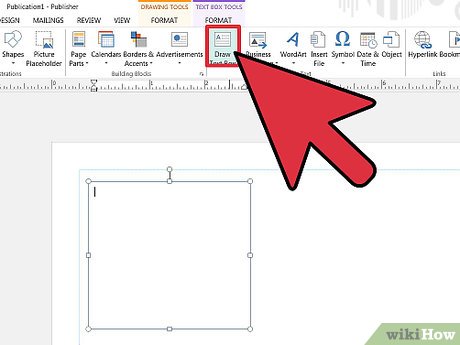 Add text. Insert a text box, or use one of the text boxes included in the template. Type the text into an existing text box, or add a new text box to the template by clicking the Text box button in the Objects toolbar, located on the far left of the application window. Select the body of the text and click the Right-Justify button in the formatting menu on the standard toolbar.
 -
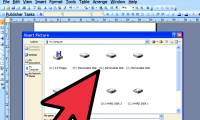
 Insert a ClipArt graphic or image file. To insert an image into the document, click the Insert tab on the Standard toolbar, click the Picture option, and select an image saved to the hard drive. To insert a ClipArt graphic, click the ClipArt option in the Insert pull-down menu to open the ClipArt task pane. Select a ClipArt Graphic from the available options by clicking on the graphic to insert into the document.
Method 2 of 2:
Wrap Text Around an Object in Publisher
-
 Format the graphic so that the text wraps around the image or ClipArt graphic. Click and drag the graphic into the desired location in or over the top of the text box(es). Click the Text Wrapping button on the Picture toolbar and choose 1 of the available options.
- Click the "Square" text wrapping option to wrap the text around all 4 sides of the graphic.
- Click the Top and Bottom text wrapping option to limit the text wrapping to the top or bottom of the graphic.
- Click the Tight text wrapping option to wrap the text as close as possible around the graphic.
- Click the Through text wrapping option to wrap the text around all 4 sides of the image. When using the Through option, text also will show through any section of the image that is transparent. For example, a Clip Art graphic may have empty space surrounding it within the picture frame that is set to transparent. Selecting the Through option will make text visible inside the frame of the graphic in the empty spaces surrounding the graphic.
- Use the Edit Wrap Points option to customize how the text wraps around an image or graphic. Click on Edit Wrap Points in the Text Wrap sub-menu. Notice how a series of small, black squares now surround the image. Click and drag on any black square to adjust how the text wraps around the object.
- Select the None option to remove any text wrap settings already applied.
Was this article helpful?
Your feedback helps us improve.
Related Articles
 How to Add a Photo to a Document Using Microsoft Publisher11 minutes read
 How to Wrap Text in Word6 minutes read
 How to automatically wrap lines in Excel (Wrap Text in Excel)3 minutes read
 Wrap text in Word3 minutes read
 How to adjust Wrap Text in Google Sheets on PC, Android and iPhone2 minutes read
 How to Use Basic Microsoft Publisher6 minutes read
Reader Comments 0
Sign in with email or Google to join the discussion.