Table of Contents
This updated guide explains how to Fix Error 0x80070070 on Windows 10: Step-by-Step through clear steps, practical examples, and important checks that help prevent common errors.
Any error message 0x80070070 is an upgrade issue with Windows 10. However, this is not a cause for concern. If you receive any of these 3 error messages (0x80070070 - 0x50011, 0x80070070 - 0x50012, 0x80070070 - 0x60000), then that means the computer doesn't have enough space to complete the upgrade..
You can refer to the following ways to fix error 0x80070070
- Fix error 0x80070070: Using Disk Cleanup Tool to Free up Space in C Drive
- Fix error 0x80070070: Disable Disk Quotas or Limit Disk Space
- Fix error 0x80070070: Extend the System Partition
- fix error code 0x80070070 Using the Media creation Tool to Upgrade Windows 10
- Fix error 0x80070070 Increase the Size of Windows Recovery Partition
In this tutorial, readers will learn the steps to fix error 0x80070070 when the device tries to upgrade to a new version of Windows 10.
How to Fix Error 0x80070070 Windows 10
When you receive the error 0x80070070 - 0x50011, 0x80070070 - 0x50012 or 0x80070070 - 0x60000, you only need to free up space on your main memory or connect an external hard drive, such as USB with enough space for Windows 10 to use. Used as a temporary memory.
Free Up Space by Using Settings
To delete unnecessary and temporary files to free up space on Windows 10, follow these steps:
1. Open Settings.
2. Click System.
3. Click Storage.
4. In the Storage sense section, click the Configure Storage Sense option or run it now .
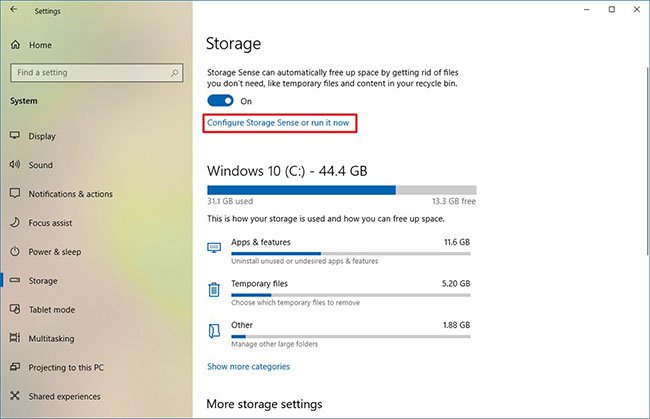 Click the Configure Storage Sense option or run it now
5. In the Temporary Files section, select the Delete temporary files that my apps aren't using option .
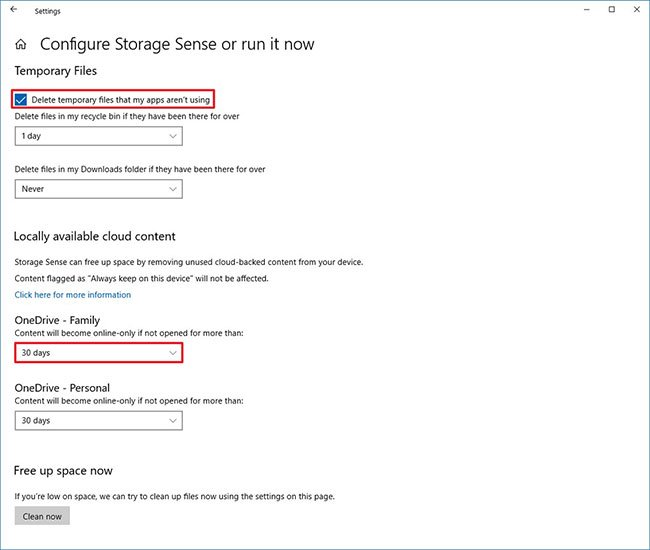 Check the Delete temporary files option that my apps aren't using
6. Use the Delete files in my recycle bin menu if they have been for over and select the 1 day option.
7. Use the Delete files drop-down menu in my Downloads folder if they have been there for over and carefully choose how the files to remove them. (If you do not want to delete the files in the Downloads folder, select the Never option.)
8. In the Locally available cloud content section , use the drop-down menus to select when you want OneDrive content to become online only to free up space.
9. Click the Clean now button .
When you complete the steps, Storage sense will regain some space to fix error 0x80070070. If you can't clean up enough files, you can try deleting temporary files.
Delete Temporary Files
To delete temporary system files, follow the steps in this article: A few tips to free up hard drive space on a Windows 10 computer.
Free Up Space with Disk Cleanup Tool
If you still need to free up more space, you can use the Disk Cleanup tool. Refer to the article: Free up hard drive space on Windows 10 with Disk Cleanup for details on how to do it.
After completing the steps and getting enough space, try upgrading to Windows 10 again and you will no longer see any error messages.
FAQ
What is the easiest way to Fix Error 0x80070070 on Windows 10: Step-by-Step?
Start with the requirements in this guide, then follow each step in order. Check the result after every major change so problems are easier to identify.
Can beginners follow these instructions?
Yes. The process is organized into practical steps, and you can repeat any step before moving forward.
What should I check if the method does not work?
Confirm your software or device version, permissions, settings, file format, and internet connection when the task depends on online services.
Related Articles
 How to Fix 'This App Can't Run on Your PC' Error on Windows6 minutes read
 How to Fix 'an Operating System Not Found' Error on Windows 103 minutes read
 Steps to Fix Error 0x8004fc12 on Windows 115 minutes read
 How to Fix VPN Error 6195 minutes read
 Why Do Your Windows Updates Keep Failing (It's Not the Internet)6 minutes read
 Steps to Fix Errors 0xc0000225 on Windows Vista // 7/8 // 8.1 //9 minutes read
Reader Comments 0
Sign in with email or Google to join the discussion.