5 easy ways to fix nvlddmkm.sys error in Windows 10
While the exact cause of the error will vary from person to person, there are a few fixes you can try to get rid of the problem.
Here are 5 ways you can fix nvlddmkm.sys error in Windows 10.
1. Update the graphics card driver
Usually, outdated GPU drivers cause a lot of errors in Windows. That's why the first logical step to take when dealing with this problem is to update your graphics card driver. This can be done in two ways: Through Device Manager or through Nvidia GeForce Experience.
Update graphics card drivers using Nvidia GeForce Experience
Nvidia GeForce Experience is a companion application to all Nvidia GPUs and it is likely that you already have it installed. If you don't have the app yet, you can download it from here. The app also has some other key features and benefits that gamers might find useful.
Here's how you can use Nvidia GeForce Experience to update your display drivers:
- Open Nvidia GeForce Experience. It is usually found on the desktop or taskbar in Windows 10.
- Log in to Nvidia GeForce Experience, click Drivers , located in the top left corner.
- You will see a list of the latest Nvidia GameReady drivers. Click Download , then the application will automatically download and install the latest driver for you.

2. Update Windows to the latest version
Occasionally, older versions of Windows trigger the BSOD nvlddmkm.sys. If you're running an older version, it's likely that the problem is caused by a compatibility issue. If that's the case, it's best to upgrade it using available system updates.
3. Overclocking GPU
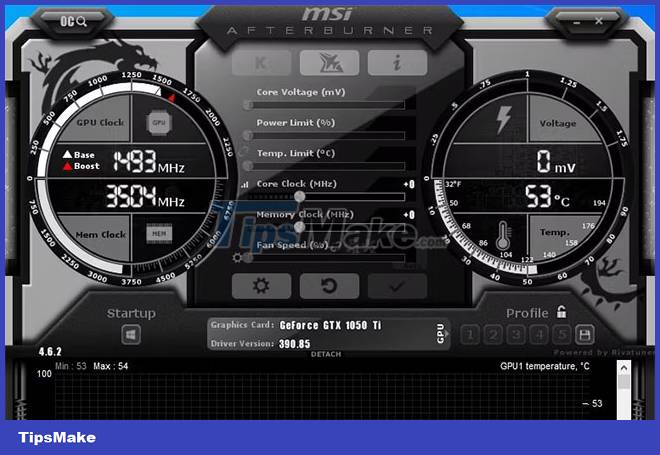
This may sound weird, but some users fixed the nvlddmkm.sys error by overclocking their GPU. While this can lead to a small performance drop, it's worth a shot if it gets rid of the bug. The simplest utility to do this is MSI Afterburner, which you can download here.
After downloading and installing MSI Afterburner, follow these steps to overclock your GPU:
- Launch the MSI Afterburner utility and find the slider that says Core Clock.
- Adjust the slider and move it to the left until it is -50 or lower.
- Apply the settings and restart your computer.

Users should note that overclocking the GPU will also reduce temperatures and voltages.
4. Run a disk and memory test on the computer
Another reason for this error could be faulty memory or a problem with your storage device. It is best to rule these out by running the corresponding tests.
Run a check of the drive using CHKDSK
CHKDSK is a built-in Windows utility that automatically checks and repairs your hard drive.
Run a memory test using Windows Memory Diagnostic
The Windows Memory Diagnostic tool, in addition to being quite easy to use, also solves most memory related problems in Windows. In this case, it's best to look for any problems.
To do this, follow these steps:
- Press Windows key + R to open the Run command window.
- Type mfsched.exe in the text box and press Enter. Alternatively, you can also launch the Memory Diagnostic Tool using the Settings app .
- In the window that opens, you can choose to restart your computer immediately and check for the problem, or wait until you do it manually. When you are trying to fix the nvlddmkm.sys error, it is best to choose to restart immediately.
Wait until the process is finished and check if the problem is now fixed.
5. Completely remove and reinstall the graphics card driver
You should only use this option after trying all other options. Also, make sure to create a system restore point in case anything bad happens. This is a great guide on how to use the system restore feature.
To reinstall your GPU driver, follow these steps:
Please note that this fix does not always work. You can always go back to the first part of the article for tips on reinstalling your graphics card driver.
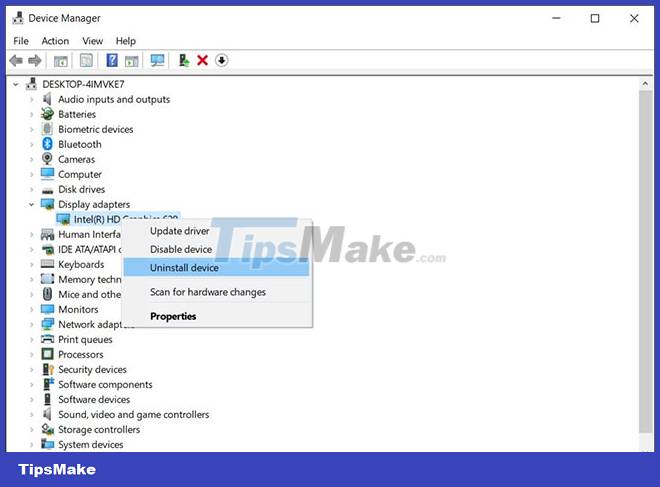
- On the search bar, type Device Manager and open it.
- Find Display adapters and expand this using the drop-down arrow.
- Right click on the GPU and click Uninstall device.

- In the confirmation window, be sure to tick the Delete the driver software for this device checkbox , then click OK.
- Once the uninstall is complete, download the latest Nvidia driver for your GPU from here. Install these drivers and restart the computer.
- When your computer boots, navigate to C:/Windows/System32/Drivers and rename the file nvlddmkm.sys to nvlddmkm.sys.old
- Then, open the Nvidia folder, usually found at C:/ProgramFiles/Nvidia , find a file named nvlddmkm.sys_ and copy it to the System32 folder.
- Now, open Command Prompt with admin rights and enter the following:
EXPAND.exe nvlddmkm.sy_ nvlddmkm.sys- Once the expansion is complete, copy and paste the newly created nvlddmkm.sys file into the C:/Windows/System32/Drivers folder.
Using the above methods, users can easily fix the nvlddmkm.sys 'Video TDR failed' error without having to replace the GPU. This error is just one of the most common errors faced by Windows users. To avoid such problems in the future, make sure you keep your graphics card drivers up to date.
You should read it
- How to fix 'This App Can't Run on Your PC' error on Windows 10
- Steps to fix error 0x8004FC12 on Windows 11
- How to fix 'An operating system not found' error on Windows 10 and Windows 8.1
- How to fix CLR error 80004005 on Windows 10
- Fix 0xc00000e9 error in Windows
- Steps to fix errors 0xc0000225 on Windows Vista / 7/8 / 8.1 / 10
 Microsoft brings Edge WebView 2 to Windows 10
 How to manage passwords on mPass Windows 10 - Secure account information
 How to fix error 0X800F080C when installing NET Framework on Windows 10
 How to install Hot Corners for Windows 10
 Improve productivity with these 7 built-in Windows 10 features!
 Microsoft Defender is causing a series of problems with Windows 10 version 20H2