Configure Always On VPN in Windows 10 with Microsoft Intune
Always On VPN is deployed and managed very differently than DirectAccess. It requires an Active Directory (on-premises) and clients must be connected to the domain.
While DirectAccess uses Group Policy to distribute configuration settings, Always On VPN is designed to use Mobile Device Management (MDM) platforms like Microsoft Intune. Using Intune, administrators can create and deploy distributed VPN profiles for any Windows 10 device anywhere.
How to create a Windows 10 Always On VPN profile with Intune
To create a Windows 10 Always On VPN profile with Intune, open the Intune control panel and perform the following steps:
1. Click Device Configuration .
2. Click Profiles.
3. Click Create Profile.
 Click Create Profile
 4. Enter a name for the profile in the Name field .
5. Select Windows 10 and later from the Platform drop-down list.
6. Select VPN from the Profile type drop-down list .
7. Click Base VPN.
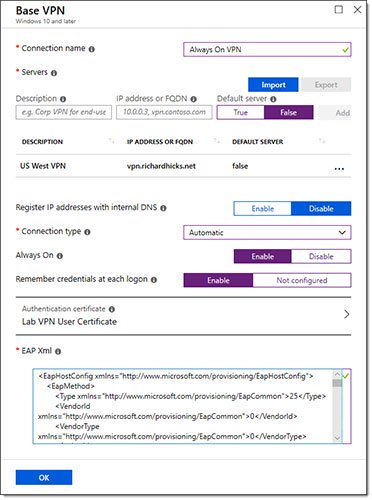
8. Enter a name in the Connection name field .
9. Enter the description and IP address or FQDN of the VPN server in the Description and IP address or FQDN fields, respectively.
10. Click True for the Default server , then click Add.
11. Select Enable or Disable for Register IP addresses with internal DNS .
12. Select Automatic from the Connection Type drop-down list .
13. Select Enable to configure the VPN connection to Always On.
14. Select Enable in Remember credentials at each logon .
15. Select an authentication certificate in the Authentication certificate.
16. Paste the EAP XML exported from the active template connection in the EAP Xml field .
17. Click OK.
 Click OK
 18. Click DNS Settings.
19. Enter the DNS suffix used on the intranet in the DNS suffixes field .
20. Click Add.
21. Click OK.
 Enter the DNS suffix used on the intranet in the DNS suffixes field
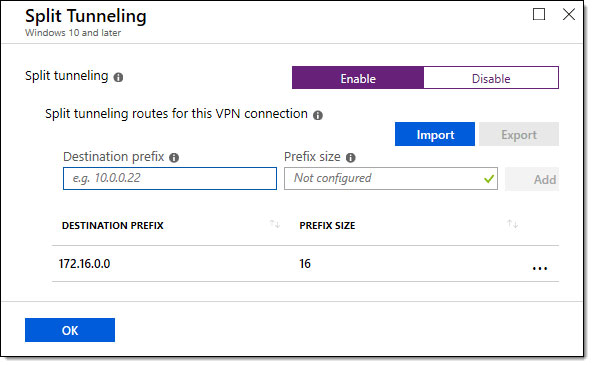
 22. Click Split Tunneling (optional).
23. Click Enable in Split tunneling.
24. Enter the network address (s) corresponding to the intranet in the Destination prefix and Prefix size fields .
25. Click OK.
 Enter the network address (s) corresponding to the internal network in the Destination prefix and Prefix size fields
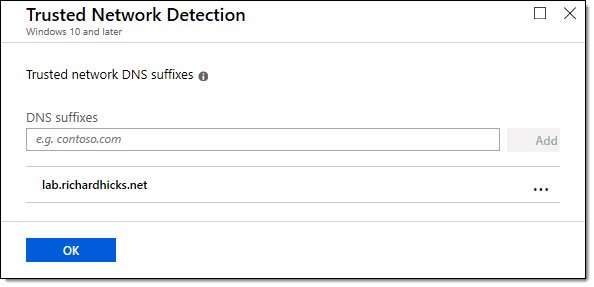
 26. Click Trusted Network Detection (optional).
27. Enter the DNS suffix associated with the intranet.
28. Click Add.
 Click Add
 29. Click OK twice, then click Create to create the Always On VPN profile.
All operations are completed!
How to deploy Always On VPN profile by Intune
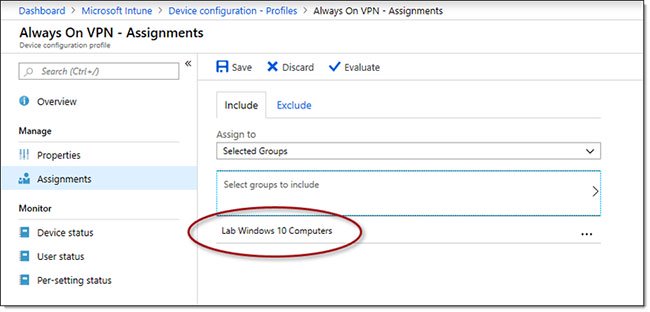
Very simple. Once the Always On VPN profile has been created, follow the steps below to assign profiles to client devices:
1. Click Assignments.
2. Select Selected Groups from the Assign to drop-down list .
3. Click Select groups to include .
4. Click the appropriate target group.
5. Click Select.
6. Click Save.
 Click on Save
You should read it
- Computer management with Windows Intune - Part 1: Introduction
- Some Samsung devices experience email, VPN errors due to missing Microsoft Intune certificates
- Managing computers with Windows Intune - Part 3: Managing computers and upgrading
- Computer management with Windows Intune - Part 2: Prepare the environment
- Secedit: configure command in Windows
- Instructions for configuring IPv6 on Windows Server
 6 ways to rename files and folders in Windows 10
 Learn about the Always On VPN feature on Windows 10
 How to turn on / off automatically restore News Bar when minimized in Windows 10
 How to check the Reserved Storage capacity in Windows 10
 How to change the News Bar background color in Windows 10
 How to enable / disable automatic restart when BSOD error is encountered in Windows 10