How to enable / disable TRIM support for SSDs in Windows 10
This guide will show you how to check the current status of TRIM support for SSDs and to enable or disable TRIM support for NTFS and ReFS file systems in Windows 10.
Table of Contents
The TRIM command is essential to maintain the performance of SSDs at an optimal level throughout its life cycle. TRIM proactively removes invalid data from SSD memory cells to ensure write operations take place at maximum speed.
Because the memory block must be erased before it can be reprogrammed, TRIM improves performance by actively deleting pages that contain invalid data, allowing the SSD to write new data without having to do so. Delete command takes time.
TRIM support for SSDs is enabled by default and is recommended to always be enabled. If turned off, there is a risk of SSD fragmentation instead of optimization.
This guide will show you how to check the current status of TRIM support for SSDs and to enable or disable TRIM support for NTFS and ReFS file systems in Windows 10.
Note : You must be logged in as an administrator to verify, enable or disable TRIM support.
Here's how:
1. Open Command Prompt with admin rights.
2. Perform step 3 (see status), step 4 (for NTFS) and / or step 5 (for ReFS) below, depending on what you want to do.
How to check the current status of TRIM support for SSD
3. To check the current status of TRIM support for SDD with the NTFS and ReFS file systems, copy and paste the below command into the Command Prompt, press Enterand go to step 6 below.
fsutil behavior query disabledeletenotify How to check the current status of TRIM support for SSD
How to enable TRIM support for NTFS and ReFS file systems
4. To enable or disable TRIM support for SDD with the NTFS file system, copy and paste the command you want to use below into the Command Prompt, press Enterand go to step 6 below.
(Activate TRIM support for SSDs with NTFS)
fsutil behavior set disabledeletenotify NTFS 0Or:
(Disable TRIM support for SSDs with NTFS)
fsutil behavior set disabledeletenotify NTFS 1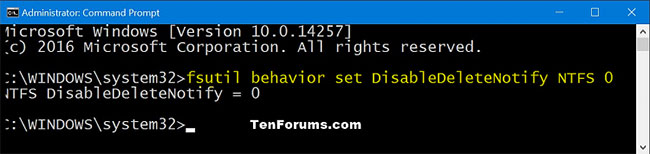 How to enable TRIM support for NTFS and ReFS file systems
How to turn off TRIM support for NTFS and ReFS file systems
5. To enable or disable TRIM support for SDD with the ReFS file system, copy and paste the command you want to use below into the Command Prompt, press Enterand go to step 6 below.
(Activate TRIM support for SSDs with ReFS)
fsutil behavior set disabledeletenotify ReFS 0Or:
(Disable TRIM support for SSDs with ReFS)
fsutil behavior set disabledeletenotify ReFS 1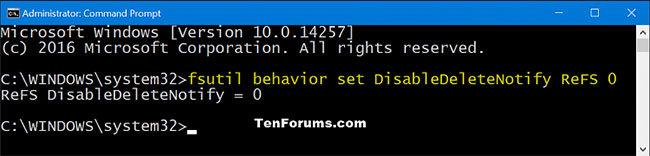 How to turn off TRIM support for NTFS and ReFS file systems
6. When done, you can Command Prompt if desired.
Was this article helpful?
Your feedback helps us improve.
Related Articles
 To enable Trim, use the Trim command on Windows.3 minutes read
 The TRIM hard drive error on Windows Defrag has not been fixed2 minutes read
 How to use the Chrome extension Trim to make Netflix better6 minutes read
 How to Trim a Video on PC or Mac2 minutes read
 How to find all Armor Trim in Minecraft14 minutes read
 Decorate the Mid-Autumn fruit tray with roses, chrysanthemum, water lily made from super beautiful papaya5 minutes read
Reader Comments 0
Sign in with email or Google to join the discussion.