How to Create a Realistic Lightsaber in GIMP
Part 1 of 3:
Creating the Lightsaber
-
 Open up Gimp. Once that is done, find the photo you want to add the lightsaber to, and click-and-drag it into Gimp.
 -
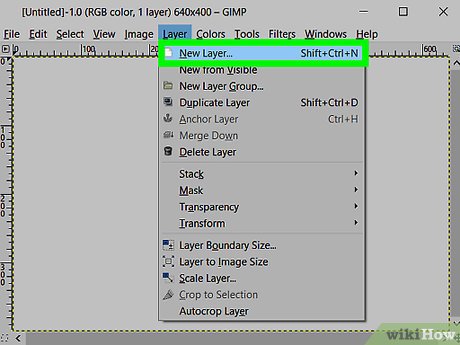
 Go to Layer r> New Layer. Name it whatever you want, and make sure it is set to "Transparency". If you have two lightsabers in your shot, you'll want two layers.
 - Go to layer into your toolbar and select the "Isolation Tool". This should look a bit like a coil of gray rope. Then, make a mask around you lightsaber blade. You can also draw a curve at the tip of the blade. Try to be exact as possible. Repeat for any other lightsabers that may or may not be in the shot.
- Grab the "Brush Tool" from your toolbar. Bring the size up to something larger than your lightsaber blade mask, and set the color to white. Then, fill the mask.
- Right click on each core layer and select "Duplicate Layer". Rename each duplicate, and put them below your core layers. Then, select your "Bucket Fill Tool" from the toolbar and fill the white part with whatever color you want your lightsaber to be.
- With your colored layer selected, go to Filters > Blur & Sharpen > Gaussian Blur. For a standard quality picture (480x640p.) select a blur radius of 20. This will create a glow, but it will be kind of faint. Duplicate the glow layers using the method mentioned in step five until you have a good looking glow.
- Tidy up a little. Your "Layers" window will be kind of crammed by now, so right click on the top layer and hit "Merge Down". Repeat this for all layers, until the background and all lightsaber layers are merged into one.
- Good work! You should now have a good looking lightsaber. But what if you want to add a clash for when two lightsabers touch?
Part 2 of 3:
Adding Clashes
- Go Filters > Lighting Effects > Supernova. Set the supernova center to where the lightsabers meet.
- Adjust the settings. Set the "Radius" to whatever you want, and set the "Rays" to 25, set the "Color" to a nice yellowish-orange, and set "Color Randomness" to zero.
Part 3 of 3:
Adding To Your Video
- Add your image to a video if desired. There is only one way to do this. It's called rotoscoping.
- Import every frame of your video and add the sabers and clashes. Do this enough times, and you have a good-looking lightsaber sequence. Happy rotoscoping!
Update 05 March 2020
You should read it
- What is a layer? Learn about layers in Photoshop
- 3 tips to manage layers in Photoshop
- How to combine layers in Photoshop
- How to use Photoshop CS5 - Part 3: Introducing Layers
- Steps to delete Layers in AutoCAD
- How to Unlock Layers in Photoshop
- Basic operations on layers in Photoshop
- Edit photos using layers
- Instructions for setting up 2-layer protection for Outlook accounts and Microsoft accounts
- How to combine 2 or more layers in Photoshop
- How to make a moon cake with thousands of unique Japanese style
- How to change the layer size in GIMP
Maybe you are interested
Complete guide on how to use gaming chairs for gamers, extremely simple Naraka: Bladepoint - Download Naraka: Bladepoint What is Facebook Token? What to get FB Token How to get fast FB Token What new features does iOS 11.4 have? When will it be released? Answer 12 frequently asked questions about iOS 11.3 update What do you need to prepare for iPhone while waiting for iOS 11.3?
