3 tips to manage layers in Photoshop
Think of the layers as stacked transparent plastic sheets. But arranging unreasonable layers can turn them into a mess.
Table of Contents
Think of layers as transparent plastic sheets stacked on top of each other and create an image that is clear. But arranging unreasonable layers can turn them into a mess. Layers are a core part of Adobe Photoshop.
Perhaps as a beginner, you have missed using Photoshop layer management tips for later use. But organizing layers is a habit, not a priority task. Suppose, someone just sent you a PSD file with two dozen layers and they all had no name or order. It's terrible!
Number one rule is to name all layers in Photoshop as soon as you create them. There are a few other rules you need to keep in mind, and they can make your life easier.
1. Add color codes to layers
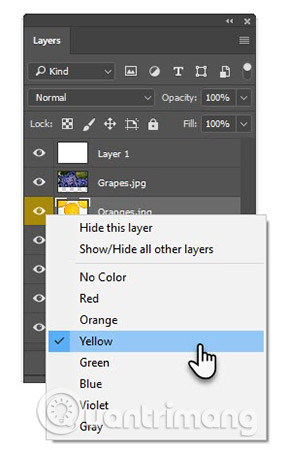
Name each layer. Also, add each color a separate layer to easily detect them when overlapping layers on each other. For example, you can color similar layers with the same color. Or you can use color codes that match the colors in that particular layer.
Right-click the eye icon for the layer you want to add the color code to. Right-click menu will appear next to that layer. Select the color for that layer and click OK.
To delete the color code, right-click again and select No Color.
2. Arrange layers into folders

Group similarly functional layers in their own folders. Too many overlapping layers can confuse you when applying masks or masks.
Layers like transparent plastic sheets are stacked on top of each other. The folder is like a clip that you use to pin all these plastic sheets together (for example, group all the layers used to edit the sky in one picture together) so you can work with they are in group form.
Select the layers you want first and then click the New Group icon at the bottom of the Layers panel.
You can also create an empty group and then drag the layers into one or more folders at a time. Label folders grouped by a name. To view all individual layers, click the small arrow to expand the entire group.
The group helps you use any editing workflow on multiple layers together. You can switch the visibility of the grouped layers as you like, for each individual layer. Another great thing is that you can apply masks to entire groups.
Photoshop also allows you to nest groups together and create a hierarchical folder structure, making it easier to manage complex documents. To cancel a group of layers, right-click on the group and select Ungroup.
3. Hide multiple layers in Photoshop with one click
Your image file can have hundreds of layers, but you just want to see a single layer. You do not need to go to each layer or layer group and turn off display mode. Use keyboard shortcuts to quickly turn off all layers and leave a single layer.
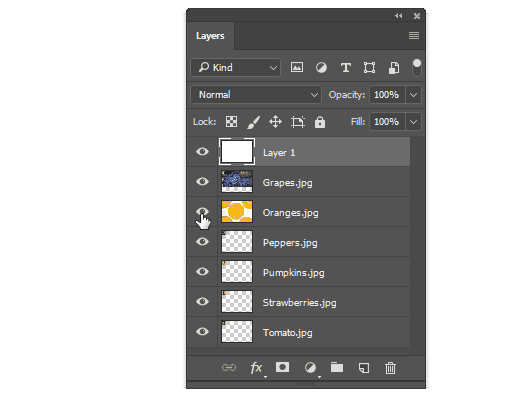
Press the Alt key (or Option key on the Mac) and click the eye icon next to the layer you want to see. All other layers are automatically hidden.
Press the Alt key and click the eye again to display all the hidden layers.
Have you found the basic idea behind layers? Are there any other time-saving Photoshop shortcuts you know? Let us know about that in the comment section below!
See more:
- Edit photos using layers
- How to use Photoshop CS5 - Part 3: Introducing Layers
- Tutorial to create a sparkling snow effect using Photoshop Brush
Was this article helpful?
Your feedback helps us improve.
Related Articles
 What is a layer? Learn about layers in Photoshop5 minutes read
 How to combine layers in Photoshop6 minutes read
 How to use Photoshop CS5 - Part 3: Introducing Layers6 minutes read
 How to resize layers in Photoshop2 minutes read
 How to separate layers in Photoshop2 minutes read
 How to combine 2 or more layers in Photoshop2 minutes read
Reader Comments 0
Sign in with email or Google to join the discussion.