Instructions for setting up 2-layer protection for Outlook accounts and Microsoft accounts
Microsoft provides users with 3 options to set up 2-layer protection. You can use your email address, phone number or use the Authenticator application to set up 2-layer protection for your Outlook and Microsoft accounts.
Table of Contents
Set up 2-layer protection to protect Microsoft accounts and your Outlook accounts are not attacked by hackers and gain control.
Microsoft provides users with 3 options to set up 2-layer protection. You can use your email address, phone number or use the Authenticator application to set up 2-layer protection for your Outlook and Microsoft accounts.

1. Use Authenticator to set up 2-layer protection
To set up 2-layer security with Authenticator, follow the steps below:
1. Click on the link to access your Microsoft account security settings and log in to your information here.
Also you can log in with your Outlook.com account, click on your name in the top right corner and then click Account Settings.
2. Next click on the link Set up two-step verification .

3. Click Next .
4. If you are trying to set up 2-layer security for an account connected to a mobile device, from the dropdown menu, click on the An app .
5. Select your device (such as Windows Phone, Android or iPhone), then click Next.

6. Follow the steps below on your device:
- With Windows Phone:
1. Install the Authenticator application.
2. After downloading and installing Authenticator, your next task is to launch the application.
3. Click the + sign icon to add a new account.
4. Click the camera icon on the screen and scan the barcode to connect the device.
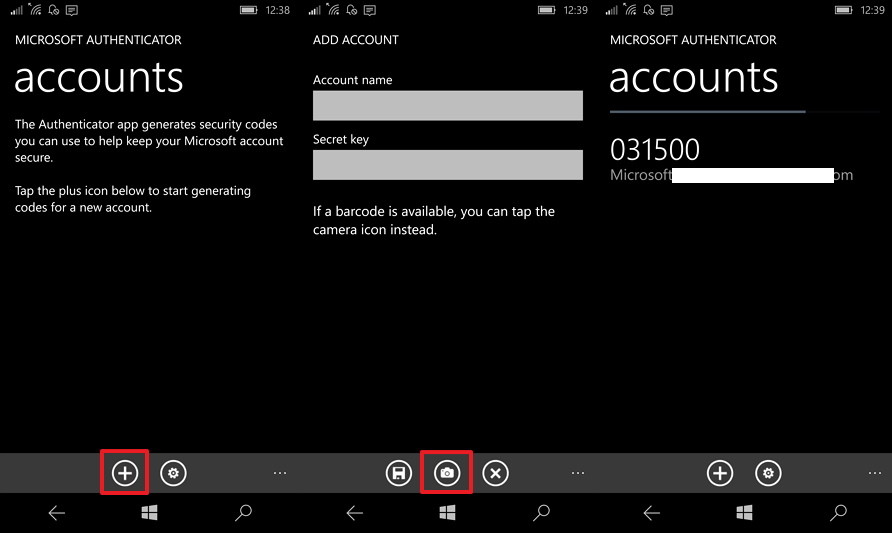
5. The last step is to enter the connection code on your mobile device and click Next.

- With Android device:
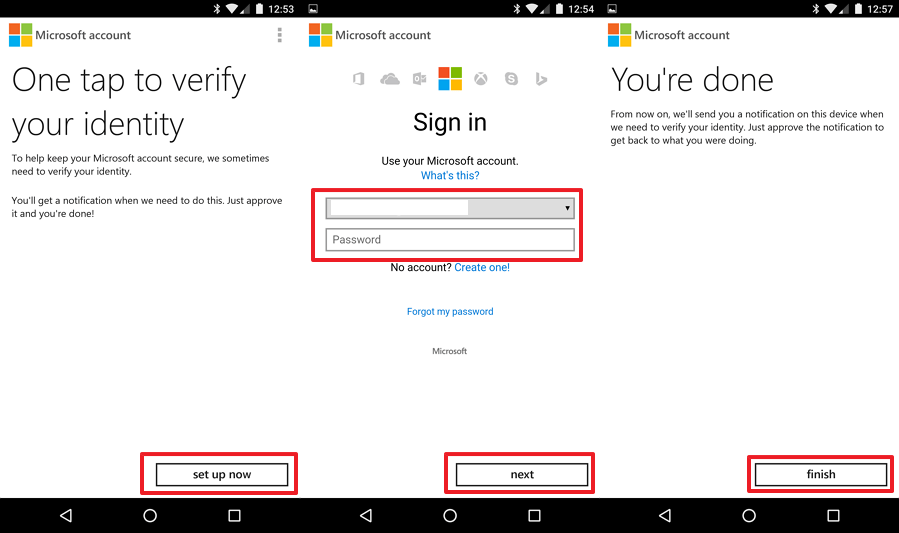
1. Install the Microsoft Account application.
2. After installation is complete, open the Microsoft Account application.
3. Click the Set up now button.
4. Enter the account information you want to link and click Next.
5. Click Finish to complete the process.
- With iPhone:
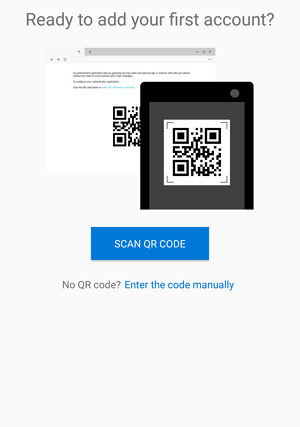
1. Install Azure Authenticator application.
2. After installation is complete, open the Azure Authenticator application.
3. Click Scan QR code to pair your device.
4. Finally, enter the connection code on your mobile device and click Next.
7. Note the recovery code in case you need to use it and click Next.
8. Click Next.
9. Click Finish.
2. Set up 2-layer protection by phone number
In addition to using Authenticator, you can use your phone number to set up 2-layer protection for your Outlook and Microsoft accounts.
1. Click on the link to access your Microsoft account security settings and log in to your information here.
Also you can log in with your Outlook.com account, click on your name in the top right corner and then click Account Settings.
2. Click on the link Set up two-step verification .
3. Click Next.
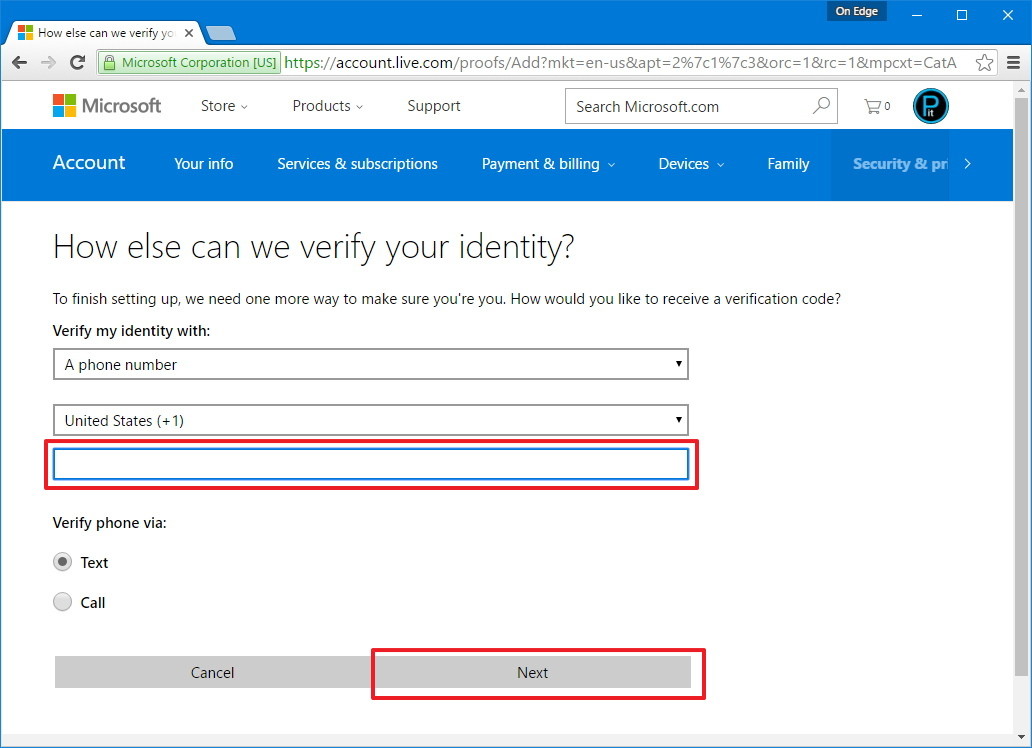
4. From the dropdown menu, click the option A phone number , then enter your phone number.
5. Select the method to receive the security code via SMS or via voice call then click Next.
6. Enter the security code you received and click Next .
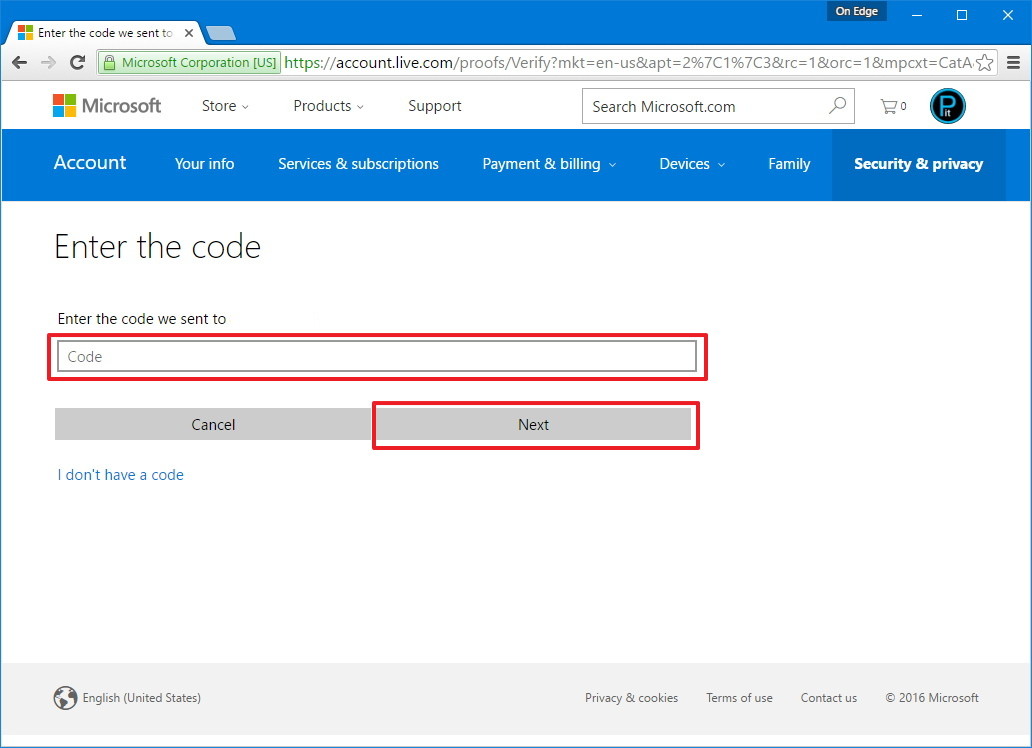
7. Click Next.
8. Click Finish to complete.
3. Set up 2-layer protection by email address
To set up 2-layer protection for your Outlook account and Microsoft account with an email address, follow the steps below:
1. Click on the link to access your Microsoft account security settings and log in to your information here.
Also you can log in with your Outlook.com account, click on your name in the top right corner and then click Account Settings.
2. Click on the link Set up two-step verification .
3. Click Next.
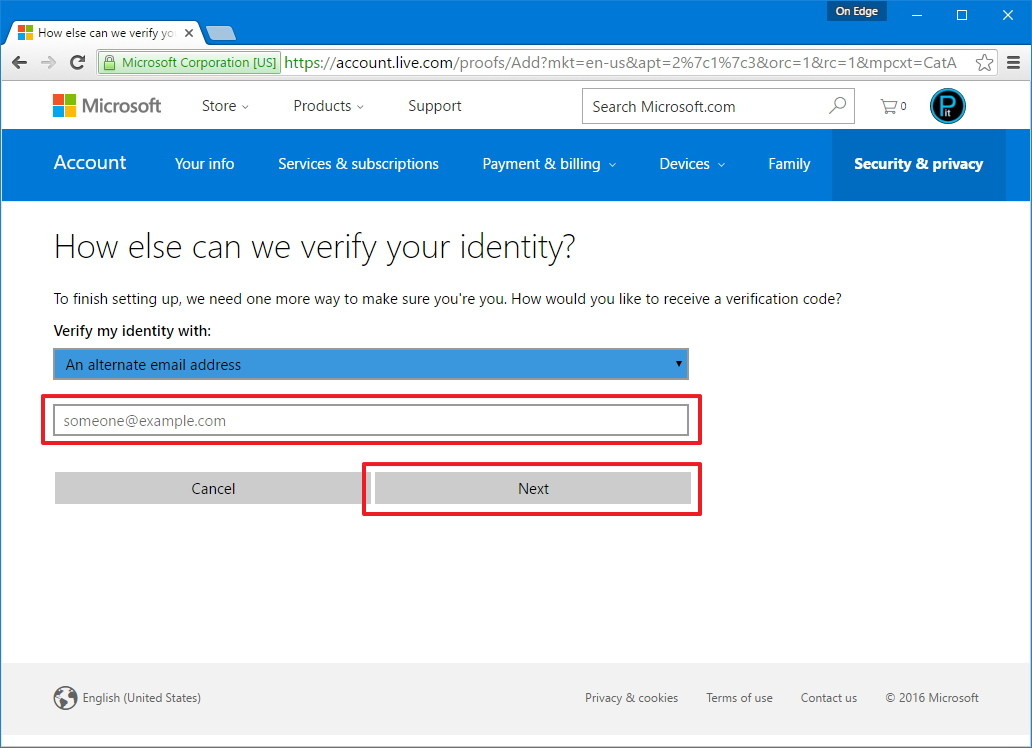
4. From the dropdown menu select the An alternate email address and enter your email address there.
5. Click Next.
6. Log in with your email account, then enter the Microsoft account code you received and click Next .

7. Next click Next.
8. Click Finish to complete.
4. Create a new password for the application
After you set up two layers of protection, some applications like Xbox 360, Outlook desktop application for PC or Mac, Office 2010, Office for Mac 2011 or earlier versions, Windows Essentials applications and other applications will not work with the old password. The reason is simple: these applications do not support 2-layer protection settings.
However, you can fix this problem by creating a password for each device application that requires a password.
1. Click on the link to access your Microsoft account security settings and log in to your information here.
2. Under the App passwords section, click the Create a new app password link.

3. Enter the new password you want to create for each application or device.
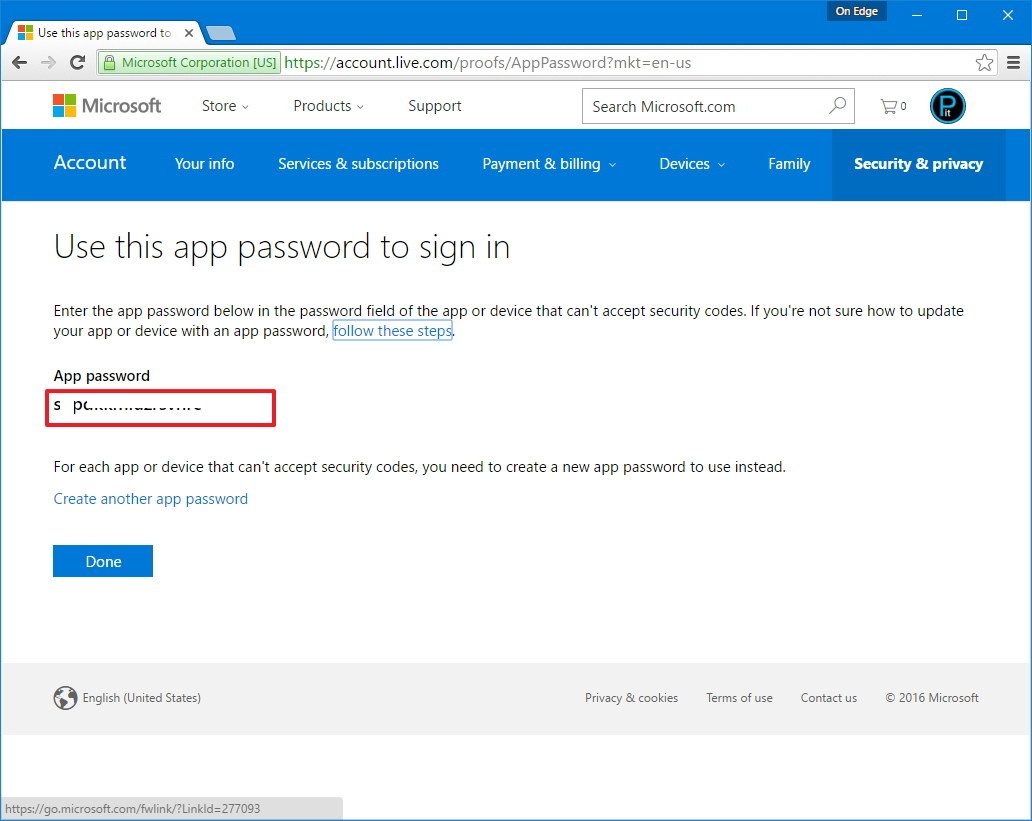
4. Repeat the steps to create an application password for each device.
If you do not want to use the password, open the security settings page and then click the link Remove existing app passwords.
5. Set up 1-layer protection
In case if you want to disable the 2-layer protection setting, follow the steps below:
1. Click on the link to access your Microsoft account security settings and log in to your information here.
2. Next click on the link Turn off two-step verification .
3. Click Yes to confirm.
4. Under the Identity verification app section , click the Turn off existing apps link .
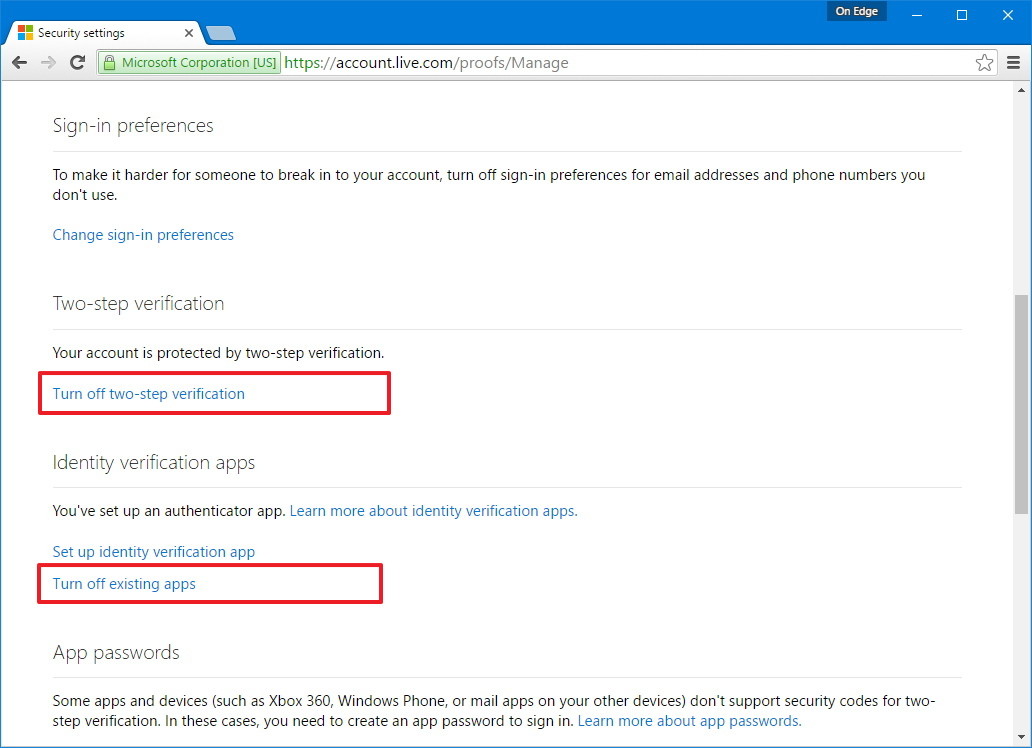
5. Click Remove to complete the 2-layer protection setup process on your account.
Refer to some of the following articles:
- Instructions for adding Gmail accounts to Outlook 2013 and 2016 using IMAP
- How to reduce the size of Outlook data files (.PST and .OST)
- How to turn on POP / IMAP Gmail to use in Outlook
Good luck!
Was this article helpful?
Your feedback helps us improve.
Related Articles
 Instructions for setting up Outlook data protection password3 minutes read
 Instructions for changing Zing ID password and installing 2-layer password3 minutes read
 Instructions on how to use Outlook from AZ for beginners3 minutes read
 Instructions on how to share contacts in Microsoft Outlook6 minutes read
 Instructions for creating 2-layer security for GoDaddy accounts2 minutes read
 5 methods of merging PST files of Microsoft Outlook7 minutes read
Reader Comments 0
Sign in with email or Google to join the discussion.