Table of Contents
This updated guide explains how to Create a Chart Combining Columns and Lines in Excel through clear steps, practical examples, and important checks that help prevent common errors.
An Example of a Chart Containing Column and Line Data Combined in Excel
First, TipsMake has an example, you have an Excel statistics table of revenue and expenses from January 2015 to December 2015, for example. Here if you draw charts and graphs in Excel, the X-axis can be from January to December, while the vertical Y axis will be the revenue or expense column. But here if you may need to show all revenue and expenses, you have to split them into two vertical axes Y. Or more advanced, you might want the revenue to be represented by columns, and the costs shown by This is a convenient way to track, meaning you may need to apply a chart to combine columns and lines in Excel. Specifically as in the following picture:

Draw a combination of columns and lines in Excel
It looks difficult but it is really easy, just follow the following steps:
1. Draw a Chart Containing Basic Data Before Combining Columns and Lines in Excel
- Step 1: Scan to select the data area to insert the chart. As in the example above we will scan the whole month + revenue + expenses.
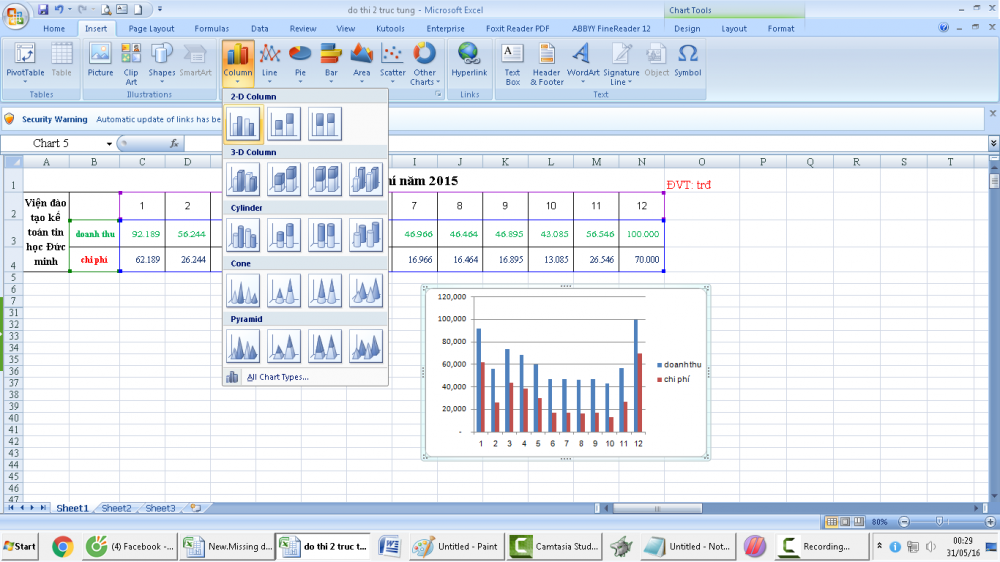
- Step 2: Draw a chart in Excel by going to the insert tab and then choosing the type of column chart you like.
- Step 3: An Excel column chart will appear as shown in the image below. You can see that the two columns of the horizontal axis x and the vertical axis y, the vertical axis y is the revenue part, not the column showing the cost figures. And there is no graphing section combining columns and lines in Excel at all. Now if you may need to display the second row in an Excel chart or draw a chart that combines columns and lines in Excel, follow the sections below.
2. to Display the Second Vertical Axis in Excel, Follow These Steps
- Step 1: Following the steps in part 1, you continue: Go to the Format tab, in the Current Selection - Plot Area section, select the name of the data range you may need to make the second vertical axis in Excel. In this case it would be "Cost" Series
- Step 2: After selecting the data area you may need to make the second vertical axis in the Excel combination of columns and lines, go to Format Selection.
- Step 3: In Dialog "Format Data Series" select "Secondary Axis" in "Plot Series On" then click Close to finish. As you can see now the column chart just now has a second vertical axis on the right showing the cost value. So you have succeeded. Now to turn this column chart into a combination of columns and lines in Excel, you need to follow up on the next section.
3. How to Create a Chart Combining Columns and Lines in Excel
- Step 1: Following the steps in parts 1 and 2, go back to the Format section and continue to select the "Cost" Series.
- Step 2: Now you may need to draw the cost part into a line combined with the sales column in Excel, you continue to the Design - Change Chart Type
- Step 3: In the Chart Types section, there will be many different templates for you to choose. Now, to combine columns and lines in Excel, select this cost part as lines. You can choose any type of Line chart you want.
social shareand social shareFAQ
What is the easiest way to Create a Chart Combining Columns and Lines in Excel?
Start with the requirements in this guide, then follow each step in order. Check the result after every major change so problems are easier to identify.
Can beginners follow these instructions?
Yes. The process is organized into practical steps, and you can repeat any step before moving forward.
What should I check if the method does not work?
Confirm your software or device version, permissions, settings, file format, and internet connection when the task depends on online services.
Related Articles
 How to Create 2 Excel Charts on the Same Image: Draw an Excel Chart4 minutes read
 How to Convert Columns into Rows and Rows into Columns in Excel3 minutes read
 Steps to Use Pareto Chart in Excel3 minutes read
 How to Create a Multi-Line Chart in Excel9 minutes read
 How to Use Pictures as Excel Chart Columns3 minutes read
 MS Excel - Lesson 4: Working with Lines, Columns, Sheets8 minutes read
Reader Comments 0
Sign in with email or Google to join the discussion.