How to Convert Powerpoint to Mp4
PowerPoint is great for creating slideshows, but they can be difficult to share if the recipient doesn't have PowerPoint installed. One easy way to share your presentations is to create an MP4 video file. This will allow you to play it on...
Table of Contents
Method 1 of 2:
PowerPoint 2010 and 2013
-
 Create your PowerPoint presentation as you'd like. When you convert your presentation into an MP4, it will preserve all of the transitions, timings, and narrations. Feel free to use all of the tools available when creating your presentation.
 -
 Click the File menu. For some versions of PowerPoint 2010, this will be an Office icon instead.
 -
 Select "Export" (2013) or "Share" (2010). This will allow you to convert the slideshow into a variety of different formats.
 -
 Click "Create a Video". This will open the video creation options.
 -
 Select the quality. The quality of the video will affect the clarity of the image and the size of the file. Lower-quality videos will be blurrier, but the file sizes will be much smaller. There are three different options you can pick from, and they are labeled slightly different for 2010 and 2013:[1]
- Presentation (2013)/High (2010) - This will result in the highest-quality video, and is best suited for actual presentations on a big screen. If you are planning on using the video to project the presentation, select this option. It will produce the largest file out of the three options.
- Internet (2013)/Medium (2010) - If you're planning on uploading the video to YouTube, or want to share it with others who will be watching from a computer, select this option. The file size can be significantly smaller, and the quality will only be slightly worse than the high quality option.
- Low/Low - This will result in a very small file, but will also result in a smaller, blurrier video. This option is best suited for aging smart phones and tablets, though recent devices can easily play higher-quality versions.
-
 Select what timings you want to use. The drop-down menu beneath the quality settings will allow you to set your timing options. You can use timings created for the presentation, or you can have the slides to advance after a set amount of time.
- You are given the option to record timing and narration from this menu as well. You can preview your timings before proceeding.
-
 Click "Create Video". This will open the familiar Save As window.
 -
 Name and save your file. Give your movie a name and select a location to save it. PowerPoint will begin creating the movie file, which may take a while for longer presentations. You can monitor the progress in the bar at the bottom of the PowerPoint window.
 -
 Play your video. You can now find and play your newly-created MP4 file. Since it is in MP4 format, it should play on virtually any computer or recent smart device.
Method 2 of 2:
PowerPoint 2007 and Earlier
-
 Understand the process. You cannot export directly to MP4 in older versions of PowerPoint. With Windows Movie Maker, a free video editor for Windows, you can create a video using image files of each individual slide. PowerPoint makes it easy to create these image files.
 -
 Install Windows Movie Maker (if you don't have it). Many versions of Windows come with Windows Movie Maker installed. If you are using Windows 7 or 8, you can download Windows Movie Maker from Microsoft here.
 -
 Export your PowerPoint presentation into image files. Once you have Movie Maker installed, you can convert your presentation slides into JPG files to make a movie from.
- Click the Office button or the File menu and select "Save As".
- Click the "Save as type" menu and select "JPEG File Interchange Format (*.jpg)".
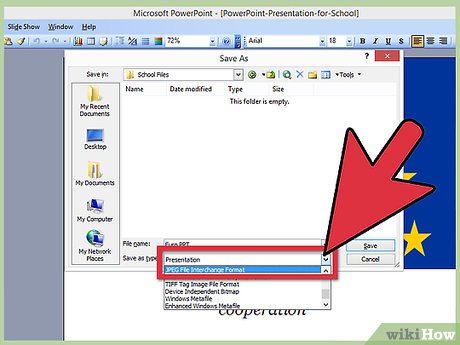
- Select or create a new directory for all of the slide files.
- Click the "Save" button, and then select "All Slides" when prompted.

-
 Open Windows Movie Maker. Now that you've created the slide files, you can import them into Windows Movie Maker and create an MP4 from them.
 -
 Import the files. You'll need to add the folder containing the slide files into Windows Movie Maker:
- Click the File menu and select "Import Into Collections". In Movie Maker 2012, click "Add videos and photos" instead.
- Navigate to the folder containing the files you just created, and then select them all. The folder will have the same name as the presentation.
- Click Open after selecting all of the files in the folder. The image files will be opened into Movie Maker.
-
 Arrange the slides. The process from here varies slightly depending on the version of Movie Maker you are using. For older versions, select all of the imported images and then drag them onto the Timeline. In Movie Maker 2012, the slides will automatically be arranged into a slideshow.
 -
 Adjust the duration of the slides. You can increase or decrease the time between each slide transition to suit the amount of text that you expect the audience to read. Make sure that you give enough time for the audience to take in all of the information.
 -
 Add transitions. You can use Windows Movie Maker's transitions tools to add transitions between each slide. Use these to add fun effects, but don't go too overboard or they'll distract from the presentation's content.
- See How to Add Transitions in Movie Maker for a detailed guide on using transitions.
-
 Save the movie as an MP4 file. Once you're finished making edits to the movie, you can save it as an MP4 file.
- Click "Save movie" or "Save to my computer"
- If given the option to select a device, choose either "For a computer" or the specific device you intend to play the video on.
- Name and save the file. It should be in MP4 format. If it isn't, select "MPEG-4" from the "Save as type" menu.
-
 Wait for the movie to be completed. After saving the movie, Movie Maker will begin creating the movie file. This may take a while for longer presentations. Once the file has been created, you can play or transfer it as you wish.[2]
Was this article helpful?
Your feedback helps us improve.
Related Articles
 How to convert PDF files to PowerPoint7 minutes read
 How to convert PowerPoint to PDF on iPhone3 minutes read
 How to convert Google Slides to PowerPoint2 minutes read
 How to convert a Keynote presentation to PowerPoint5 minutes read
 Convert Powerpoint to video14 minutes read
 How to Convert Word to PowerPoint12 minutes read
Reader Comments 0
Sign in with email or Google to join the discussion.