How to Chroma Key in Windows Movie Maker
Chroma keying is a technique for Windows Movie Maker that imports a background image into user videos. Record your subject. With any method of using the green screen, you will need a video to superimpose over your background. Also, keep in...
Table of Contents
Method 1 of 2:
Using XML Code
-
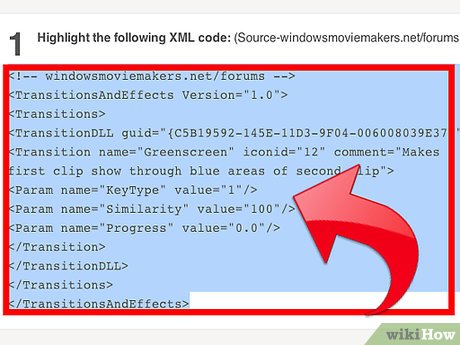 Highlight the following XML code: (Source-windowsmoviemakers.net/forums)
-
 Copy the code, and paste it into Notepad.
 -
 Click File>Save As, and navigate to C:Program FilesMovie MakerSharedAddOnTFX.
- If you don't already have an AddOnTFX folder, right click then New>Folder.
-
 Save the file as "greenscreen.xml".
 -
 Run Windows Movie Maker.
 -
 Click Import on the left sidebar.
 -
 Find the picture or video you want to show behind your subject.
 -
 Import it into WMM. Drag it down to the time line to the left of the video with your subject in front of the blue screen.
 -
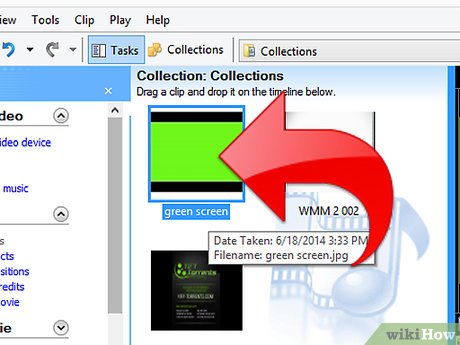 Now that you have your two videos, click "Green screen".
 -
 Drag it down to the timeline. Click the video of the green screen and drag it over onto the other clip. Don't drag it too far because that will just make the clips switch places.
 -
 Keep going until the blue triangle disappears.
 -
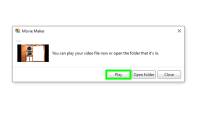
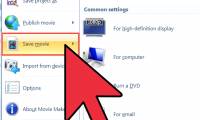
 Click File>Save Movie File to save your movie.
Method 2 of 2:
Using Software
-
 Download additional software from a reputable source. There are several websites that have created applications that streamline this process.
 -
 Open the Windows Movie Maker video you would like to superimpose over the backdrop.
 -
 Drop the video and the downloaded chroma key into the timeline.
 -
 Adjust in the timeline so the images sync up.
Was this article helpful?
Your feedback helps us improve.
Related Articles
 How to Use Windows Movie Maker14 minutes read
 How to rotate the video in reverse, tilt with Windows Movie Maker4 minutes read
 How to Make a Slideshow with Windows Movie Maker6 minutes read
 How to Use Story Remix4 minutes read
 50 useful shortcuts for Windows Movie Maker4 minutes read
 How to Make a Video in Windows Movie Maker8 minutes read
Reader Comments 0
Sign in with email or Google to join the discussion.