Table of Contents
This practical guide walks through how to compress and decompress files on Windows 11, explains the main requirements, and highlights common issues that may appear along the way.
Create Zip File in Windows 11
First, open File Explorer and navigate to the location of the file (or files), as well as the folder that you want to compress into a standard ZIP file. (You can also compress files and folders directly on the desktop.) Note that if you compress folders, their internal folder structure will remain the same when you extract them later.
In case you want to compress a group of files or folders, select them by dragging the mouse pointer over them, or hold down the ' Ctrl ' key and select each file, then right-click. If it's a single file, just right-click it directly. In the context menu that appears, click on ' Compress to ZIP file '.

After a while, the corresponding ZIP file will appear in the same folder as the source file you just compressed. The ZIP file name will be highlighted, allowing you to rename the file if you wish. Entering a new filename or keeping the default is fine. When you're done soldering, press Enter.

That's all there is to do! Now that the ZIP file has been created, you can copy or share it just like any other file type.
Extract Zip files in Windows 11
Extracting ZIP files in Windows 11 is as simple as compressing them. First, find the ZIP file that you want to extract. Next, right-click the file and select ' Extract All ' in the menu that appears.

In the ' Extract Compressed (Zipped) Folders ' window that appears, you will see the current file path as the default location for the extracted files. To change the location where the file will be extracted, click ' Browse ' then navigate to the desired drive or folder.
To see the extracted files in File Explorer when the process is finished, check the box next to the ' Show extracted files when complete ' option. Finally, click ' Extract '.
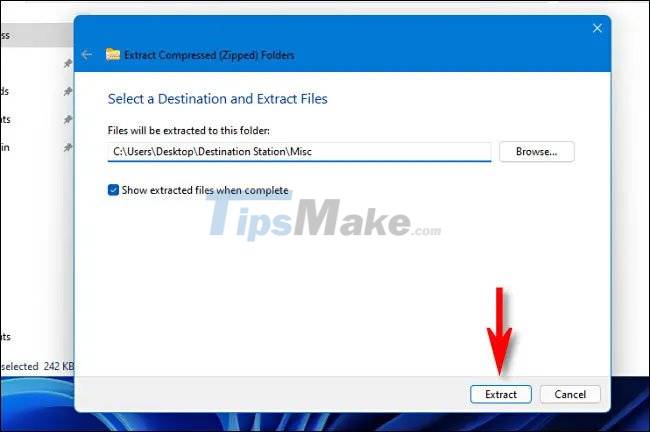
The compressed data in the ZIP file will now be decompressed to the location you selected. If you have ' Show extracted files when complete ' set up, that location will open as a new window in File Explorer. Hope you are succesful.
Key Takeaways
Use the information above as a practical reference for how to compress and decompress files on Windows 11. Review each step carefully, confirm any requirements, and choose the option that best fits your situation.
FAQ
What does this guide explain about Compress and Decompress Files on Windows 11?
It explains the main concepts, practical considerations, and useful steps related to compress and decompress files on Windows 11 without requiring advanced knowledge.
Who can benefit from learning about Compress and Decompress Files on Windows 11?
This information is useful for readers who want a clear overview, practical guidance, and reliable steps related to compress and decompress files on Windows 11.
What should I check before applying this information?
Review the requirements, confirm that your device, software, or situation matches the instructions, and back up important data before making major changes.
Related Articles
 How to Compress and Decompress Files on Windows 104 minutes read
 How to Compress and Decompress Files and Folders on a Mac3 minutes read
 How to Compress and Decompress Files in Node.js7 minutes read
 How to Compress and Decompress ZIP Files Quickly5 minutes read
 How to Compress and Decompress Files Without Installing Additional Software3 minutes read
 How to Compress and Decompress Files on iPhone2 minutes read
Reader Comments 0
Sign in with email or Google to join the discussion.