How to clean faucet heads
Faucet heads, whether in the bathroom or kitchen, are prone to hard water deposits, calcium, limescale, and dirt buildup. However, cleaning them is incredibly easy. Here are some detailed instructions.
- Materials needed to clean the faucet head
- Instructions for cleaning faucet heads
- How to clean a clogged faucet
- Step 1: Remove dirt
- Step 2: Remove the faucet head if possible
- Turn open the faucet.
- Step 3: Mix the cleaning solution
- Step 4: Soak in solution
- Step 5: Scrub the faucet head
- Step 6: Repeat if necessary
- Step 7: Rinse and reassemble
- Materials to prepare
- Steps to follow
Faucets, whether in the bathroom or kitchen, are prone to hard water deposits, calcium, limescale, and dirt buildup. If not cleaned regularly, mold and mildew can grow. However, cleaning your faucet is incredibly easy. Here are some detailed instructions.
Materials needed to clean the faucet head
- Water
- Distilled white vinegar
- Bowl or zip bag
- Clips or rubber bands
- Soft-bristled brush (like an old toothbrush) or non-abrasive sponge
- Microfiber cloth
- Rubber jar lid liner (optional)
Instructions for cleaning faucet heads
Step 1: Remove dirt

For spray nozzles (like those on a kitchen sink or shower), you should occasionally rub your thumb over the nozzle to remove any debris that may be blocking the water flow. Removing large debris will allow the cleaning solution to focus on more stubborn dirt.
Step 2: Remove the faucet head if possible
If your faucet has a removable head, removing it may make cleaning easier. (If your faucet head is not removable, skip to Step 3.)
Here's how to remove the faucet head:
- Pull the spray tube out of the faucet.
- Clamp the nozzle to prevent it from retracting.
-
Turn open the faucet.
Step 3: Mix the cleaning solution
Mix a 1:1 solution of water (any temperature) and distilled white vinegar. If you have removed the faucet head, place it in a cup or bowl and pour in enough solution to cover the underside of the faucet head where the water comes out.
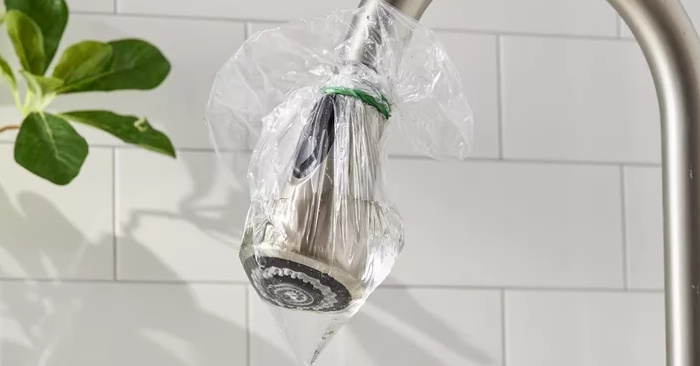
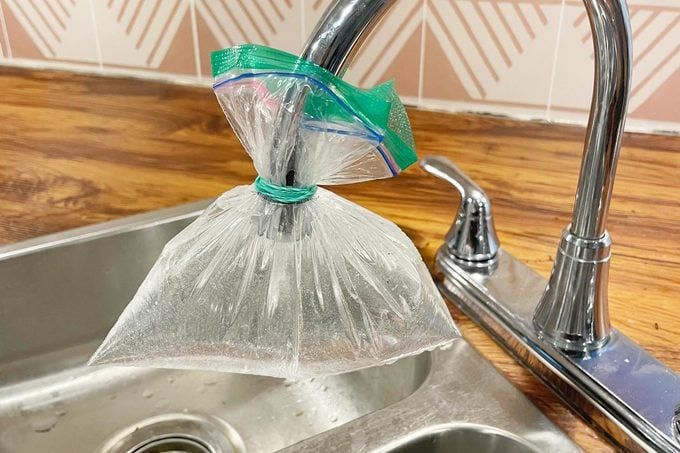
If your faucet is fixed, put about 2 tablespoons of the solution in a zip-top bag and secure it to the faucet end with a rubber band or clip. Again, try to coat the underside of the faucet end with the solution.
Step 4: Soak in solution
Let the solution soak for at least 30 minutes. If you're dealing with particularly stubborn stains? Let it soak overnight.
Step 5: Scrub the faucet head
Check the faucet head about every 30 minutes if possible, using a toothbrush or non-abrasive sponge to scrub the surface and remove debris.
For shower heads, the nooks and crannies can get clogged, so you should gently use a toothpick combined with a brush to open the holes.
Step 6: Repeat if necessary
If too much grime builds up, continue soaking the faucet head in the vinegar solution.
Step 7: Rinse and reassemble
Some people choose to use baking soda to enhance the scrubbing effect, but a vinegar soak can be just as effective. Simply remove the nozzle from the sink or bag and rinse it with water. Wipe it clean with a microfiber cloth. If you removed the nozzle, reinstall it.
How to clean a clogged faucet
Materials to prepare
- Dishcloth
- A rubber faucet cap opener, wrench, electrical tape pliers, or the aerator that came with the faucet if it has a hidden aerator.
- Bowl or cup
- Water
- Distilled white vinegar
- Soft bristle brush (like an old toothbrush)
Steps to follow
Step 1: Remove the aerator
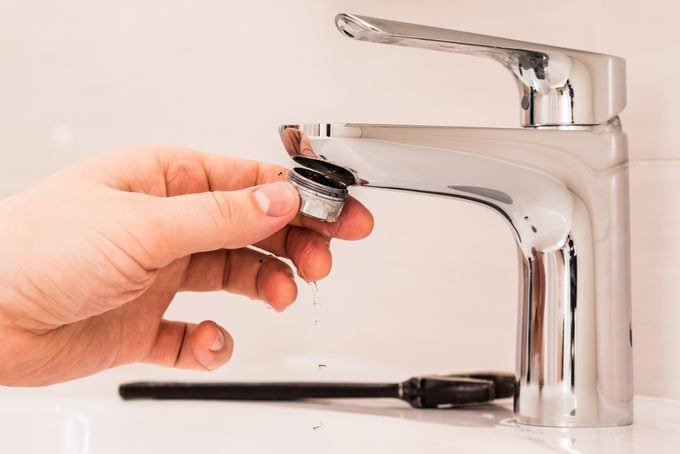
First, locate the faucet aerator. Next, line the sink with a dish towel to cover the drain hole and avoid any accidental debris. Then, remove the aerator by hand or with a rubber clamp or wrench,' says Schopp. 'Usually, it will come loose to the left, but you'll be working from the top of the faucet, so you'll actually turn it to the right to loosen it.'
If the aerator is hidden, the faucet will come with a toothed tool to remove it.
No matter what type of aerator you are dealing with, be careful when removing this small part of the faucet so as not to alter its shape.
Step 2: Clean the aerator
In a cup or bowl, make your own homemade cleaner. Mix one part distilled white vinegar with one part water. Mix enough solution to cover the parts. Let it soak for 30 minutes, scrubbing periodically with a toothbrush to remove residue.
Step 3: Repeat if necessary
Repeat the process if you see too much dirt buildup.
Step 4: Rinse and reassemble
Rinse the aerator with clean water and reinstall it on the faucet head.
- This way you can remove all deposits from the sink and faucet
- How to fix a leaky two-handle faucet
- How often should I clean my shower?
- 7 simple steps to make your laptop as clean as new
- How to use Clean Master to clean up, speed up Windows
- Where to buy sink faucet genuine, cheap?
- How to clean curtains
- How to implement Clean Boot on Windows 10/8/7
- Text and make calls on your iPhone directly from your Windows computer with a free application from ... Dell
- 'Turn' a folder into a virtual drive on Windows 10
- How to install and use Apple's Notes application on Windows 10
- 5 ways to remove default apps on Windows 10
- Tips for playing Internet Cafe Simulator 2 for newbies
- Fishing guides and rare fishing tips in Play Together
- How to Write Fake Reviews
- Tips for sending RAR files via Facebook Messenger on your computer
- Useful tips when playing Internet Cafe Simulator
- Play Together: Tips for finding lost items and puppies during a police mission


 How to fix a leaky two-handle faucet
 Where to buy sink faucet genuine, cheap?
 Which type of sink and faucet is good and cheap?
 What is Bitcoin faucet? What is Bitcoin faucet?