How to Change the Orientation of Text in Microsoft Word
Changing your text orientation can be useful if you want to create sidebars in a newsletter, tear-off tabs at the bottom of a 'for sale' flyer, or more readable column headings in a table. Here's how to change your text alignment in both...
Table of Contents
Method 1 of 3:
Writing Vertical Words
-
 Follow this method for horizontal letters in a vertical orientation. This method creates text with each letter of a word below the last, like a tall, narrow street sign. If you're trying to rotate the letters so you have to turn your head to read them, skip down to the other instructions.
 -
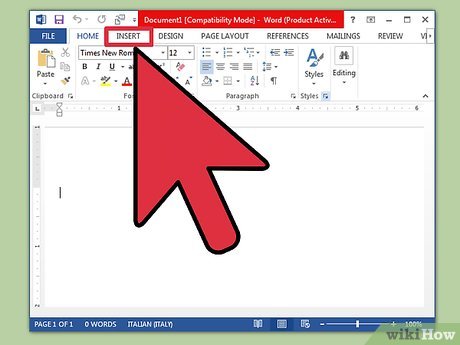
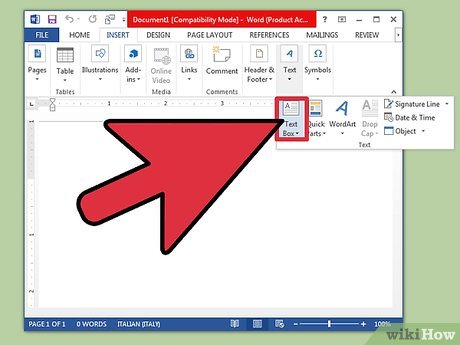
 Insert a text box. A text box makes it much easier to adjust the position and orientation of text. Add it to your Word document as follows:
- Word 2007 or later: On the ribbon menu above your document, click the Insert tab, then Text Box, then Draw Text Box. Click and drag in the document.[1]
- Word for Mac 2011 or later: Select Home on the ribbon menu, then click Text Box on the right hand side. Click and drag in the document.
- Word 2003 / Word for Mac 2008 or earlier: Select Insert → Text Box from the top menu. Click and drag in the document.[2]
-
 Type in your text. Click the text box and type in the text you'd like to orient vertically. If you already typed it in to the document, copy and paste it into the text box.
 -
 Click the text box. A rectangular outline will appear around the text. Each corner of the box has a circle. These circles are "handles" you can pick up and drag to change the box size.
 -
 Drag the corner of the text box. Click and hold on any corner of the text box, then move the cursor. Drag the corner to make the text box a tall, narrow shape. Once the box becomes too narrow to display two letters side by side, they will shift on top of each other instead.
- If the box is rotating, or if it's moving without changing shape, you didn't click it right. Try again and make sure to click the corner of the box.
Method 2 of 3:
Rotating a Text Box (Word 2007 and later)
-
 Check your version of Word. This method covers Word 2007 or later on a Windows, and Word 2011 or later on a Mac. If you don't know your version number, here's an easy test: if there's a "ribbon menu" of icons above your open document, follow these instructions. If there's no ribbon menu skip to the next method instead.
- If you only see a row of tabs labeled "Home," "Layout," etc., click on one of these tabs to expand the ribbon menu.
-
 Insert a text box. Click the Text Box button on the ribbon menu. This is under the Insert or Home tabs, depending on your version of Word.
 -
 Type in the text box. Click on the text box and type in the text you'd like to rotate. Notice that clicking on the text box makes a border appear.
 -
 Click the circle above the text box. Look for a line that extends above the border of the text box, ending in a circle. Click and hold this circle.
 -
 Drag to rotate the box. Move your cursor while holding down on the circle to rotate the text box.
- After rotating, when you click the box to edit the text, it may snap back to the normal orientation. This is just to make it easier for you to see what you're doing. It should return to the position your chose after you click outside the box.
-
 Hold Shift for cleaner rotating. Hold down Shift while rotating to limit the possible positions. This makes it easier to rotate to even 45º or 30º angles, and to make parallel text boxes.
 -
 Use menu options instead. If you're having trouble achieving the look you want, try rotating using menu commands instead:[3]
- Double-click the text box to open the Format ribbon menu, or select the Format tab.
- Click the Text Direction button in the ribbon menu. In some versions this is a small, unlabeled button with an image of vertical text.
- Select one of the options from the drop-down menu.
Method 3 of 3:
Rotating Text (Word 2003 and earlier)
-
 Check your version number. This method covers Word 2003 for Windows, Word 2008 for Mac, and all earlier versions.
 -
 Insert a text box. Click on Insert in the toolbar and select Text Box from the drop-down menu. Click the box and type to enter text.
 -
 Move and resize the text box if necessary. Click and drag on the outside lines of the box to move it; click and drag on the blue circles and boxes to resize it.
 -
 Click inside the text box. This will allow you to format the box separately from the rest of the document.
 -
 Click on Format in the toolbar and select Text Direction from the drop-down menu. A dialog box will pop up giving you the option to change the text orientation.
- These older versions have inconsistent text rotation features.[4][5] If this doesn't work or you don't see the option, move on to the next step.
-
 Insert WordArt instead. Click Insert → Picture → WordArt on the top menu. Type in your text and select an art style.
- You will not be able to edit this text, since it will turn into an image.
-
 Rotate the WordArt object. Click the image that was just created and a border will appear. Look above the top side of the border for a small line leading to a circle. Click and drag this circle to rotate the object.
- Hold Shift while rotating to limit the available angles.
Was this article helpful?
Your feedback helps us improve.
Related Articles
 How to Change Text Direction in Microsoft Word7 minutes read
 Word 2013 Complete Guide (Part 6): Aligning page layout5 minutes read
 How to Edit Text in Word5 minutes read
 Guide font formatting, change stretch and create artistic text in Word6 minutes read
 Instructions for using Text Box in Word 20104 minutes read
 Guide to Word Word 2016 (Part 19): Inserting Text Box4 minutes read
Reader Comments 0
Sign in with email or Google to join the discussion.