How to change screen orientation in Windows 10
In Windows 10, you can change the screen orientation to horizontal, vertical, horizontal (flip backwards) or vertical (flip backward).
A tablet and 2-in-1 devices are designed to automatically rotate the screen vertically or horizontally, when you rotate it to see what's displayed on the screen.
This tutorial will show you how to change the screen orientation in Windows 10.
Change the display orientation by rotating the screen
Note : This option will only be available for tablets and 2-in-1 devices
If you turn on Rotation Lock , the display direction will not change when you rotate the screen.
Just manually rotate the screen to change the horizontal or vertical orientation you want.
Change the direction in the Settings section
1. Open Settings and click on the System icon .
2. Click Display on the left side.
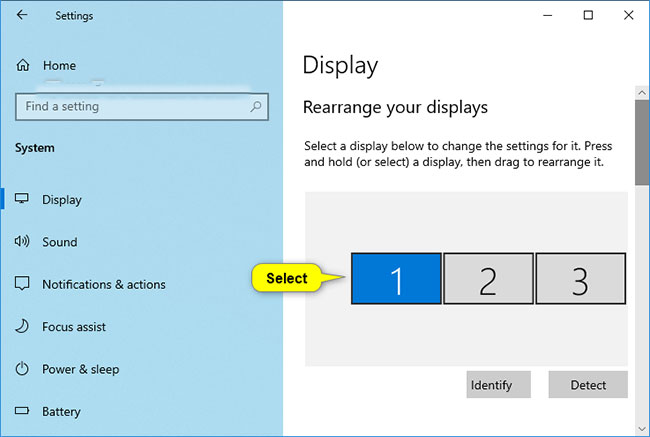
3. If you have multiple monitors connected to the PC, select the screen you want to rotate.
Note : If all screens are not displayed, click the Detect link to see if Windows can find it.
If you're not sure which screen belongs to, then you can click the Identify link to get a quick look at the screen's number.

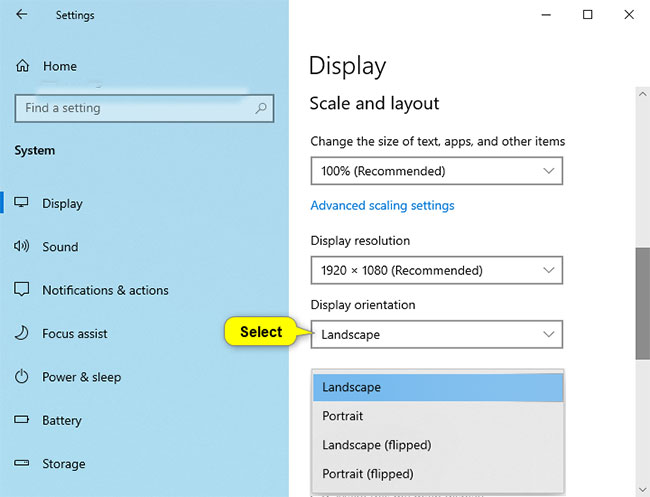
4. Choose Landscape (default), Portrait, Landscape (flipped) or Portrait (flipped) in the Display orientation menu for what you want.

5. If the selected screen orientation looks good, click Keep changes. If not, you can click Revert to return to the previous direction.
Note : You will have 15 seconds (time may vary) to click Keep changes or Revert before Windows automatically rotates back to the previous direction.
This can be helpful if the changes you make prevent you from seeing this dialog.

6. When done, you can close the Settings if desired.
Changes in the NVIDIA Control Panel
This option will only be available if your PC has NVIDIA graphics with NVIDIA driver installed.
1. Right-click or press and hold on the screen and click NVIDIA Control Panel .
2. Perform the following actions in the NVIDIA Control Panel .
A) Click Rotate display in Display in the left panel.
B) If you have multiple screens, select the screen you want to change direction.
C) Choose Landscape (default), Portrait, Landscape (flipped) or Portrait (flipped) in Choose the orientation for what you want.
D) Click Apply.

3. If the selected direction looks good, click Yes. If not, you can click No to return to the previous display.
Note : You will have 20 seconds (the time may vary) to click Yes or No before Windows will automatically return to the previous display.
This can be helpful if the changes you make prevent you from seeing this dialog.

4. When done, you can close the NVIDIA Control Panel if desired.