Table of Contents
This updated guide examines How to Turn a Scanned Document into Microsoft Word Document and organizes the essential facts, background, and practical takeaways in clear American English.
Method 1
Converting a Scanned PDF
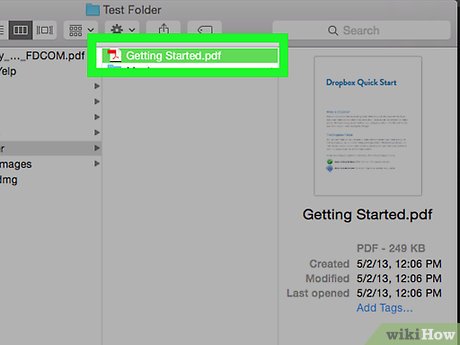 Make sure your scanned document saved as a PDF. Microsoft Word can recognize and convert scanned PDF files into Word documents without requiring any additional software.[1]
- If your document saved as an image (e.g., a JPG or PNG file), you can use New OCR to convert it instead.
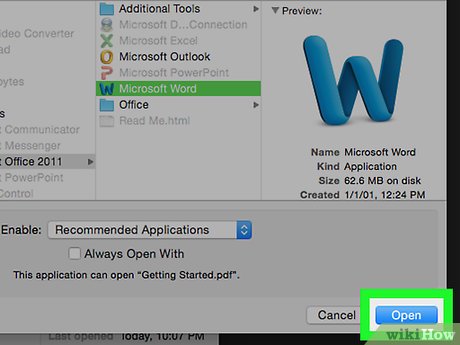 Open the PDF in Word. This process will vary depending on your operating system:
- Windows — Right-click the PDF you want to convert, select Open with , and click Word in the resulting pop-out menu.
- Mac — Click the PDF you want to convert, click the File menu item, select Open With , and click Word in the pop-out menu.
 ClickOKwhen prompted. Word will begin converting the scanned PDF into a Word document.
- This process can take several minutes if your PDF has lots of text or images.
 Enable editing for the file if needed. If you see a yellow bar with a warning at the top of the Word window, click Enable Editing in the yellow bar to unlock the file for editing.
- This usually only pertains to files you've downloaded (e.g., if you downloaded your scanned PDF from a cloud service).
 Clean up your document. Converting scanned files into Word documents isn't an exact science; you may have to add missing words, remove excess spaces, and fix typos before your Word document is ready to go.
 Save the document. Once you're ready to save the converted document as its own Word file, do the following:
- Windows — PressCtrl+S, then enter a file name, select a save location, and click Save .
- Mac — Press⌘Command+S, then enter a file name, select a save location from the "Where" drop-down box, and click Save .
Method 2
Converting a Scanned Image
 Open the New OCR site. Go to http://www.newocr.com/ in your computer's web browser.
 ClickChoose file. It's a grey button at the top of the page. Doing so prompts a File Explorer (Windows) or Finder (Mac) window to open.
 Select the scanned file. In the file browser, navigate to the scanned image file of your document, then click the file.
 ClickOpen. It's in the bottom-right corner of the window. Doing so will prompt the file to upload to the website.
 ClickUpload + OCR. You'll find this button near the bottom of the visible page. New OCR will begin extracting the readable text from your scanned image.
 Scroll down and clickDownload. This link is in the lower-left side of the page, just above the box containing the document's text. A drop-down menu will appear.
 ClickMicrosoft Word (DOC). It's in the Download drop-down menu. This will prompt a Microsoft Word version of the scanned file to download onto your computer.
 Open the document. Once the file is done downloading, you can double-click it to open it in Microsoft Word. Your scanned image is now a Microsoft Word document.
- You may have to click Enable Editing at the top of the page as the document might be locked by default.
 Clean up your document. Converting scanned files into Word documents isn't an exact science; you may have to add missing words, remove excess spaces, and fix typos before your Word document is ready to go.
Method 3
Scanning a Document into a Word File
 Open Office Lens. Tap the Office Lens app icon, which resembles a red and white app with a camera iris and the letter "L" in the center of the icon.
- If you don't have Office Lens installed, you can download it from the Google Play Store for Android or from the App Store on iPhone.
 Allow Office Lens access to your phone. If this is your first time opening Office Lens, tap Allow or OK when prompted to allow Office Lens to access your phone's files.
 TapDOCUMENT. It's a tab at the bottom of the screen.
 Point your phone's camera at a document. Position the document that you want to scan inside the camera's view.
- Make sure you document is well lit so the camera can pick up as much detail as possible.
 Tap the "Capture" button. It's a red circle at the bottom of the screen. This will take a photo of the document's page.
 Tap
Tap . It's in the bottom-right corner of the screen.
- You can scan more pages by tapping the camera with the plus icon at the bottom of the screen.
 TapWord. You'll find this option in the "SAVE TO" section of the "Export To" page.
- On Android, tap the box next to Word and then tap SAVE at the bottom of the screen.
 Sign into your Microsoft account. If you haven't already, enter your Microsoft account email address and password. Once signed in, your Word document will be uploaded to your OneDrive account.
- This must be the account that you use to log into Microsoft Word as well.
 Open Word on your computer. It's the blue app with a white document and the letter "W" in the icon.
 ClickOpen Other Documents. It's on the left side of the window below the "Recent" section.
- On Mac, simply click the folder icon that says Open on the left-hand side of the window.
 ClickOneDrive - Personal. It's at the top of the window. This will open your OneDrive folder.
- If you don't see the OneDrive option, click + Add a Place , then click OneDrive and sign in with your Microsoft account.
 Go to the Office Lens folder. Click on the "Documents" folder, then click the "Office Lens" folder. This is on the right pane of the window.
 Double-click your Word document. This opens the Word document you scanned using Office Lens in Microsoft Word.
FAQ
What is How to Turn a Scanned Document into Microsoft Word Document about?
It provides a structured overview of word, explains the main context, and highlights practical takeaways for readers.
Why does this topic matter?
Understanding the main concepts helps readers evaluate the issue, avoid common mistakes, and make better-informed decisions.
How should readers use this information?
Use the guidance as a practical starting point, confirm details that may have changed, and follow current product, safety, or security recommendations.
Related Articles
 How to Convert Scanned Documents to Word Documents: Complete Guide5 minutes read
 How to Remove Scanned Document Stains on Google Drive: Complete Guide4 minutes read
 How to Convert a Scanned File to Word6 minutes read
 How to Copy and Paste the Contents of a PDF File into a New File: Clear9 minutes read
 How to Convert JPEG Images to Word Documents: Practical Guide3 minutes read
 Document: How to Use Microsoft Word14 minutes read
Reader Comments 0
Sign in with email or Google to join the discussion.