How to add / remove Move to OneDrive context menu in Windows 10
In Windows 10, you can easily save your files to OneDrive and access them from any device, like a PC, tablet, or phone.
When you have OneDrive running in the background on Windows 10, all files will have a Move to OneDrive context menu. If OneDrive is not currently running, the Move to OneDrive context menu will no longer be available.
Once you've logged into OneDrive with your Microsoft account and used the Move to OneDrive context menu, the file will be transferred to OneDrive online.
This guide will show you how to add or remove Move to OneDrive context menus for files in Windows 10.
Note:
- You must be logged in as an administrator to add or remove this context menu.
- If you delete the context menu Move to OneDrive, all the context menu items below are also deleted when you right-click an item in the OneDrive folder.
 All context menu items are deleted
 Delete Move to OneDrive in the right-clicking menu
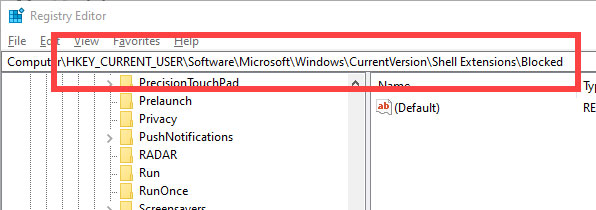
1. Open the Start menu, search and click results to open Registry Editor. Now, copy the link below, paste it in the address bar and click Enterto go to the destination folder.
HKEY_CURRENT_USERSoftwareMicrosoftWindowsCurrentVersionShell ExtensionsBlockedNote : If there is no "Blocked" folder , create a new one. To do that, right-click on the Shell Extensions folder , select New> Key and name the folder "Blocked".
 Enter the path in the address bar
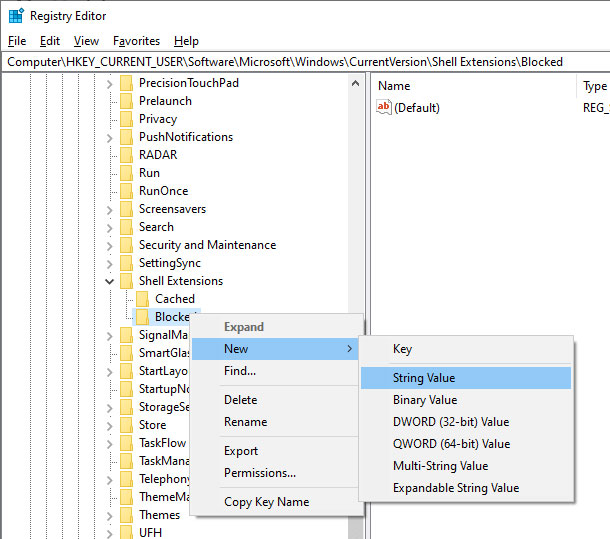
 2. In the "Blocked" folder , right click and select the New> String Value option . Name the new value as {CB3D0F55-BC2C-4C1A-85ED-23ED75B5106B}.
 Select New> String Value
  Name the new value as {CB3D0F55-BC2C-4C1A-85ED-23ED75B5106B}
 3. Close Registry Editor and restart Windows. You will no longer see the Move to OneDrive option in the right-click context menu.
If you want to bring the Move to OneDrive option back, simply right-click the newly created value and select the Delete option . This action will delete the string value and restore the Move to OneDrive option in the context menu.
Download the Reg file
If you don't want to edit the registry manually, download this zip file and extract it to the desktop. To remove the Move to OneDrive option, double-click the Remove Move to OneDrive file from context menu.reg . You will see a warning message. Click the Yes button . Restart Windows for the change to take effect. The Move to OneDrive option will be deleted on the next restart.
To restore options, execute the file Add Move to OneDrive to context menu.reg .
If you're curious, you can open the .reg file with Notepad to see what key and value are being changed.
You should read it
- ★ How to delete options in the Windows context menu
- ★ Add Copy to folder and Move to folder in the right-click menu
- ★ This small application helps bring the context menu interface of Windows 10 to Windows 11
- ★ Microsoft is committed to improving the context menu experience on Windows 11
- ★ How to add items to the 'Create New' context menu in Windows 10