How to add 'Move to' or 'Copy to' to the Windows 10 context menu
Windows 10 has a hidden function that allows you to right-click a file and move or copy it to a specific location desired. This small registry tip will help you copy and move files easily.
Table of Contents
Windows 10 has a hidden function that allows you to right-click a file and move or copy it to a specific location desired. This small registry tip will help you copy and move files easily.
If you've never worked with Registry Editor before, you might want to learn a bit about it before you start and remember to back up the Registry (as well as your computer), before making the following changes.
If you want to be more secure, you can also create a system restore point before continuing.
Add 'Move to' option to context menu
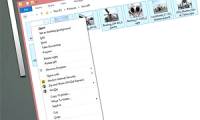
To add 'Move to' to the context menu, the first thing you have to do is open the Registry Editor. Navigate to the following key in the left sidebar or you can paste directly into the address bar:
HKEY_CLASSES_ROOTAllFilesystemObjectsshellexContextMenuHandlers
Here, right-click on 'ContextMenuHandlers' , click and select New> Key from the pop-up menu.
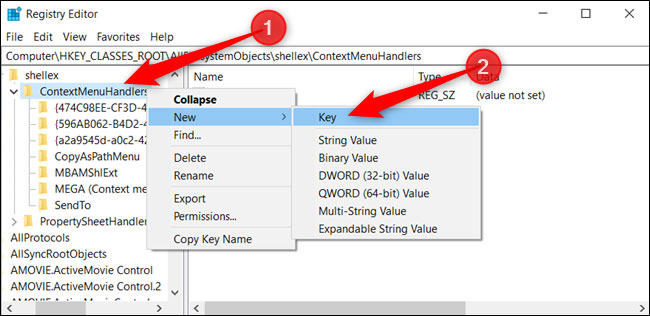
Name the new key 'Move to' and then press Enter .
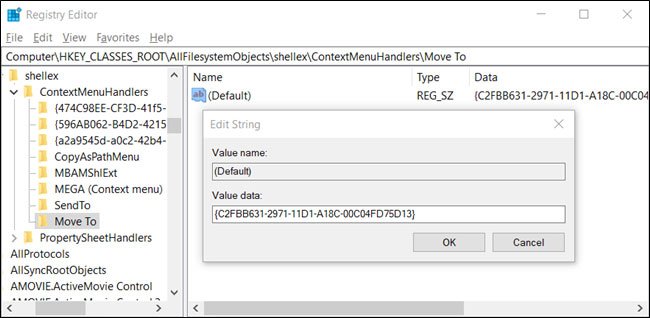
Now, double-click (Default) , paste the following string in the Value Data field, and then press Enter :
{C2FBB631-2971-11D1-A18C-00C04FD75D13}
You can now close Registry Editor safely. You do not need to reboot or log out to start using this function.
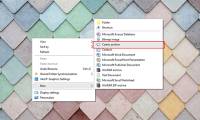
Add the 'Copy to' option to the context menu
Same as before, to add 'Copy to' to the context menu, first open Registry Editor.
Navigate to the following key in the left sidebar or paste directly into the address bar:
HKEY_CLASSES_ROOTAllFilesystemObjectsshellexContextMenuHandlers
Here, right-click ContextMenuHandlers and select New> Key from the pop-up menu.
Name the new key 'Copy to' and press Enter .
Now, double-click (Default) , paste the following string in the Value data field, then press Enter :
{C2FBB630-2971-11D1-A18C-00C04FD75D13}
When finished, you can safely close Registry Editor. Again, you do not have to reboot or log out to start using this function.
Use the REG file
If you don't want to edit the registry, you can download the following files to add 'Move to' or 'Copy to' to the context menu. Just download this ZIP file:
https://www.howtogeek.com/wp-content/uploads/2020/01/AddMoveToAndCopyTo.zip
. open and double-click 'AddMoveTo.reg' or 'AddCopyTo.reg' , then click Yes to add information to the registry.
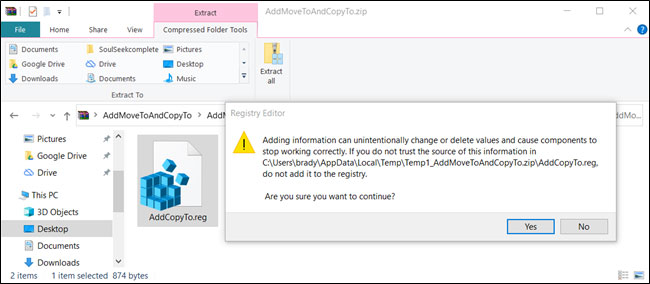
These REG files add registry settings like the one mentioned above.
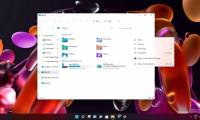
Use 'Move to' or 'Copy to' from the context menu
After you add these tweaks to the Windows Registry and right-click the file or folder, the context menu will appear as usual, but it will also now contain the 'Move to' and / or 'Copy' options. to ' .

A small dialog box will appear so you can select the destination folder. Once done, simply click on 'Copy' to send the file to the directory you specified.
Was this article helpful?
Your feedback helps us improve.
Related Articles
 Add Copy to folder and Move to folder in the right-click menu3 minutes read
 How to add / remove Move to OneDrive context menu in Windows 104 minutes read
 The context menu of Windows 11 will have a new eye-catching design3 minutes read
 This small application helps bring the context menu interface of Windows 10 to Windows 113 minutes read
 Microsoft is committed to improving the context menu experience on Windows 113 minutes read
 How to add items to the 'Create New' context menu in Windows 105 minutes read
Reader Comments 0
Sign in with email or Google to join the discussion.