How to disable / enable F8 Advanced Boot Options in Windows 10
Advanced Startup Options allows you to start Windows in advanced troubleshooting modes such as Advanced Startup Options. This guide will show you how to enable or disable the old F8 Advanced Boot Options screen when booting in Windows 10.
Table of Contents
By default, you can boot into Advanced Startup Options in Windows 10.
The Advanced Boot Options screen is the old black screen when booting as in Windows 7 and earlier Windows. Advanced Startup Options allows you to start Windows in advanced troubleshooting modes such as Advanced Startup Options. However, you can access the Advanced Boot Options screen by turning on the computer and continuing to press the key F8before Windows starts.
This guide will show you how to enable or disable the old F8 Advanced Boot Options screen when booting in Windows 10.
Note:
- You must be logged in as an administrator to enable or disable the F8 Advanced Boot Options screen.
- If you have enabled Fast Boot in the UEFI firmware installation, then you will not be able to boot the Advanced Boot Options screen, as you will not have time to press F8 before Windows boots.
- If you dual boot Windows 10 with another Windows operating system and have Advanced Boot Options turned on, you will always see the below Windows Boot Manager screen first when booting.
Disable / enable F8 Advanced Boot Options using the displaybootmenu command
1. Open Command Prompt with admin rights or Command Prompt when booting.
2. Perform step 3 (to enable) or step 4 (to disable), depending on what you want to do.
3. To activate the F8 Advanced Boot Options screen in Windows 10, enter the command below in the Command Prompt, press Enterand go to step 5.
bcdedit /set {bootmgr} displaybootmenu yes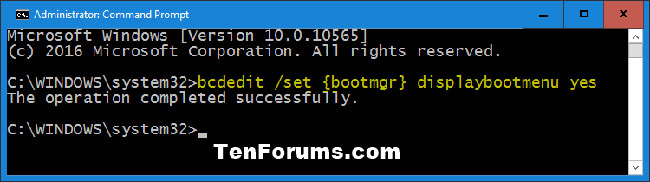 Activate the F8 Advanced Boot Options screen in Windows 10
4. To disable the F8 Advanced Boot Options screen in Windows 10, enter the command below in the Command Prompt, press Enterand go to step 5.
bcdedit /set {bootmgr} displaybootmenu no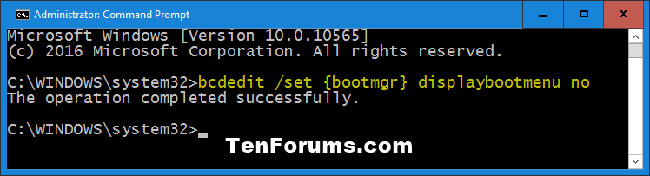 Disable the F8 Advanced Boot Options screen in Windows 10
5. When done, close the Command Prompt if you like.
Disable / enable F8 Advanced Boot Options with the bootmenupolicy command
Note : If you have multiple boot operating systems, this option is handy to be able to specify which operating system you want to disable / enable F8 Advanced Boot Options.
1. Open Command Prompt with admin rights or Command Prompt when booting.
2. Enter bcdedit in the Command Prompt and press Enter.
3. In the Windows Boot Manager section , look to the right of the default and note what is in the identifier (for example, "{current}" ). This is the default operating system.
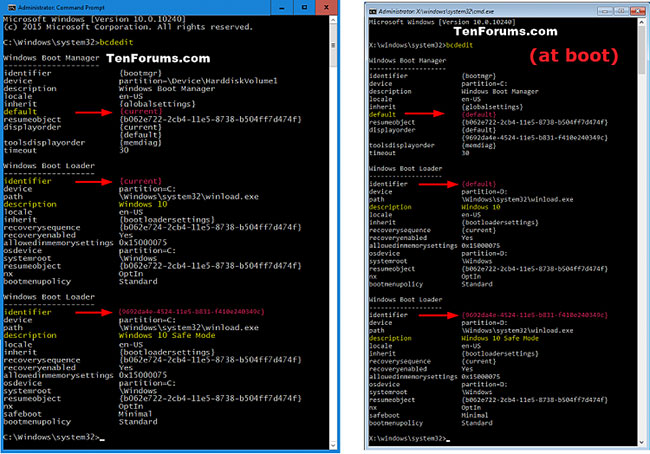 Note the default and identifier sections
4. Perform step 5 (to enable) or step 6 (to disable), depending on what you want to do.
5. To activate the F8 Advanced Boot Options screen in Windows 10, enter the command below in the Command Prompt, press Enterand go to step 7.
bcdedit /set {identifier} bootmenupolicy Legacy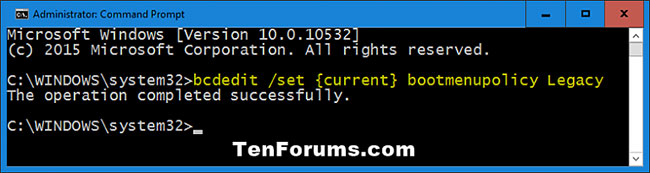 F8 Advanced Boot Options screen activation command
Note: Replace the identifier in the above command with the actual identifier (for example, {current} ) from step 3 for the default operating system.
For example:
bcdedit /set {current} bootmenupolicy Legacy6. To disable the F8 Advanced Boot Options screen in Windows 10, enter the command below in the Command Prompt, press Enterand go to step 7.
bcdedit /set {identifier} bootmenupolicy Standard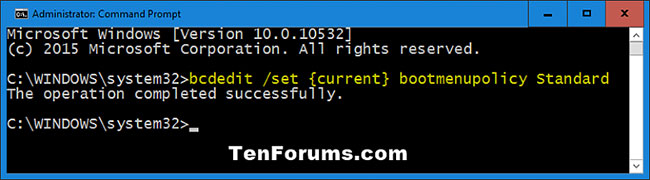 Command disables F8 Advanced Boot Options screen
Note : Replace the identifier in the above command with the actual identifier (for example, {current} ) from step 3 for the default operating system.
For example:
bcdedit /set {current} bootmenupolicy Standard7. When done, you can close the Command Prompt if you like.
Was this article helpful?
Your feedback helps us improve.
Related Articles
 How to Use Windows Advanced Boot Options to Troubleshoot Faster8 minutes read
 How to access the Boot menu in Windows 114 minutes read
 6 ways to access the Boot Options menu in Windows 107 minutes read
 How to enable / disable Fast Boot in UEFI firmware settings on Windows2 minutes read
 How to disable / enable UEFI Secure Boot in Windows 105 minutes read
 How to enable advanced settings on Windows 113 minutes read
Reader Comments 0
Sign in with email or Google to join the discussion.