Table of Contents
This updated guide examines Add Mac to the Workgroup Windows Network and organizes the essential facts, background, and practical takeaways in clear American English.
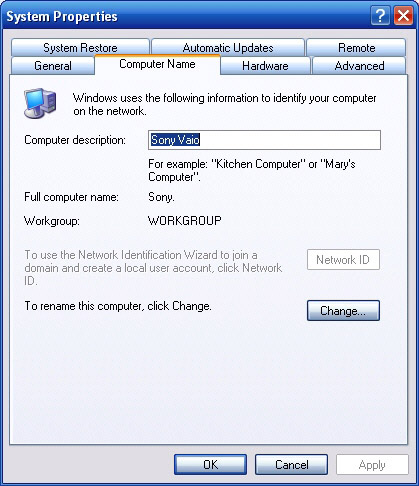 Figure A: Notice the name of the workgroup you want to add the Mac to
Next, determine that the Windows workgroup is sharing the appropriate files through the network: 1. Click Start 2. Double-click My Computer 3. Determine the appropriate folders being shared (with the hand icon below the folder icon (Figure B)) After you have correctly identified the Windows files to share, or if you only need to share a printer in the network, check and make sure the printer or printers have been shared by: 1. Click Start 2. Click Printers and Faxes 3. Determine if the printer has been shared (with the hand icon below the printer)
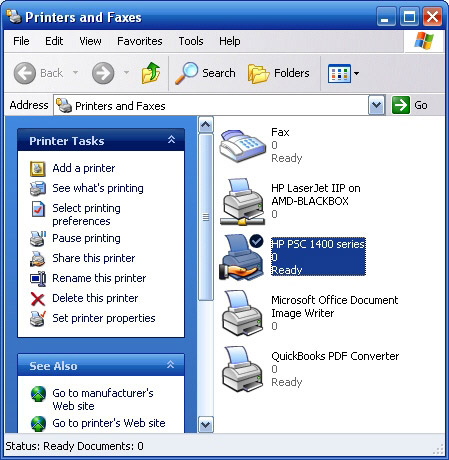 Figure B: The hand icon indicates that the component is being shared
Before connecting Macintosh computers to the workgroup, you need to review the user / group and permissions associated with the shared source (to ensure you can properly configure the Macintosh to connect to it). For each object being shared, do the following: 1. Right-click the source being shared and select Properties from the menu that appears 2. Click on the Security tab (Figure C). 3. Note the group or username that has access to the shared source 4. Pay attention to each specific permission for the group or user 5. Correct the same permissions for groups and users with the provided Add and Remove buttons 6. Click OK (if you have made changes)
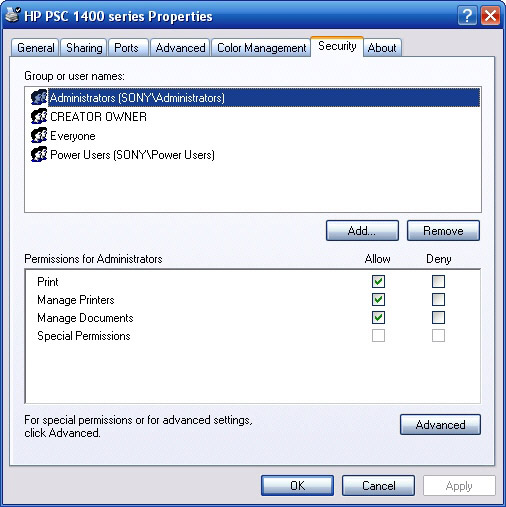 Figure C: Use the Permissions tab to configure permissions for each user and group
If you do not see the permissions listed for each user, your Windows XP system may be enabled with Simple File Sharing sharing mode. To turn off this mode and allow more specific controls for shared files and printers, do the following: 1. Click Start 2. Select My Computer 3. Click Tools 4. Click Folder Options 5. Select the View tab 6. In the list of Advanced settings settings , scroll down to the bottom and uncheck the Use simple file sharing (Recommended) box. 7. Click OK Configure the Mac Now switch to Macintosh configuration. To connect a Macintosh to a Windows workgroup: 1. Click the Dock's Finder icon 2. Click Network in the Finder's left sidebar (Figure D). 3. Click on Workgroup . 4. Select the shared source storage system you want to connect to. 5. Click the Connect button 6. In the SMB window that appears, enter the workgroup name and username / password in the Windows machine permissions section to access the shared source, then click OK (Figure E). 7. Select the data source you want to connect to and click OK (Figure F) 8. Shared sources in Windows will appear in the Finder section; Just drag and drop icons from Finder to Desktop of Macintosh and start using them (Figure G)
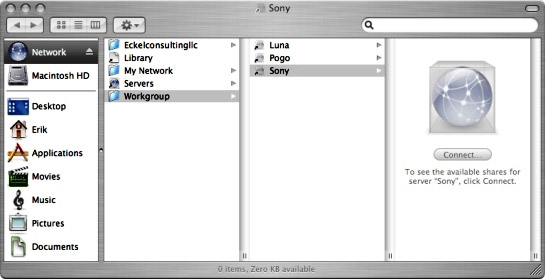 Figure D: Use the Finder on the Mac to get started
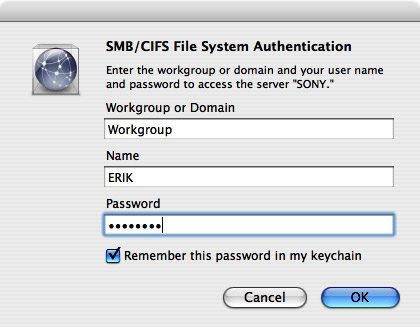 Figure E: You will have to enter the Workgroup name and the username / password value of the machine connected to
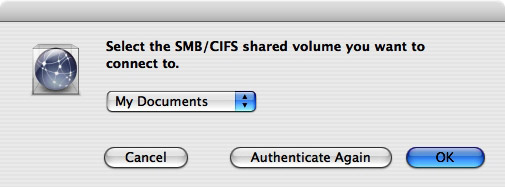 Figure F: Specify the data source to connect to in the Windows network
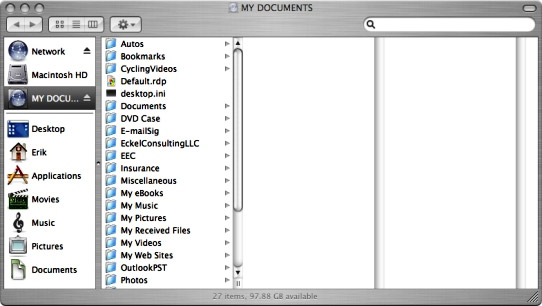 Figure G: Windows shared source will appear in Finder when Macintosh Successfully connect to Windows system
Often workgroup names don't need to match correctly. Many Windows XP systems put workgroup on their computers as MSHOME while others are Workgroup . Macintosh uses the default Workgroup name. However, if you want to change the default workgroup name of the Mac, follow these steps: 1. Click the Dock's Finder icon 2. Click Applications 3. Drag to the Utilities folder and select it 4. Double-click Directory Access (Figure H) 5. Allow changes by clicking on the lock icon. 6. Provide the Administrator account's username and password 7. Double click SMB / CIFS 8. Enter the group name you want to use in the window that appears and select it from the drop-down menu. 9. Click Apply 10. Close Directory Access .
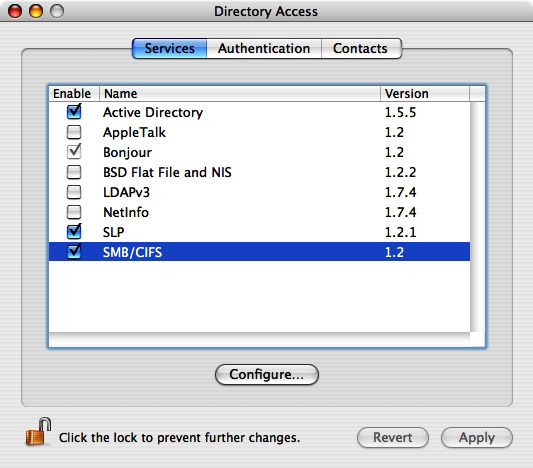 Figure H: Use the Mac's Directory Access utility to turn on Windows Sharing
Shared sources To share documents on a Mac with a Windows system, perform the following steps: 1. Click on the System Preferences icon of the Dock 2. Click Sharing in the Internet & Network section 3. Make sure the Windows Sharing box is selected 4. Click the Accounts button 5. Click to select the cells to determine which Macintosh accounts allow you to use Windows Sharing 6. Make sure Windows Sharing is turned on, if you do not click the Start button Next, go to the Windows system that needs to access the Macintosh source and: 1. Click Start 2. Click My Network Places 3. Click on View Workgroup Computers from the Network Tasks window; Macintosh systems may appear in this window. 4. If the Macintosh system is not in the My Network Places window, do it the B way; Click on an additional network in the Task Pane . 5. The Add Network Place Wizard window will appear, click Next 6. Select Choose another network location and click Next 7. In the Internet or network address box , specify the IP address of the Macintosh system (you can find it by clicking on the System Preferences icon of the Dock on your Mac, select Network and select Built-in Ethernet. from the Show menu drop down), followed by the username of the Mac, and then click Next . Note that this step must be absolutely accurate; The network address entered must be in 10.0.0.1admin format if the Mac address is 10.0.0.1 and the username on the Mac is admin (Figure I) 8. Specify the name for the created network and click Next 9. Click Finish 10. Shared sources on Macintosh will appear in Windows.
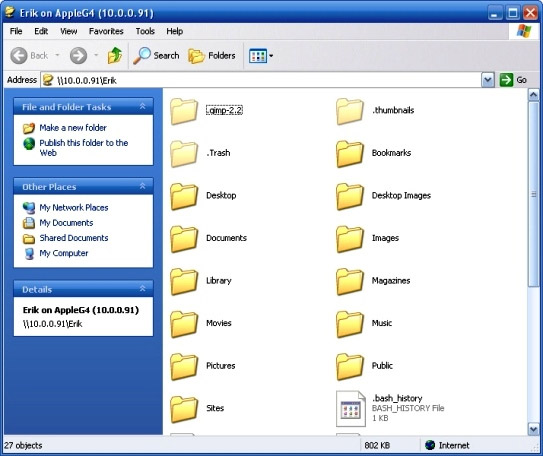 Figure I: After configuration is complete, the shared source on the Macintosh will appear in a Windows window
Finally, to print from a Macintosh via the printer in the Windows system: 1. Click the System Preferences icon on the Dock 2. Click the Print & Fax icon in the Hardware section 3. Click the lock (if it is closed) to allow changes (you must enter the administrator account username / password to complete this operation) 4. Click the Plus icon to add a printer 5. Click the More Priners button 6. Make sure Windows Printing is selected from the first drop-down menu 7. Make sure the Network Neighborhood is selected from the second drop-down menu 8. Select the workgroup that contains the printer that you will use to print, and then click Choose 9. Select the Windows workstation that has the printer installed and plugged in, then click Choose 10. Enter the username / password with the Windows permissions and click OK 11. Select the printer from the Printer Browser menu 12. Determine the type of printer by the drop-down menu (or select Generic list) 13. Click the Add button.
FAQ
What is Add Mac to the Workgroup Windows Network about?
It provides a structured overview of Workgroup, explains the main context, and highlights practical takeaways for readers.
Why does this topic matter?
Understanding the main concepts helps readers evaluate the issue, avoid common mistakes, and make better-informed decisions.
How should readers use this information?
Use the guidance as a practical starting point, confirm details that may have changed, and follow current product, safety, or security recommendations.
Related Articles
 3 How to Change Workgroup on Windows 105 minutes read
 How to Fix Not Seeing Computers in Workgroup4 minutes read
 Deny Access When Managing Hyper-v Remote Server in Workgroup3 minutes read
 Map the Drive in Windows 7: What You Need to Know8 minutes read
 Combine Windows Xp and Vista Machines on the Same Network4 minutes read
 What Is HomeGroup? How to Use and Set Up on Windows6 minutes read
Reader Comments 0
Sign in with email or Google to join the discussion.