How to change the network configuration name in Windows
The first time you configure and connect to the network, Windows stores that information as a network configuration and names it the most generic name such as Network, Network 1, etc. If there are multiple networks, names The default may cause confusion for users. This article will show you how to change the network configuration name.
Table of Contents
The first time you configure and connect to the network, Windows stores that information as a network configuration and names it the most generic name like "Network", "Network 1", and so on. This is the name you will see when you click on the network icon in the taskbar or when you open the Network and Sharing Center in Control Panel. If there are multiple networks, the default name may be mistaken for users. This article will show you how to change the network configuration name.
Note: There is no simple way to do this, you must intervene in the Local Security Policy or Registry Editor to change the network configuration name in Windows 10.
Method 1: Change the network configuration name with Local Security Policy
The easiest way to change the network image name in Windows is to modify the Local Security Policy settings. Local Security Policy is part of Group Policy Editor. However, unlike the Group Policy Editor used to configure settings for all computers and users, Local Security Policy is used to set up and modify settings for specific local machines. To start, press Win + R key, type secpol.msc and press Enter .
- Quickly open the tools in Control Panel with Run

In the Local Security Policy window, navigate to the " Network List Manager Policies " folder in the left pane. Find and double-click your network configuration name that appears on the right panel. By default, the network will be listed with the default configuration name, for example "Network".
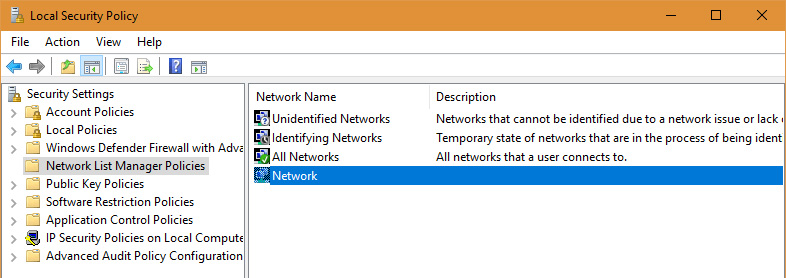
In the network properties window, select the option ' Name ' then enter the name you want to change and click the ' OK ' button to save the changes. Note, you cannot use any special characters in the name.

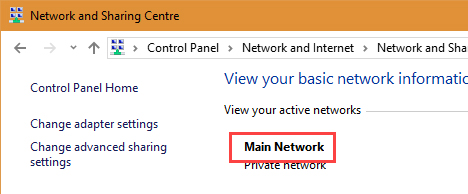
You will see the new name when clicking on the network icon in the taskbar.

New network shaped names are also changed in the Network and Sharing Center. If you don't see any changes, restart the system.
Method 2: Change the network configuration name using the Registry
Users will not have access to Local Security Policy if they are using Windows Home version. However, you can use Registry Editor to change the network configuration name. To open the Registry Editor, press the Win + R key, type regedit and press the Enter button.
In the Registry Editor window navigate to the following location. If you're using Windows 10, copy and paste the link below into the address bar and press the Enter button.
HKEY_LOCAL_MACHINESOFTWAREMicrosoftWindows NTCurrentVersionNetworkListProfiles
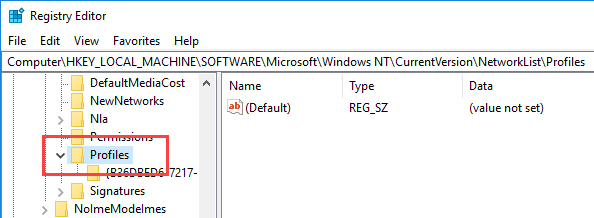
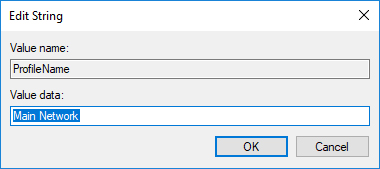
Under Profiles, you will see keys with alphanumeric names. Windows sets a new key for each network configuration in the system. In the image above, because there is a network configuration, there is only one key. If you have more than one network, under the Profiles section there will be more keys, find the key related to the network configuration you want to rename. Determine the specific key by looking at the " ProfileName " value in the table on the right. When you have found the key, double-click the " ProfileName ."
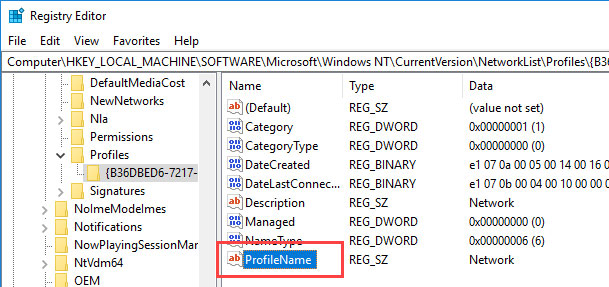
Now enter the new name in the Value Data field and click the ' OK ' button to save the changes. Note, do not use any special characters in the name.
Reboot the system and you will see the new network configuration name.
I wish you all success!
See more:
- 2 How to change the name displayed on the computer
- Set up and configure a LAN (Local Area Network)
- Network configuration and administration in Windows 7
Was this article helpful?
Your feedback helps us improve.
Related Articles
 How to change network name in Windows 113 minutes read
 The best network configuration management tools and software9 minutes read
 Instructions for troubleshooting Windows 7 network errors15 minutes read
 How to Change MAC Address on Windows6 minutes read
 How to configure TCP/IP settings in Windows6 minutes read
 Error handling when running the Wireless Network Setup Wizard after updating Windows XP SP22 minutes read
Reader Comments 0
Sign in with email or Google to join the discussion.