Access data in HomeGroup from Vista and XP
In this article, we will access the shared folders and printers in a Windows 7 HomeGroup from Windows XP and Vista computers.
As mentioned in the article, Windows 7 HomeGroup's Network Connection with Windows 7 is an improved version of a peer-to-peer Workgroup designed to make file and folder sharing easier on a small business network or a home network. We then created and joined a HomeGroup with Windows 7.
In the article Sharing Data in Windows 7's HomeGroup, we learned that the Libraries method is used to share folders, files and describe other integrated features that users can use to open. Expand the ability to share folders in Windows 7's HomeGroup.
As we all know, only computers that use Windows 7 operating systems can join the HomeGroup. In addition to supporting HomeGroup, Windows 7 can also participate in a standard workgroup network configuration with Windows XP and Windows Vista systems, which can be configured to share folders, and access shared folders. Sharing like Windows XP and Windows Vista systems usually works.
However, while in use, we may encounter another situation: Windows XP and Vista systems can access shared data in the HomeGroup. Of course, we can do this but need to do some small tricks.
In this article, we will access the shared folders and printers in a Windows 7 HomeGroup from Windows XP and Vista computers. In addition, we will share and access resources on Windows XP and Windows Vista systems from a Windows 7 HomeGroup system.
Configure Windows 7 HomeGroup system
To configure a Windows 7 system to be part of HomeGroup that allows Windows XP and Vista computers to access shared folders and printers, we will first have to create a dedicated account. Password protected for sharing with Windows Vista and Windows XP systems. To restrict this account to only perform a shared task, we will have to install it as a standard user.
Access Control Panel , enter user in the search box, then select Create Standard User Account from the results displayed. When the Create new account window appears as shown in Figure 1, enter a name for the new account. In this example we will use the name HG-Share and then click the Create Account button.

When the new account appears in the Manage Accounts window, click on this account to open the Change an Account window. Next, click on the Create a Password link and set a password as shown in Figure 2. After entering the password click the Create Password button.

To complete this step, we will log in to the new account and log out now to make sure that this user account has been created with the correct login information.
Hide shared accounts
Access from a Windows Vista system


Access from a Windows XP system


Access printer sharing in HomeGroup

Share from Windows XP and Vista computers

Figure 8: Sharing folders from Windows XP to the same HomeGroup shared in Workgroup.
With Windows Vista
As mentioned in the article, Windows 7 HomeGroup's Network Connection with Windows 7 is an improved version of a peer-to-peer Workgroup designed to make file and folder sharing easier on a small business network or a home network. We then created and joined a HomeGroup with Windows 7.
In the article Sharing Data in Windows 7's HomeGroup, we learned that the Libraries method is used to share folders, files and describe other integrated features that users can use to open. Expand the ability to share folders in Windows 7's HomeGroup.
As we all know, only computers that use Windows 7 operating systems can join the HomeGroup. In addition to supporting HomeGroup, Windows 7 can also participate in a standard workgroup network configuration with Windows XP and Windows Vista systems, which can be configured to share folders, and access shared folders. Sharing like Windows XP and Windows Vista systems usually works.
However, while in use, we may encounter another situation: Windows XP and Vista systems can access shared data in the HomeGroup. Of course, we can do this but need to do some small tricks.
In this article, we will access the shared folders and printers in a Windows 7 HomeGroup from Windows XP and Vista computers. In addition, we will share and access resources on Windows XP and Windows Vista systems from a Windows 7 HomeGroup system.
Configure Windows 7 HomeGroup system
To configure a Windows 7 system to be part of HomeGroup that allows Windows XP and Vista computers to access shared folders and printers, we will first have to create a dedicated account. Password protected for sharing with Windows Vista and Windows XP systems. To restrict this account to only perform a shared task, we will have to install it as a standard user.
Access Control Panel , enter user in the search box, then select Create Standard User Account from the results displayed. When the Create new account window appears as shown in Figure 1, enter a name for the new account. In this example we will use the name HG-Share and then click the Create Account button.
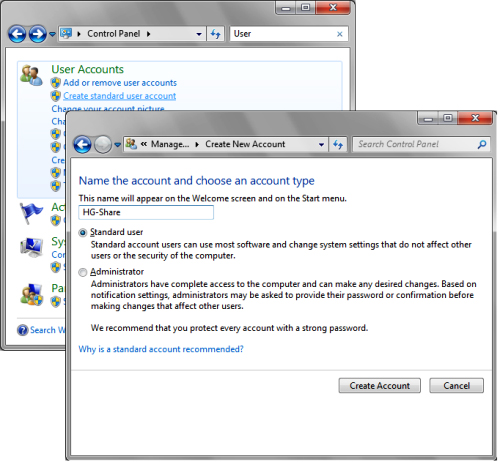
Figure 1: Create a standard person account.
When the new account appears in the Manage Accounts window, click on this account to open the Change an Account window. Next, click on the Create a Password link and set a password as shown in Figure 2. After entering the password click the Create Password button.
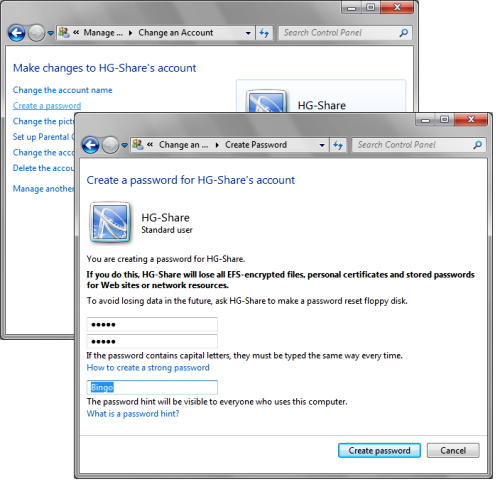
Figure 2: Set the password for the newly created account.
To complete this step, we will log in to the new account and log out now to make sure that this user account has been created with the correct login information.
Hide shared accounts
Once the special sharing account has been created and the correct login information has been established, and we do not have to log in to this account again. Therefore, we may not want it to appear on the login screen. Fortunately, we can hide this shared account with the Net command-line tool launched from a Command Prompt window.
First, right-click the Command Prompt shortcut and select the Run as Administrator command. When UAC appears, we need to make a suitable choice. When the Command Prompt appears, enter the following command:
First, right-click the Command Prompt shortcut and select the Run as Administrator command. When UAC appears, we need to make a suitable choice. When the Command Prompt appears, enter the following command:
users localgroup net / delete accountnameIn which accountname is the shared account name.
We will have to repeat all the steps in this section on every Windows 7 system in HomeGroup that wants to give access to. In doing so, use the exact shared password and account name used previously to use the same access method to every computer in HomeGroup to simplify things.
Access from a Windows Vista system
With a dedicated sharing account enabled, the process of accessing shared folders in a Windows 7 HomeGroup is quite easy from a Windows Vista system. Click the Start button and select Network . When the Network window appears, locate the Windows 7 system you want to access and click on it. Then, a message will appear asking for the login information created for the dedicated sharing account. Just enter the account name and password as shown in Figure 3. Select the Remember My Password check box so that you do not have to enter your login information for future connections. Done, click OK .

Figure 3: Enter the login information of the special sharing account.
Once you have access to a Windows 7 computer, open Shared Users then we can access all the files and folders shared with HomeGroup as shown in Figure 4. At that time, the same access that the HomeGroup set up. will be applied, the My Documents folder will be installed as Read-only and the Public folder will be read / write .
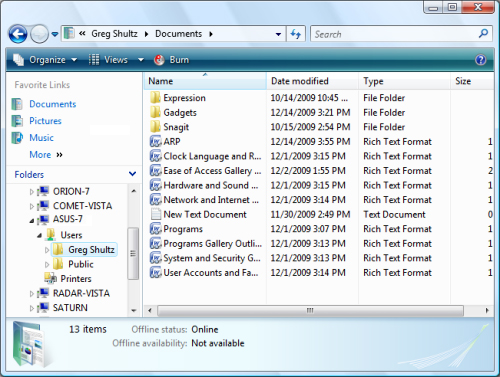
Figure 4: All files and folders shared via HomeGroup are in Users share.
Access from a Windows XP system
This dedicated sharing account also makes the process of accessing shared folders in a Windows 7 HomeGroup much simpler from a Windows XP system. To be able to access shared resources in the HomeGroup, access My Network Places , select View Workgroup Computer in the Network Tasks panel.
If the Windows 7 system that we are looking for is a member of the same group working with this Windows XP system, we will see and double click on this Windows 7 computer to access it directly from The View Workgroup Computers window is shown in Figure 5. However, if the Windows 7 system is a member of another workgroup, we will have to select the Microsoft Windows Network command from the Other Places table and then open the workgroup containing the system. Windows 7 needs access.
If the Windows 7 system that we are looking for is a member of the same group working with this Windows XP system, we will see and double click on this Windows 7 computer to access it directly from The View Workgroup Computers window is shown in Figure 5. However, if the Windows 7 system is a member of another workgroup, we will have to select the Microsoft Windows Network command from the Other Places table and then open the workgroup containing the system. Windows 7 needs access.
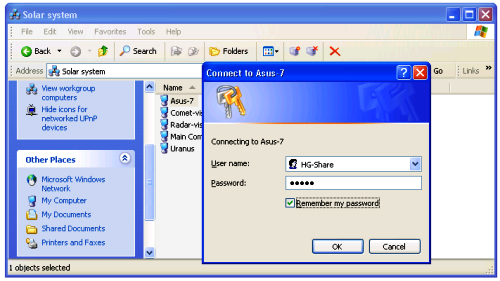
Figure 5: Enter the login details of the special sharing account to access the Windows 7 system from your Windows XP computer.
Once you have successfully accessed the Windows 7 computer, open Shared Users and we can access all the files and folders shared with the HomeGroup as shown in Figure 6. At that time, access is similar to that of HomeGroup. Once setup is applied, the My Documents folder will have access to Read-only access , and the Public folder is read / write .
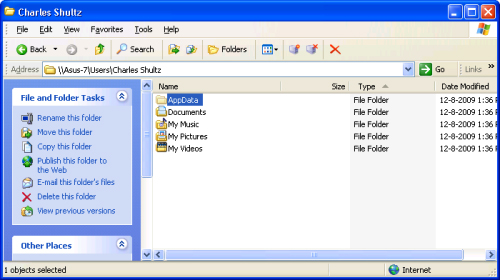
Figure 6: Access shared resources via HomeGroup in Users share.
Access printer sharing in HomeGroup
When accessing shared printers in Windows 7's HomeGroup, the method works much the same as connecting to shared folders. Once you have successfully accessed the Windows 7 system from your Windows XP or Windows Vista computer, you can see and connect to the shared printer as shown in Figure 7.
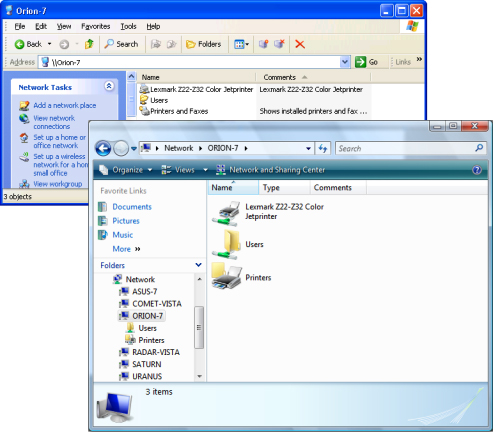
Figure 7: The shared printer in the HomeGroup will appear
and can be accessed when connecting to Windows 7 system.
and can be accessed when connecting to Windows 7 system.
The process of connecting to a shared printer is not different when the printer driver has been downloaded from the shared computer and installed on a Vista or XP computer. After that, we can use this printer as if we were using a printer in a peer group.
Share from Windows XP and Vista computers
Of course, when connecting to HomeGroup using this method, in addition to being able to access shared resources to HomeGroup from Windows 7 systems, we will want to share resources from Windows XP and Windows Vista with This HomeGroup.
With Windows XP
In Windows XP, with the Simple File Sharing feature enabled (default setting), we just need to right click on the folder we want to share and select Sharing and Security . In the Network Sharing and Security dialog box, select the Share This Folder on the Network check box as shown in Figure 8. We can choose or cancel the checkbox Select Allow Network Users to Change My Files depending on whether we want to share the folder This is with read / write access (read / write) or Read-only access (read only).
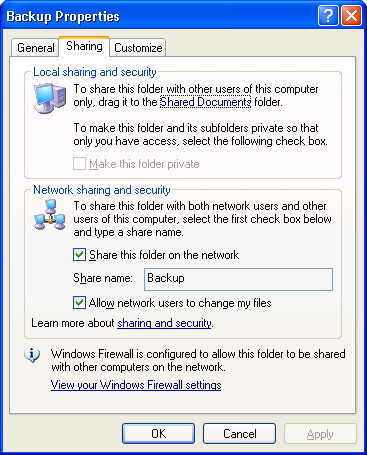
Figure 8: Sharing folders from Windows XP to the same HomeGroup shared in Workgroup.
With Windows Vista
Windows Vista does not integrate Simple File Sharing, and by default sharing the same directory as in Windows 7. However, depending on usage needs, there are a number of sharing settings in Windows Vista that we can use.
For example, we can create a dedicated sharing account as mentioned above, then use it from Windows XP and Windows 7 systems to access the shares on the Windows Vista system. Or we can cancel password-protected sharing and use the Public folder, which can be configured for read / write or read-only access, to share files to the HomeGroup.
For example, we can create a dedicated sharing account as mentioned above, then use it from Windows XP and Windows 7 systems to access the shares on the Windows Vista system. Or we can cancel password-protected sharing and use the Public folder, which can be configured for read / write or read-only access, to share files to the HomeGroup.
Share by
Jessica Tanner
Update 25 May 2019