10 ways to customize Word 2010
Network Management - It can be said that the most interesting thing for Word 2010 is its flexible interface and high customization capabilities, allowing you to customize what suits your needs in ways that Word 2007 does not.
Depending on what you like to do in Word, you can change and customize your preferences. You can set up the program to work as quickly as possible or you can arrange tools and document details to find and use them quickly. Word 2010 allows you to adjust some basic settings so that it works according to what you want.
1. Change the quick access Toolbar
The Quick Access Toolbar is a small set of tools located in the upper left corner of the Word 2010 screen. By default, the program provides tools such as Save, Undo and Repeat, but you You can click the Customize Quick Access Toolbar arrow at the end of the line to display more options. To add a tool to the toolbar, click it in the list. To customize more details, click More Commands to display the Quick Access Toolbar item in the Word Options box. Here, you can find and add the desired tools, set them to appear in all documents or just appear in the document you are working on, and even import or export settings. Customization of Quick Access Toolbar for use on other computers.
2. Add your tabs and groups to the Ribbon
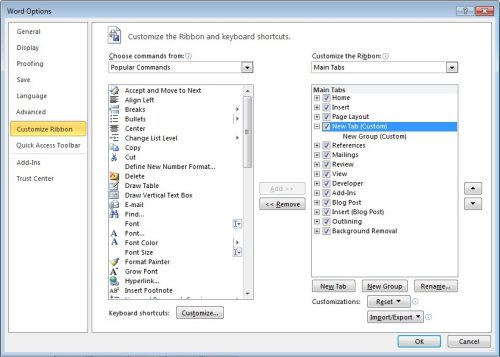
This is the setting that many of you want - allowing Word Ribbon to be adjusted. In Word 2010, you can easily add your tabs to the Ribbon, set the tab groups according to certain configurations. To add a new tab group, click the File and Options tab; Then click Customize Ribbon . Word will add your new tab immediately, after the tab you selected in the list (Figure A). Click New Tab on the right side of the dialog box, rename the tab, add and name the group. Now you can drag and drop the appropriate tools into the new group. Click OK to save the changes.
Figure A: You can add your own tabs or groups to the Ribbon, customize the necessary tools for certain projects.
3. Change the program color
There aren't many other skins to choose from, but if you don't like the default Word 2010 gray interface, you can change it to blue or black. The color scheme will appear in the Ribbon, the title bar, around the desktop area of the screen. By default, the program uses a gray scheme, which allows you to see subtle changes in Word 2010's interface design. When selecting a tool or option, a bit of space is available. Ribbon, colored events and borders will appear. Developers suggest selecting a black scheme will help you get high contrast, easy to read. Note that any changes you make to the color scheme apply to other Office 2010 applications, so it's no surprise that your Outlook window is different after doing so. change in Word 2010.
4. Add document properties
The Backstage view in Word 2010 allows users to easily observe and work with all types of file-related information. You can add tags to display documents easily in search. Besides, you can view document properties by clicking the File tab and selecting Info . Document properties will appear in the right pane. If you want to add all of Word's document properties to the list so that you can click and upgrade them, click Properties , then click Show All Properties . You can also add properties in the Document Panel at the top of the file by clicking Properties and selecting Document Panel .
5. Create your own Quick Parts
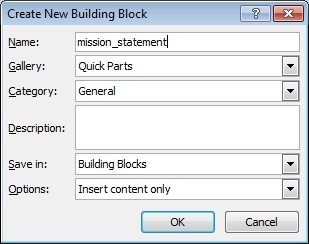
How many times in a year do you have to type the company statement to name the reports you write or the documents you send? You can create your own Quick Parts to save statements - perfect the font settings and formatting you need - so it can be easily inserted into documents. To create a separate Quick Part, you must first add the text or image you want to group in, then click it. Click the Insert tab, click Quick Parts . At the bottom of the list, click Save Selection To Quick Part Gallery . Finally, in the Create New Building Block dialog box (Figure B), enter the name of the Quick Part, select where you want it to appear, fill in the other options as needed. Click OK to save.

Figure B: You can easily create your own Quick Parts for use in documents
6. Set the default folder
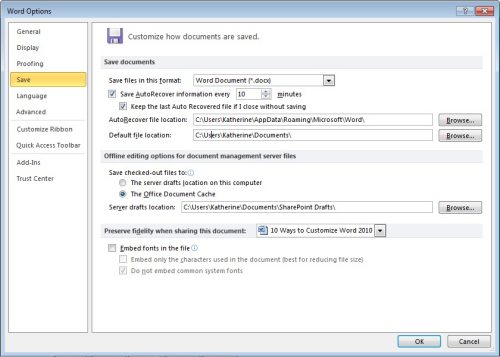
Are you tired of navigating through a series of folders to save a new file? In Word 2010, you can easily configure files to be placed somewhere for ease of operation. Because of saving the SharePoint site or Windows Live Skydrive account is part of the program, you can also choose shared folders to save your work. To change the default values, click the File and Options tab. In Word Options , click Save (Figure C). Click the Default File Location field and type in the path to the folder you want to use or click Browse to point to it. Similarly, if you are working on SharePoint and want to change where Word will store new documents, click the Server Drafts Location field and enter a new path, or click Browse to point to where you want to save the file. Click OK to save the changes.

Figure C: Set options for new shared documents in the Save tab of Word Options
You can also choose to host an online server (or Windows Live SkyDrive account) when you click the File , Save & Send tab and click Save To SharePoint or Save To Web .
7. Customize the page
Businesses often use document printing forms in a way that expresses their identity. Aligning settings can be very different, allowing readers to record more or simply leaving lots of free space for design purposes, possibly the same space in the header and footer, . and many other settings. You can do this by opening the Page Setup dialog box and setting up the page in the way you want, then click Set As Default . A prompt will ask if you want to continue, changes will be made to the Normal.dot template. Click Yes if you want to change. At this point, the new document will be created with the page settings you have set.
8. Display the style area
If you want to see what happens behind the script in the document (for example, the type used for the heading, which type is used for the body part, .), you can choose to display Style for your document. in Draft and Outline views. The Style area is a vertical column on the left side of the page, showing you all the styles used in the current file. Turn this on by clicking the File tab, clicking Options and Advanced . In the Display group, specify the amount of space required for the area in the Style Area Pane Width In Draft And Outline Views . Click OK after changing and displaying the document in Draft or Outline view to verify the changes that have just been set.
9. Organizing styles
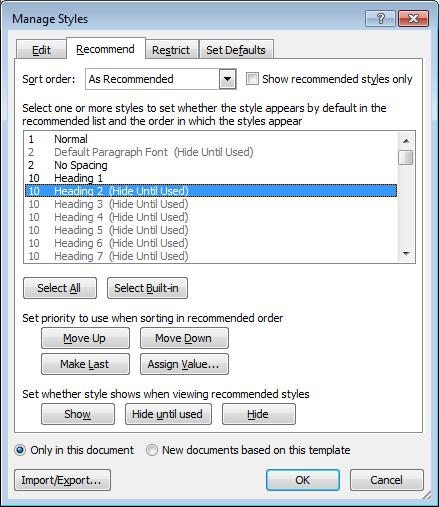
Are you interested in creating and working with your own styles? This is not a difficult task to do in Word 2010. Simply by formatting the text with the desired font, size, color and effect. Right-click your work and point to Styles , click Save Selection As A New Quick Style . If the styles start overcrowding in the Styles repository, you can organize them and create default favorites. First, click the launcher dialog in the Style group (in the Home tab) and click the Manage Styles button under the Styles panel. In the Recommend tab, click the style you want to change and click Set Whether This Style Shows When Viewing Recommended Styles . Find in the list and click the types you want to hide or display.

Figure D: Only show the desired styles by setting in the Recommend Styles Manage Styles tab
10. Set preferred fonts
Each of us has its own preferences when it comes to the font to use or read. To follow your preferences, you can set Word to use them in the Manage Styles dialog box. Click the Set Defaults tab and select the preferred Font settings, Size, Color, Position, Line Spacing and Paragraph Spacing. Click OK to save the settings.
