Explore the MS Word toolbar
The following tips will help you customize the Microsoft Word environment in order to increase the usefulness of toolbars and speed up your work.
The following tips will help you customize the Microsoft Word environment in order to increase the usefulness of toolbars and speed up your work.
Microsoft Word toolbars have function keys that speed up the daily word processing process you still do a lot. However, you can still customize those toolbars to make them even more practical and useful. For example, if you frequently use a certain 'symbol', you can create a button on the toolbar to insert the icon completely automatically. You can also add menu objects to the shortcut menu or even create a separate menu for MS Word. Let us review what we can do to make MS Word toolbars more useful.
To create a button on the toolbar to insert an icon into the text completely automatically and easily, go to Tools | Customize. In the Customize window, go to the Commands section and navigate to the All Commands option in the Categories list on the left hand side. In the All Commands window on the left, find the Symbol command. Click left on the Symbol command and drag and drop it onto any toolbar that you want the Symbol button to be there. When the Symbol dialog box appears, select an icon to insert. Click OK.

After you create the key press in the above way, the button will bear the name of the icon. To make the button more user-friendly, once again open the Customize dialog box and right-click the button you just created. Now you can see in the context menu, you can change the name or change the icon for that key.
Similarly using the above method you can add a button on the toolbar that allows you to insert a picture into the text completely automatically. Find the InsertPicture command in the list All commands and drag and drop it onto the toolbar that is most convenient for you. Then right-click the button you just created and select an image associated with that button by selecting Assign Hyperlink | Insert Picture. Remember, you must leave the Customize dialog box open while right-clicking on the button otherwise it won't work.
You can create photos for your toolbar buttons from any 16 x 16-pixel image. Then copy that image into the operating system clipboard and paste it in place of the button in the toolbar by right-clicking on the button you want to change and selecting Paste Button Image. Again remember to open the Customize dialog before right-clicking on the toolbar button.
To switch the button to insert a photo to other applications of the Microsoft Office suite, open the MS Office application you want to convert and the Customize dialog box in MS Word, right-click the button you want to move and select the Copy Button Image command. Switch to the application you want to move the button through and open the Customize dialog in the same way as in MS Word and use the Paste Button Image command as usual.
The All Commands list contains a series of Word commands that are similar to Symbol commands, such as Color, Column, Condensed, Expanded, Lowered, Raised, FontSize, and FileOpenFile . also by simple steps like above. . This way we ensure your document processing work will be greatly accelerated.
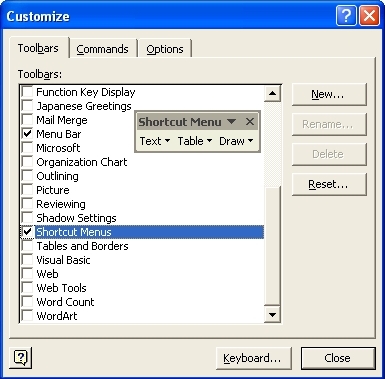
You can also customize MS Word by adding commands to the shortcut menu (Shortcut Menus). To do this, open the Customize dialog to the Toolbar section. In the list of Word toolbars, check the Shortcut Menus option. When this toolbar appears, select Text, Table, or Draw depending on your preference. With the new menu still open, switch to Commands in the Customize dialog box and drag and drop the necessary commands into this shortcut menu.
Another way to customize Word is to add one of the built-in menus in the application such as the Work menu. Word's built-in toolbars are also in the Tool | dialog Customize. Select Built-in menu in the Categories list on the left-hand side of the window and drag and drop the Work menu in the Commands list on the left to drop into any Word toolbar or system menu bar.
The Work menu bar contains links to files that allow you to open files quickly - a handy feature if you have to work with a lot of different documents. To operate this function, open the Customize dialog box and open a file that you want to add to the Word menu. With the file you open, select the Word menu Add To Work Menu, the file path is now saved in the Work menu and you can open it very quickly.
To remove the path of a file in the Work menu bar, press Ctrl + Alt + _ (the underline key), and the cursor has now changed to a large minus sign. Click on the Work menu and then click on the file you want to delete from the list. Note that not only files are deleted from the Work menu bar but also on your hard drive so be really careful when deleting a file. To avoid the situation that you often have to delete certain files from the list and lose that file, create a back-up copy of the file in another folder and then proceed to delete it from the list of Work menu because you are not warned by Word when deleting a file on the Work menu.
You have everything you need to make your work easier and faster than ever.But what if you want to bring everything back to its original state?Open the Customize dialog box and click the Reset button and select Yes.Everything is back to its original state.
Was this article helpful?
Your feedback helps us improve.
Related Articles
 New feature in Google Toolbar 5 for IE4 minutes read
 How to hide and show the Ribbon toolbar in Word and Excel3 minutes read
 How to quickly show lost toolbars in Word4 minutes read
 How to remove unwanted Toolbar on Chrome, Firefox, IE and Edge browsers?11 minutes read
 Turn off the Mini Toolbar and Live Preview features in Word 20131 minutes read
 How to remove the original Babylon Toolbar on IE, Chrome and Firefox?10 minutes read
Reader Comments 0
Sign in with email or Google to join the discussion.