10 great tools of Microsoft Word
QuanTriMang - Microsoft Word is the leading popular text editor today. It is everywhere, from offices, schools to private homes. Unless you have undergone a training course to use Word, you probably will only know and use a very small amount of it. This is really unfortunate because you have 'wasted' the great features of this text editor.

Most people use an average of only about 10% of Word's features
It is believed that most people only use about 10% of Microsoft Word features. One of the reasons is that there are many good features that are "buried" through many menus and toolbars. Even if you discover some hidden feature, it's difficult to use it regularly. However, this article will help solve the problem.
We will reveal to you 10 tools in Word 2003, 2007 and 2010 that everyone can 'benefit'. Some will help create data with a better looking interface while others save time and effort when performing repetitive tasks.
When equipped with this knowledge, you will spend less time each time using the software and have more time to create great data.
1. Save time with templates
Templates are special data types that can store structural and format information for commonly used data, such as mail and envelopes. Besides, Word also gives users a lot of template options.
To use this feature in Word 2003, click File → New and click the ' On my computer ' link in the right-hand panel. Select a card, select the template and click Create New and remember to select the Document radi .
In Word 2007, click the Office → New button and select Installed Templates from the list. In Word 2010, click File → New → Sample Templates . Select a template and click the Create button.
Some templates contain instructions, but it is often as simple as replacing text, then like storing data as usual. To save any data as a template, press F12 and select Word Template from the File type drop-down menu.
2. Display 2 parts of a data at the same time
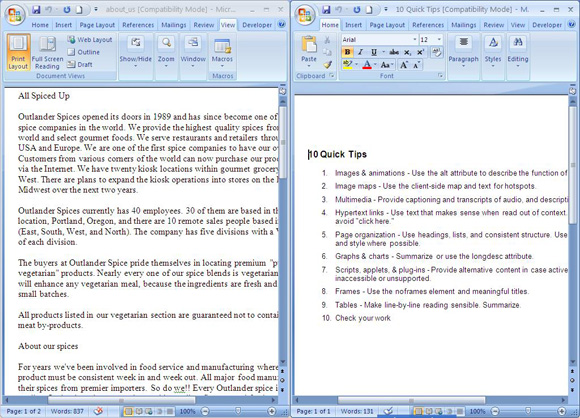
When working with long data, it will be difficult and inconvenient to scroll up and down between different items. Word has an obscure feature that can split a single data into two separate windows for users to see at the same time.
In Word 2003, click Window → Split . In Word 2007/2010, click View → Split . Move the mouse pointer to the place you want to split, then left-click the mouse. Each piece of text can be scrolled and zoomed in / out independently of each other.

To change the split position, click the split line between the two copies and drag it to the new location. To remove the split, users can drag the split bar to the end of the window or repeat the actions performed on the menu above and select Remove Split .
3. Create mail for multiple recipients
Sending a data to multiple recipients becomes much easier with the Mail Merge wizard in Word. In Word 2003, click Tools → Letters and Mailings → Mail Merge . In Word 2007/2010, click the Mailings tab and then click the Start Mail Merge button. Select Step by Step Mail Merge Wizard to start the wizard.
In all cases, the wizard table will appear to the right of the data. You can stop it by clicking the X button in the right corner of the table. Word can use Outlook's address book. Mail merge also has the ability to create emails, envelopes and labels. Or, simply, just create a list of addresses to print out (the wizard will call them an address book).
4. Compare 2 data in parallel
Word has a very smart feature for users to compare data by placing them side by side on the screen. In Word 2003, open the data, click Window and select Compare Side by Side with the remaining data. If there are more than 2 data open, a dialog box will appear to ask the user who wants to compare with which data.
2 data to compare will expand so that each data occupies half of the screen. When users scroll down on this data, the other data side will have the same effect. (Click the icon in the bottom left corner of the Compare Side by Side toolbar to disable it).
In Word 2007/2010, click View → View Side by Side . No other toolbar will appear but you can turn off the ability to scroll in parallel by clicking View → Synchronous Scrolling.

To turn off data display in parallel, in Word 2003, click Windows → Close Side by Side . In Word 2007/2010, click View → View Side by Side.
5. Translate data and use other tools
Word's Research panel helps users seamlessly access dictionaries, synonyms, translations and even search online. To open the Research panel, hover your mouse over any word (or highlight a phrase), hold down the Alt key and click the left mouse button. A table will be opened to the right of the data, displaying search results from all available reference services.
The search term is typed in the ' Search for ' dialog box and the service can be selected from the drop-down dialog box at the bottom. Dictionary, synonyms and translation are free. However, in addition to Bing, the Research pages listed there will require a small fee to view the full search results.
Select Translation from the list and click on the blue arrow icon (under ' Translate the whole document ' to translate all data for free by using Microsoft Translator, an online service.
To remove services from the list, click the Research option at the bottom of the table and click to remove the checkmark from what you don't want.
6. Open Word 2007/2010 data in Word 2003
One of the biggest changes in Word 2007 is the introduction of the .docx file format. This format cannot be opened in an earlier version of Word. However, Word 2003 users can install the Microsoft Office Compatibility Pack to open and save the saved data in the latest format.

In addition to allowing opening .docx data, after installing this package, there will be a new option ' Word 2007 Document' appear in the Save as type dialog box when you save the data. Word 2007/2010 users can save files in .doc format using the Save As command .
To make this format the default, click File → Options (or Office → Word Options button in Word 2007) and select Save . Select ' Word 97-2003 Document (* .doc) ' from the menu ' Save files in this format '.
7. Automate tasks with macros
Use macros to record keystrokes and reuse it at any time, saving you time and effort. In the example, we will create a simple macro with 6 rows and 7 columns using the shortcut Alt and T.
In Word 2007/2010, click the View tab and then click the down arrow below the Macro icon on the right and select Record Macro . In Word 2003, click Tools → Macros → Record New Macro . Enter the name in the Macro Name dialog box. Click Keyboard , press Alt and T at the same time, then click Assign → Close.
In Word 2007/2010, click Insert → Table → Insert Table and then enter 7 for the column number and 6 for the row number then select OK . Click View → the arrow below Macros and select Stop Recording . In Word 2003, click Tables → Insert → Table . Then enter the line number and column number and the line then click OK . Next, click Tools → Macro and Stop recording .
Macros can run at any time by pressing Alt + T - a table will appear at the cursor pointing. The macro will record all keystrokes and select the menu but does not have the ability to record the cursor movement. To delete or rename macros: In Word 2007/2010 click View → Macros ; In Word 2003, click Tools → Macro → Macros .
8. Explore Building Blocks
Building Blocks is a set of pre-created objects in Word 2007 and 2010. Users can use them while creating data. These include page styles, text boxes, headers and footers and page structure.
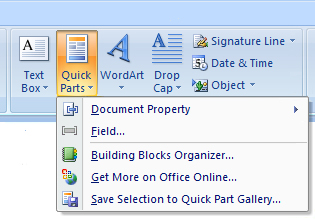
They will help your data look more professional. To use, click Insert → Quick Parts → Building Blocks Organizer . The list of items has been indexed and clicked on the name of each item to display a preview in the right panel. A short description will appear at the bottom. To insert an item into the data, click Insert .

Some items such as page numbers will also automatically create headers or / and footers, so they will appear on each page. For text boxes, just write the words you want to override the sample text.
9. Improve data with models
Creating a beautiful structure is time consuming because it will be difficult to get all the appropriate fonts and font colors. Word will make this easier with lots of data themes that contain typefaces, list types, colors and more to help make the data look more professional.
In Word 2003, click Format → Themes and select a theme to preview. Uncheck the ' Background image ' dialog box to remove the background image and check ' Vivid colours ' for more colors. Click OK to use that theme. Click Format → Styles and Formatting to see the existing styles - click one of them to use.
In Word 2007/2010, click Page Layout → Themes and select one of the built-in themes. The theme changes the style and color in the Styles section of the Home tab as well as changing the existing text, line and border colors. To reset by default, select Office theme .
10. Add header and footer
Headers and footers containing text and graphics are repeated on each page, such as page numbers.
In Word 2003, click View → Header and Footer . A dialog box appears at the top and bottom of the page and the Header and Footer toolbar appears. Click Insert Auto Text to automatically use pre-created news items such as dates and authors.
To automatically add page numbers, click on the icon to the right of the Auto Text button. Different page number formats can be selected by clicking on the 3rd icon from the left. Click the Close button to return to the data.

In Word 2007/2010, click Insert → Header (or Footer ) and choose a style you like. The Design tab will automatically open. Click on the ' Type text ' area at the top or bottom of the page to enter your own text. Click the Page Numbers or Date and Time button to select a format and insert these items.
To return to the body of the data, click Close Header and Footer. Then, to edit it again, just double click the header or footer.
So, we showed you 10 useful tools when writing documents. Hope they will help you to create professional and faster documents.