10 features in Word 2013 make working faster and easier
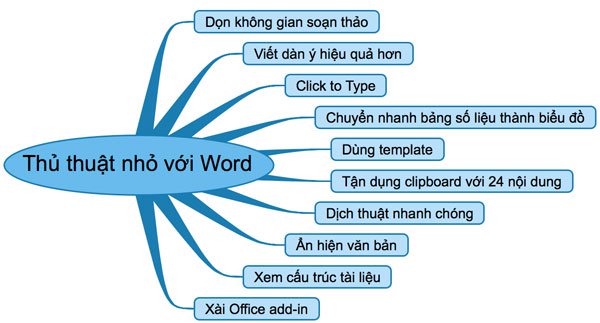
Every day I spend a lot of time using Word to type all kinds of documents and many other brothers are like me. And even though we already know how to format text, how to insert different graphic objects . but there are still features in Word that can help us work faster and easier. Here are 10 such features, and if you share anything else, it's welcome and invite you to comment on this topic too.
Download Microsoft Office 2013
1. Clean up the drafting space more widely
At typing, what we need most is concentration to be able to complete our work as quickly as possible. And instead of having all kinds of buttons distract us, Word 2013 lets you hide them all to leave an extremely neat and clean text input box. You just need to press Ctrl + F1 to hide the Ribbon on the top of the screen.
In addition, when reading long texts, you can also activate the new " Read mode " mode . Then all the nodes will be hidden, the interface between pages will be optimized for the horizontal, so the content fills the screen very happily. If you use Windows tablet, Read mode is more effective. How to enable it is to press Alt + W + F , or go to the ribbon " View "> " Read mode ".
2. Write a more convenient outline with Outline View mode
Instead of having to write everything in prison, you should write in front of the main ideas or headings for your text, then go into writing the following sections. If you use it well, you can speed up the work very much, even when editing and reading text, especially with long text or reports.

Outline mode in Word 2013 ( how to access: on the ribbon View> Outline View ) will help you to do this easily because you can compose items and then use the green arrow button to adjust the level arbitrary degrees ( support 9 different levels, from main to smallest ). This operation is obviously much faster than having to select each line of text and press the " Style "> " Heading " button as the traditional way. In addition, you can filter your text by subject levels to see more neatly and broadly with the " Show Level " box. For example, if you select Level 3, the headings 1, 2, 3 will be displayed.
3. Use Word to jot down your ideas
This feature is called Click and Type , which allows you to click anywhere on the text page and start typing right away without noticing downstream, headline, or alignment. In fact, Click and Type has been available since Word 2002 but now I recommend it to you. How to activate is as follows: go to the Ribbon View tab, switch to Print Layout or Web Layout to start editing. This way you can record your ideas as soon as they pop out, which is also quite interesting right?

4. Quickly turn the data sheet into a chart in 3 notes
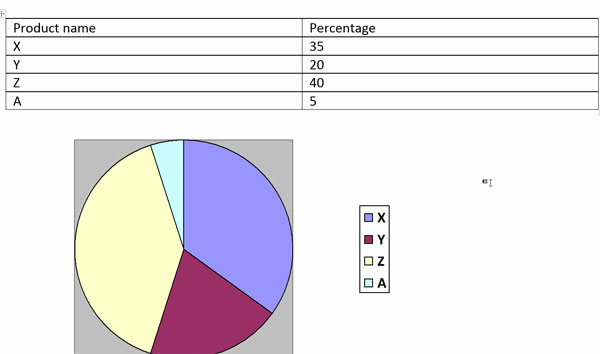
Do you have a datasheet in the Word file, and you want a more intuitive look by displaying it on the chart? Normally you will have to copy that data to Excel and then insert the chart, otherwise you have to re-enter the data after inserting a new chart into the open Word document. Both of these ways are quite time consuming, instead you only need to do 3 steps:
- Select the data table
- Go to Insert tab > Object> Microsoft Graph Chart

3. The chart will appear immediately, and you can adjust the chart type ( column, circle, point, line . ) and many other parameters at will.
Note that the chart created by the Microsoft Graph Chart is not very nice, so I mainly use it to visualize data and when finished viewing, it will be deleted, not left. If you want to create a better and more beautiful chart, you should use the normal Chart feature in Word.
5. Don't forget to use the template available
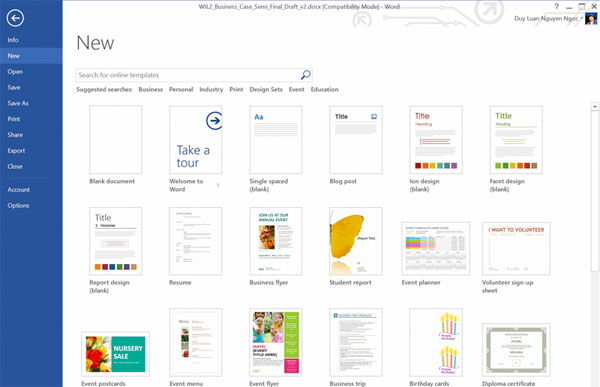
Word comes with lots of templates, ie templates that are written and partially pre-decorated. Most of these templates are very beautiful, from professional stuff to thank you letters. You just need to fill in the content according to your own will be done, while the decoration, the layout is already made available. To create a new document based on a template, go to File> New> select a template ( except the "Blank document" box, because it's just a blank document ). You can also search for more beautiful templates right in Word 2013 or go to Google.
6. You can copy up to 24 different content in Word
Every time you copy or cut something, the computer will move it to a temporary area called clipboard . Windows' Clipboard only has 1 data area, ie if you copy the text A and then copy B, then A will be deleted and make room for B. Meanwhile, Word can contain up to 24 content. different. This way you can copy from multiple places and paste it down very conveniently, without having to jump back and forth between multiple documents together.
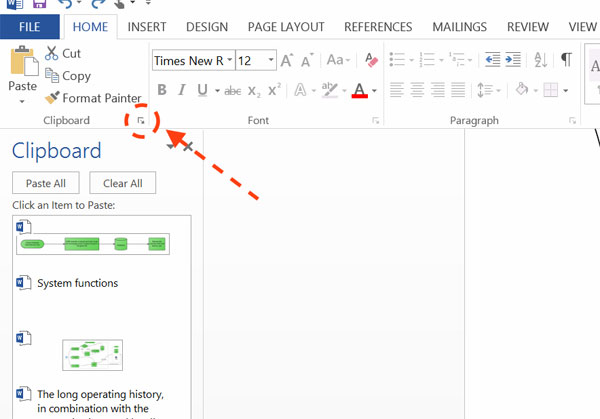
How to copy to Word's Clipboard just as usual, you can use the right-click menu or press Ctrl + C. Next click the small arrow in the " Clipboard " section of the Home tab, a new table will appear on the left side of the screen. Here are all the content that you copied, and every time you press Ctrl + C , a new content will appear ( until 24 pieces are full, the oldest content will be overwritten gradually). by the newer ). To paste a certain content into the document, just click it to be pasted into the document.
7. Translate right in Word
You are reading an English text and need to translate a short passage in Vietnamese? Instead of having to copy and upload the Google Translater or Bing website for translation, you can do it right in Word 2013. The translation engine used will be Microsoft Bing , and the translation content will be displayed at A new table on the right side of the window saves a lot of time for us.
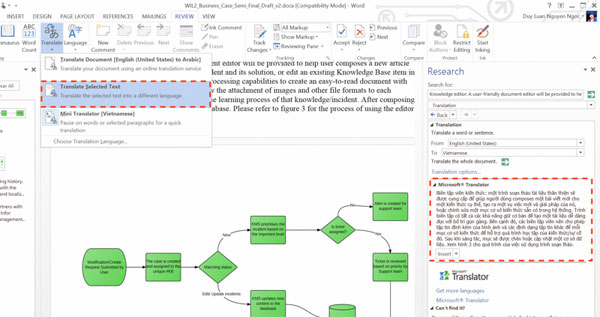
Usage is as follows:
- Select the text you want to translate
- Switch to Review card > Translate
- Select Translate Selected Text if you want to translate only a small piece of text
- Select Translate Document if you want to translate the document as well
- Click the " Insert " button in the translated text if you want to insert it into the document
In the new table that appears on the right, you can select the first and last language to translate, for example, from English to Vietnamese or Vietnamese to English. Note that there must be an Internet connection, the translation feature will work.
8. Hide any text
As the name suggests, this feature will hide a piece of text that you don't want others to see. Some use situations can be used to hide documents such as:
- Create a little puzzle
- Hide sensitive information
- Create a copy with the complete information of the document, the other is a summary that only prints a few important places. Instead of having to copy two different files, you can use the hidden feature to make it more compact and light.
- Insert a few words and then hide them for the purpose of text layout according to your own wishes.
How to hide text:
- Select the text you want to hide
- Go to Home> Font> press the small arrow icon> Font dialog box appears ( or Ctrl + D )
- Click on the " Hidden text " box to hide the text
- Click OK

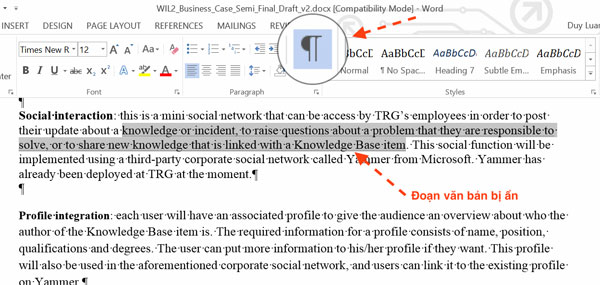
In case you want to see the hidden text, click the P-shaped icon as highlighted in the image below. The hidden text will appear but it is dotted. If you want to return it to normal, uncheck the " Hidden text " box according to the instructions above.
9. Browse quickly through the document structure
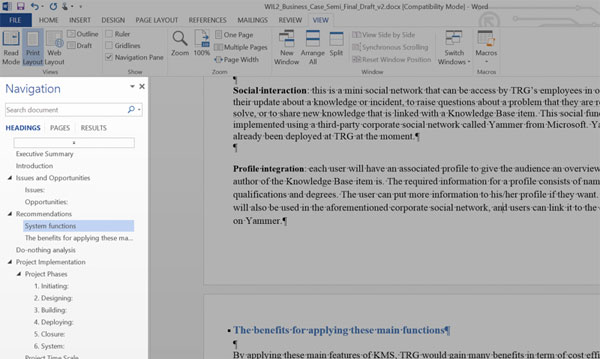
With well-formatted documents ( ie the format of the full heading ), you can quickly grasp the structure of the parts of the text as to what, the text refers to what content. You can even jump quickly to the part you want to see without scrolling crazy. All will be done via a small panel on the left hand side of the Word window, and this panel can be activated easily by going to the View tab> ticking the " Navigation Pane " box.
10. Use add-ins to work more efficiently
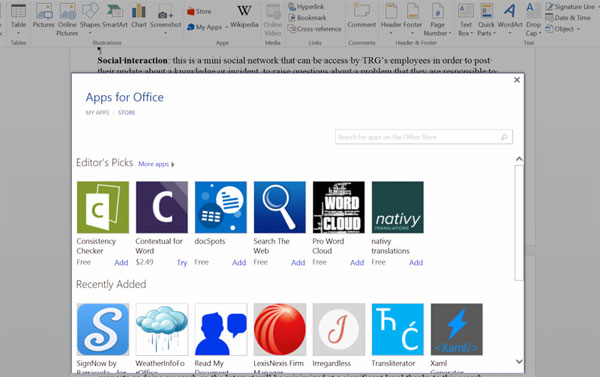
Microsoft Office 2013 suite is integrated with an add-in application store, which is small software that runs with Word, Excel, Outlook or PowerPoint to help us solve some problems that normally have to go to the new web. For example, you can integrate Bing Dictionary to look up words faster, use Bing Image to search for images, use tools to convert PDF files from images to plain text, calculation tools versatile right in Word . Please see the article 12 useful and free add-ins on Office 2013 to know how to install and more detailed features of these interesting small applications.
In addition, in the process of using the computer you often copy files or folders to different drives, after a period of use will make your hard drive become messy by duplicate files, take up all Hard drive capacity. But finding duplicate files in that data is actually not that simple, and some of the files you update have more data.