Windows Vista: Supporting users using Remote Assistance (Part 2)
 Windows Vista: Support users using Remote Assistance (part 1)
 Mitch Tulloch
Using RA in businesses
The main Remote Assistance scenario within a corporate network environment is the support of workstations in the corporate network and in a domain. The user's computer must be properly configured before they are granted RA. This is done through Group Policy, as explained in the previous section of this chapter with the heading ' RA Management with Group Policy '. In addition, the RA exception in Windows Firewall must be enabled.
Because most corporate networks have a perimeter firewall to block external access that wants access to the internal network, people who want to connect from outside to the corporate network can be more difficult. However, most businesses use virtual private network (VPN) technology to allow remote users to connect to their corporate network on the Internet, this type of scenario is fully feasible. Remote Assistance.
Use Remote Assistance in the company Help Desk environment
The standard method for using Remote Assistance in an enterprise environment is for Help Desk personnel to provide Remote Assistance to users who call to request assistance. Typical scenarios can be described below:
-
User Jane Dow has a problem configuring an application on her computer. She picked up the phone and called Help Desk, briefly explained the problem she encountered and asked for help.
-
A Help Desk user named Jacky Chen (helper) asks Jane about the full legal name or IP address of her computer. Jane responds with an information she obtained from computer properties or running ipconfig.
-
Jacky uses Remote Assistance on his computer and uses the Offer RA feature to help Jane. A dialog box appears on Jane's computer, which asks her if she wants to allow Jacky to connect to her computer.
-
Jane accepts the request and Jane's computer can temporarily change the network bandwidth used by the RA session. The open RA window on Jane's screen tells her that she is being helped by Jacky.
-
At this point, Jacky can see Jane's screen but he cannot control it. Jane then explained the problem and she was having, with the 'chat' feature of RA or by phone. Jacky asks Jane to take a series of steps to fix the problem and see her screen in his own RA window what she's doing.
-
If the instructions Jacky offers are too complicated or if the time is limited, Jacky may ask Jane to share control on the computer. If Jane agrees, Jacky clicks the Request Control button at the top of his RA window. A dialog box appears on Jane's desktop asking if she would like to give Jacky permission to share control on her computer. Jane accepts the command window and also selects the option to allow Jacky to respond to the UAC command prompt - User Account Control on Jane's computer.
-
Now Jacky has connected to Jane's computer with Jane's information and he can view her screen and interact with it via his mouse and keyboard. Jacky then continues to take the necessary steps to solve the problem, fix the problem or give instructions that can help Jane fix them if they appear again. If at any time Jane wants Jacky to remove control of the computer, she can click the Stop Sharing button, the Disconnect button or press the Esc key.
Other RA usage scenarios
Many other RA scenarios can also be used for businesses, from large businesses to small office environments or at home. Here are some scenarios for using RA:
-
People who are having problems configuring an application on their computer can call Help Desk to request assistance. Helpers can use Offer RA to connect to users' computers, request their on-screen controls, and show users how to configure their applications. This is the standard scenario for Help Desk in businesses and is described in more detail in the section titled 'Typical RA scenario for corporate Help Desk' in this article.
-
Users who are having trouble installing the printer have sent an help request to Help Desk using Windows Mail. Helpers check email sent to their department, open attachments and connect to users' computers. The Helper asks for control on the user's computer and instructs him on the steps to install the printer.
-
Users are on the road connected to the internal corporate network with a VPN connection on the Internet. He has problems configuring Windows Mail, so he opens Windows Messenger and notifies someone in the company's support team that is online. He sends an RA invitation to the helper with Windows Messenger, the Helper will respond to this invitation, request control and show the user how to configure Windows Mail.
These pre-existing scenarios cannot be fully intended with support scenarios in companies. However, the enterprise environment will use Offer RA to provide support to users who have called the help team when they have problems. Some businesses also allow users to submit RA invitations via email or by saving invitations to shared networks, and they are regularly checked by the support team. Other scenarios can use the IM application to support RA within the corporate network.
Helper can have multiple Assistance sessions open simultaneously - each session for each user. However, users only have one Remote Assistance session in the Waiting For Connect state. Created invitations can be sent to multiple recipients - to anyone who can connect. All subsequent connection attempts will be locked until the first helper disconnects, then another helper can connect. If the user disconnects the session, the Remote Assistance application will end and no connection will be allowed .
Interact with RA in Windows XP
Remote Assistance in Vista is compatible with RA in Windows XP with some limitations:
-
Offer RA from Vista to XP is supported, but Offer RA from XP to Vista is not supported. This means that businesses that want to add Offer RA as a support solution for their Help Desk must support a computer that supports Vista.
-
NAT traversal with Teredo and IPv6 is only supported on Vista with Vista RA without support from Vista with XP.
-
Voice support for RA in XP is also not supported as in Vista, any attempt made by users on an XP computer to use this feature during an RA session with a computer helper Vista will cause a message to indicate this restriction.
-
The MAILTO method of attracting assistance supported by RA in XP is not supported by RA in Vista.
-
Windows Messenger (the component used on XP) is not used with Vista. Users of RA with Windows Messenger in XP need to switch to an IM carrier that supports Vista and Remote Assistance. Windows Live Messenger currently supports XP, Vista and RA.
-
Offer RA via Messenger is a new feature in Vista and not available in Windows XP.
Execution and management of RA
Remote Assistance is a powerful and flexible feature that can be used in many ways to support users within large and medium businesses. In this section we will outline how to initialize RA sessions from the UI and the command line. It also describes how to use RA in the assistance of a business with two scenarios:
-
Helpers provide RA to users (callers come to the support team for help with their problems).
-
Users create an RA invitation and save it in a shared network, which is regularly checked by the help team.
Information on RA execution scripts, including sending invitations with Windows Mail and Windows Messenger, will be provided to you in the following articles.
Initialize RA sessions
Remote Assistance sessions can be initiated from the user interface or command line utility. A significant idea from the helper's context is that Offer RA will be quickly forgotten about helping out as it did in XP, but now you can access it easily through the GUI.
Initialize RA from GUI
The initialization of RA sessions from the GUI can be done using the following methods:
-
From the Start menu, click Start > All Programs > Maintenance > Windows Remote Assistance . Doing so will create an RA application.
-
Click Start > Help And Support , and then click Windows Remote Assistance .
-
Click Start , type assistance , and when Windows Remote Assistance appears in the program list, click it.
One of the above methods will open the initial RA window as shown in Figure 2 below.
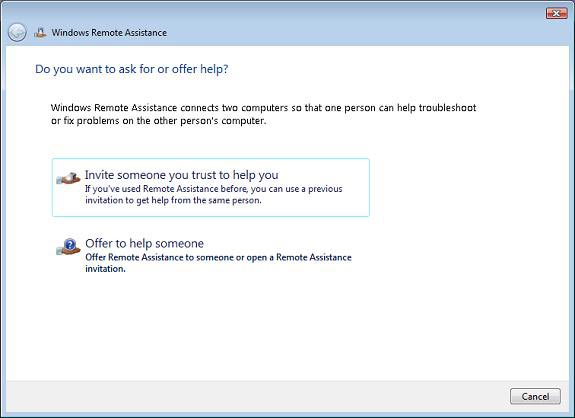
Figure 2: Initial screen of Windows Remote Assistance
Initialize RA from the command line
RA in Vista is executed via the msra.exe command. You can initiate Remote sessions directly from the command line or by script. The syntax and usage of this command are explained in Table 3 below.
Option
Describe
/ novice
Launches Remote Assistance as Novice in Solicited Remote mode and shows the user the option to send the Remote Assistance card using an SMAPI-enabled email application such as Windows Mail or by saving the invitation as a file.When this option is made, Windows Remote Assistance will open on the computer in the Waiting For Connect state.
/ expert
Launch Remote Assistance in the Helper mode and show the user the option to specify the location of the Remote Assistance card to open or specify the Novice's computer name or address (Offer RA).The computer name can be the host name (if the Novice is on the local subnet) or the full name (DNS name), and the address may be an IPv4 or IPv6 address.Unsolicited RA without an invitation needs a preconfigured configuration on the remote computer to be helped.
/ offerRA computer
Launch Remote Assistance as a helper in Unsolicited (Offer) Remote Assistance mode and use DCOM to remotely open Remote Assistance on Novice's computer and then connect to this computer to initiate an RA session.The Novice computer can be specified with a host name (if Novice is on the internal subnet) or the full name (DNS name), and the address can be either IPv4 or IPv6 address.This method will be introduced in detail for you later.
/ email password
Launch Remote Assistance as Novice in Solicited RA mode and create an RA card with a password protected with the new RA invitation message opened by the e-mail client that supports default SMAPI (usually Windows by default) Mail).Password must be 6 characters or more.The e-mail client application launches a window with the invitation file attached.The user must enter the helper's email address in the To field to send a message to the helper.
/ saveasfile path password
Launch Remote Assistance as Novice in Solicited RA mode and create a password-protected RA card and be saved at a specific path.The path may be to a local or shared network and the user must have the appropriate permissions on the destination directory to create the file.The path must include the file name for the tag.(The .MsRcIncident extension will automatically be added to the file name.)Password must be at least 6 characters.This method will be demonstrated in some other scenarios.
/ password openfile path
Launch Remote Assistance as a helper and open the previously created RA card and save it in any path.The path may be to a specific directory or to a shared network and the helper must have legal rights on the destination folder to open the file.The path must include the file name of a valid card with the .MsRcIncident extension.Password must be the same as the password used by the user when creating the card.
Note : There is no support for Windows Managing Instrumentation (WMI) script of msra.exe .
Scenario # 1: Offer RA using DCOM
Before you can provide RA to other users, your user account must be identified as a helper on the user's computer. You can use Group Policy to do this in an enterprise environment.
When a support person (or a specific group) has been configured as a helper for all Vista computers in a domain or OU, the Helper can provide RA to users of machines. This is when they need support. For this scenario, for example, Tony Allen ( tallen@contoso.com ) is a Vista user who needs help to solve a problem on his computer. Tony phoned the help office and the call was received by Karen Berg ( kberg@contoso.com ), who asked Tony about his computer's name or IP address. Tony provides Karen with all the necessary information (TALLEN-PC.contoso.com) or IP address, and Karen then gives Tony assistance with the following steps:
-
Start RA with any of the previously introduced methods
-
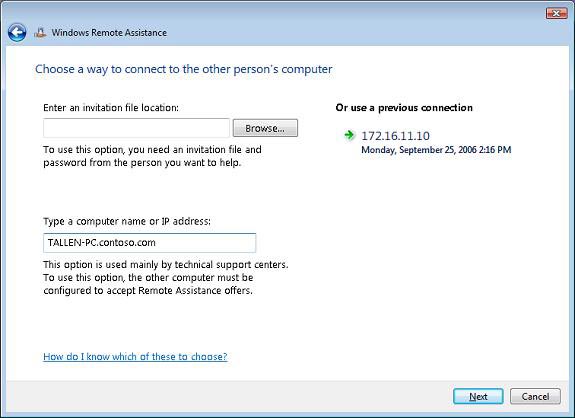
Click Offer To Help Someone .
-
Enter ' TALLEN-PC.contoso.com ' in the field labeled Type A Computer Name Or IP Address :
-
Click Next
Now a dialog box will appear on Tony's computer asking him if he wants to allow Karen to connect to his computer and view the desktop. Tony has two minutes to reply to this dialog box before the time out timeline appears, when an expiration date, a message will appear saying "the person you want help with is not answered" on Karen's computer . Karen can resubmit the offer by selecting from the list of previous connections displayed in the RA application (Figure 3). If Tony accepts the offer, the RA session is started and Tony's computer will be viewed by Karen through the RA application window on his computer.
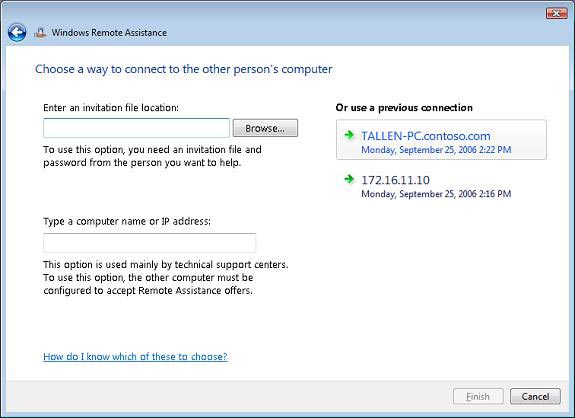
Figure 3: Latest RA invitations and suggestions listed
under Or Use A Previous Connection
Here, the desktop properties of Tony's computer can be changed (based on configurable settings) to optimize the network bandwidth used by the RA for screen display on Karen's computer. Karen can request control from Tony, send files to Tony or receive files from him, or chat with Tony, or cancel sessions. Tony can send and receive files, chat, suspend or cancel session connections.
Note : If you are a user and a helper has shared control on your computer, you can immediately end the sharing right and return the session to Screen Sharing status by pressing Esc
Scenario # 2: Soliciting Remote Assistance by creating RA cards and saving them on a shared network are checked
Another way to use RA in an enterprise environment is that users have to create invitation files and save them on a shared network, which is always checked by the help desk staff. In this way, when the help team detects that a new card has been uploaded for sharing, the helpdesk can call the user by phone to get the password for the card and then use it to set up Create an RA session with the person in need.
To make the procedure easier, administrators have deployed a script on the user's computer using the Remote Assistance command line (msra.exe) to create invitation files and save them on a network share. share. For example, the user invitation files are uploaded to FILESRV3.contoso.comSupportIncomingTickets , a folder in Support sharing on the server named FILESRV3. The script named SubmitTicket.vbs below can be deployed on each user computer to perform this task:
dim strPassword
dim strUser
dim strTicketName
strPassword = InputBox ("Enter a password for your ticket")
Set WshShell = Wscript.CreateObject ("Wscript.Shell")
strUser = WshShell.ExpandEnvironmentStrings ("% username%")
strTicketName = strUser & "-" & Year (Now) & "-" & Month (Now) & "-" & Day (Now) & _
"-" & Hour (Now) & "-" & Minute (Now) & "-" & Second (Now)
strRA = "msra.exe / saveasfile FILESRV3SupportIncomingTickets" & _
strTicketName & "" & strPassword
WshShell.Run strRA
When a user double-clicks on this script to run it, an input box will appear asking the user to enter the password used to protect the invitation. After the user provides the password, a new RA card will be created and saved to the destination folder on the server. The name of the card must be unique and include the user's name followed by the date as for tallen-YYYY-MM-DD-HH-MM-SS.MsRcIncident . When the helper checks the sharing he obtains the password of the card using the OOB method (like a phone call), the helper opens the card. After the user agrees, the RA connection is established.
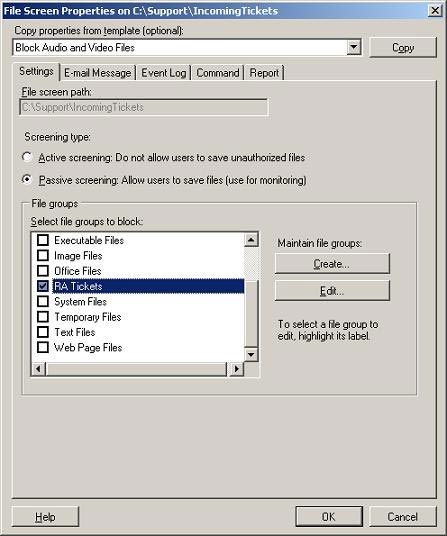
To check the IncomingTickets folder in a network share, help staff can use the file screen feature of Windows Server 2003 R2. To do this you can create a passive file screen to check the directory and send an email alert to Help Desk whenever a new card is downloaded to the folder. The steps are given below:
-
Install or upgrade File Server on a Windows Server 2003 R2 computer, where the Support folder is located
-
Start File Server Resource Manager from Administrative Tools, right-click on the root node then select Configure Options .
-
Specify the DNS name of the IP address of an SMTP host that can be used to forward the email message generated by the file screen that you will create.
-
Click OK to close the File Server Resource Manager Options, select File Screens under File Screening Management.
-
Select the Create File Screen option in the Action section
-
Click Browse to select the Incoming folder for File Screen Path.
-
Select the option labeled Define Custom File Screen Properties and click Custom Properties .
-
Choose the option of Passive Screening so that uploaded cards will be checked and not locked by the screen.
-
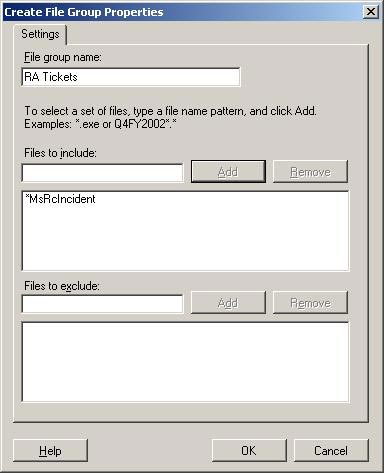
Click Create to create a new file group called RA Tickets and use the Add button to add files of type * MsRcIncident to the group.
-
Click OK to return to the properties page for the new file screen, then check the checkbox for the RA Tickets file group you just created.
-
Click the Email tab and specify the support alias (such as support@contoso.com ) that will be notified wherever a new card is uploaded to the directory. Configure appropriate content and titles for newsletters.
-
Click Create to create a new file screen then select the option to save the screen without creating a template.
-
Check the new file screen by opening the command line window on the user's computer and typing msra.exe / saveasfile path password in which path is the UNC path to the Incoming folder in Support on the server, and the password is password Any password with more than 6 characters.
 Windows Vista: Supporting users using Remote Assistance (Part 3)