Hide data into a secure location - Part 2: Vista
 Hide data into a safe location - Part 1: Windows XP
Network administration - Data will be safer if you don't store them on the same partition as Windows and your programs. In the previous article of this series, I showed you how to do it with the XP operating system, in this second part, we will cover how to do it in Windows Vista.
Restoring Windows to its brand-new condition (very necessary work) is often involved in losing everything on the system partition of the hard drive. It can be documents, photos and anything we can call 'data'. Transferring data to another partition will complement you with an extra layer of security and other convenience.
Before you begin, you need to create an image backup for your drive, this is to ensure your safety.
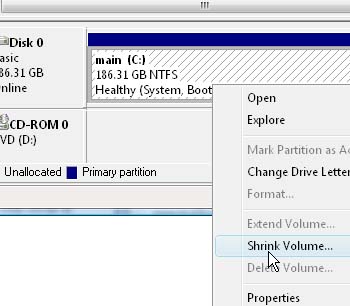
Reduce the size of your existing partition and create a new partition. Select Start, type diskmgmt.msc , and press ENTER . In the Disk Management program that appears, right-click on your hard drive partition and select Shrink Volume. Fill in the dialog box that appears. When the partition has shrunk, right-click the Unallocated check box and select New Simple Volume, then follow the instructions in the wizard. The default settings will be pretty good settings for normal use.

Once you've set up two partitions, make your computer show all hidden files and folders: in Windows Explorer, select Organize, then Folder and Search Options. Click the View tab, select Show hidden files and folders, and click OK. You can change it again when you have completed the instructions in the lesson if you want.
Then to be safe, backup your registry.
For convenience purposes, we will call the new partition, maybe D: or E: X:. Will also call your username as logon.
Navigate in Windows Explorer to the data you created (we call X:) and create a new folder named logon . Then select Start and click on the username at the top of the Start menu to launch another Windows Explorer window, which will bring up the old C: Users logon folder .
Let's start by moving the Documents folder: Right-click Documents and select Properties. Click the Location tab . Enter the new path X: logon Documents . (Now you know what the meaning of X: and logon is). Answer to all Windows questions.
You can see that the Documents folder still exists in the C: Users folder when Windows finishes. Not interested in that because the actual files are now on the X: drive. If you do not believe, open the Documents folder and click on the address bar like:

You will then see:

This trick works in all folders in your login except AppData. You can decide which of these folders you want to transfer.
You can also see some files in the login folder, named ntuser. *. Do not transfer these files. They are components of the Registry.
The AppData folder has things you may want to transfer or may not. While Windows does not want you to transfer any of these components, there is a way to transfer the components you want to transfer.
In x: logon, create a folder called AppData . Then in: Users logon , open the old AppData folder and drag the Roaming folder to D: logon appdata. This is a copy operation, not a folder.
At this point, you must edit the Registry. Select Start , type regedit , and press ENTER . In the left pane, navigate to select HKEY_CURRENT_USERSoftwareMicrosoftWindowsCurrentVersionExplorerUser Shell Folders . Double-click the AppData value, change the 'Value data' field to X : logon Application DataRoaming , press ENTER . Restart the computer and go to C: Users logon AppDataRoaming (assuming it's C drive :) and delete all folders except Microsoft.
If you are not using Outlook or Windows Mail, then here is your end. If you use these additional software, please do some additional instructions below:
Outlook: In Windows Explorer, navigate to and select C: UserslogonAppDataLocalMicrosoft . Inside this folder, you will see a subfolder called 'Outlook'. Convert it to X: logonApplication Data .
Then select Start, Control Panel . Double-click the Mail icon (if you don't see this icon, click Switch to Classic View ). Click the Data Files button. In the Data Files tab, click on the Personal Folders list (there may be only one view). Click OK when you see the error message. Browse in the dialog that appears to X: logonApplication DataOutlook , double-click the displayed file and close the other dialogs.
Windows Mail: Open Windows Mail and select Tools, Options , click the Advanced tab, and the Maintenance button, followed by the Store Folder button. Click Change, and select a new location. When you close Windows Mail, the program will copy the files to their new home.
You should read it
- ★ 6 utilities turn Windows XP into another operating system
- ★ History of Microsoft Windows operating system throughout the ages
- ★ Hide data into a safe location - Part 1: Windows XP
- ★ Despite Microsoft's efforts, Windows 7 is still used in nearly 50% of businesses surveyed
- ★ At its worst, Windows Vista is Microsoft's most beautiful operating system