How to Enable Remote Desktop
This wikiHow teaches you how to enable Remote Desktop on Windows 10 (Pro and Enterprise), Windows 8 (Pro and Enterprise), Windows 7, Windows Vista, and Windows XP, plus how to enable Remote Management for macOS. Make sure you're using a....
Method 1 of 4:
Windows 10 and 8
-
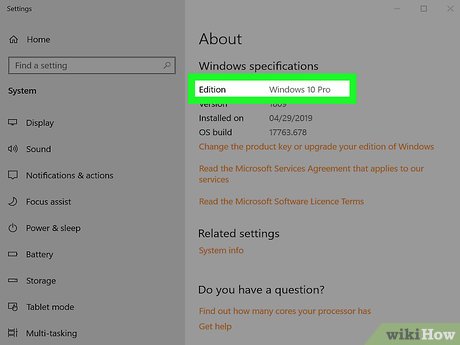 Make sure you're using a version of Windows that supports Remote Desktop. You cannot enable incoming Remote Desktop connections if you're using the Home edition of Windows 10. The only versions of Windows 10 that allow incoming Remote Desktop connections are the Pro and Enterprise versions.[1]
 -
 Click the Startmenu. It's usually at the bottom-left corner of the screen.
-
 Click Settings. It's near the bottom of the menu.
-
 Click System. It's at the top of the list.
 -
 Click Remote Desktop. It's near the bottom of the left panel.
- If you're using Windows Home edition, you'll see a message that says your edition is not supported.
-
 Slide the 'Enable Remote Desktop' switch to On. A confirmation message will appear.[2]
-
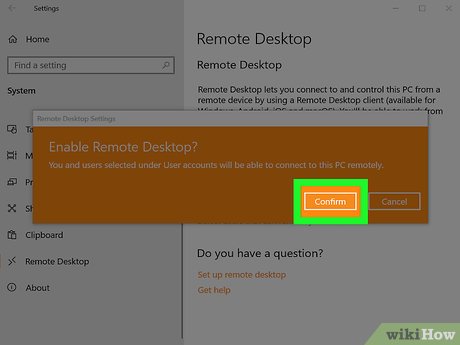 Click Confirm. Remote Desktop is now enabled on this PC.
- The two options below ('Keep my PC awake for connection' and 'Make my PC discoverable on private networks') are automatically selected so the PC stays ready for Remote Desktop connections. Click Show settings next to either of these options if you'd like to adjust these settings.
- Depending on how your network is set up, you may have to make changes to your firewall or router to allow incoming connections.
-
 Click Advanced settings. It's at the bottom of the 'Enable Remote Desktop' section.
 -
 Enable or disable Network Level Authentication. The option you select depends on your network:
- If people will be connecting to this computer from the outside world: Remove the check mark from 'Require computers to use Network Level Authentication to connect (recommended),' and then click the back button when you're finished.
- If this PC is on a local network and users from that network will need to connect with their network accounts: Make sure there's a check mark in the box next to 'Require computers to use Network Level Authentication to connect (recommended),' and then click the back button.[3]
-
 Click Select users that can remotely access this PC. It's under the 'User accounts' section.
 -
 Add the users you want to allow to connect to the computer. Only the users you allow here will be able to access this PC via Remote Desktop. Once you've added users, they'll be able to connect to this PC via Remote Desktop.[4]
Method 2 of 4:
Windows 7 and Vista
-
 Click the Start menu.
- You must be logged in with an Administrator account to enable Remote Desktop.
-
 Right-click on "Computer" first and select Properties.
 -
 Click Remote settings. It's in the left panel.
 -
 Check the box next to "Allow Remote Assistance connections to this computer." It's under "Remote Assistance."
- Make sure the "Don't allow connections to this computer" radio button is not checked.
-
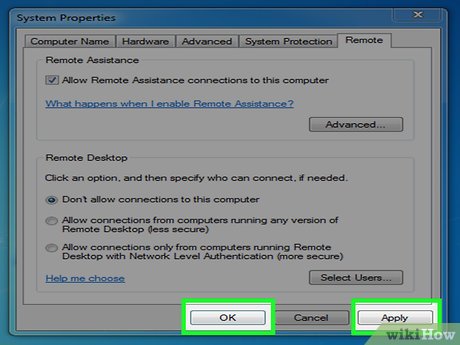 Click Apply and then OK. Leave your computer running and make sure it stays connected to the Internet. Your computer is now ready to be accessed remotely.
Method 3 of 4:
Windows XP
-
 Click the Start menu. It's usually at the bottom-left corner of the screen.
 -
 Click Control Panel.
 -
 Click Performance and Maintenance.
 -
 Click System.
 -
 Click the Remote tab.
 -
 Check the box labeled "Allow users to connect remotely to this computer."
 -
 Click OK.
 -
 Return to the Control Panel and select Security Center.
 -
 Click Windows Firewall.
 -
 Uncheck the "Don't allow exceptions" box.
 -
 Click the Exceptions tab and check the "Remote desktop" box.
 -
 Click OK.
 -
 Leave your computer running connected to the Internet. Your computer is now ready to be accessed remotely.
Method 4 of 4:
macOS Remote Management
-
 Click the Applemenu. It's at the top-left corner of the screen.[5]
- After enabling Remote Management on your Mac, you may have to adjust your firewall settings to allow incoming connections.
-
 Click System Preferences.
 -
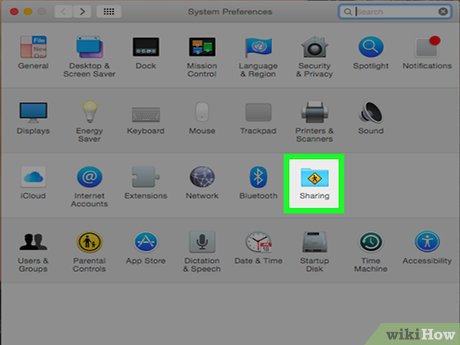 Click Sharing. A list of sharing types will appear on the left side of the window.
 -
 Select Remote Management. Check the box next to this option to enable it. It's in the left column.
 -
 Choose who can connect to your Mac remotely. Choose your desired option under 'Allow access for' on the right side of the window.
- To allow anyone with an account to log in, select 'All users.'
- To only allow specific user accounts to log in remotely, select 'Only these users,' and then add each user to the list.[6]
-
 Select a user and click Options. If you didn't add a specific user, just click Options. This opens a list of things users can do when logged in remotely.
 -
 Select rights for the user(s) and click OK. The options you select depend on what you want that user to be able to do when logged in.
 -
 Click Computer Settings. It's near the top-right area of the window.
 -
 Choose your desired settings and click OK. Your needs will vary depending on what you want people to be able to do when signed in.
- If users will connect with VNC, check the box next to 'VNC viewers may control screen with password,' and then enter a password. Make sure anyone who uses VNC to connect remotely has that password.
-
 Allow Remote Management through your firewall. If you're using the built-in firewall on your Mac, you'll need to allow Remote Management through. Here's how:
- Go back to System Preferences and click Security & Privacy.[7]
- Click the Firewall tab.
- Click Firewall Options or Advanced.
- If 'Remote Management' doesn't appear in the box with the phrase 'Allow incoming connections,' click the + to add it, and then select Allow incoming connections.[8]