Macromedia Flash - Text display effect
This lesson will show you how to create a very nice text effect that can be used in some banner effects, advertisements, and presentation files ...
This lesson will show you how to create a very nice text effect that can be used in some banner effects, advertisements, and presentations . With this exercise, you will not need to use Action Script code.
Step 1
Open a new flash file.
Step 2
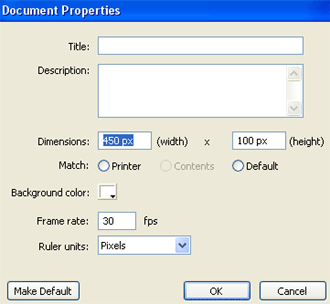
Select Modify > Document (shortcut Ctrl + J ). Set the width of the file to 450 pixels and the height to 100 pixels. Select white as background color (#FFFFFF) and frame rate to 28. Then click OK .
Step 3
Select the Pencil Tool (Y) and from the Pencil Tool options in Toolbox panel, select Ink . See the following picture:

Step 4
After that, go to the Properties Panel (Ctrl + F3) and select the black stroke color, the stroke type is Solid , the thickness is 3 .

Draw a line like the following image

Step 5
Grab the Text Tool (A), go to the Properties Panel (Ctrl + F3) below the stage. Then select the following options:
1. Select the Static Text type
2. Select MT Bold Script font (or according to which font you want to use)
3. Select the font size of 30 and be bold ( B )
4. The selected text color is black
5. Under the font size and font color choose Anti-alias for readability

Step 6
Then enter the text content. The example in this case is ' Mother '.

Step 7
Pick the Pencil Tool again (Y) and draw another line after the text like the following image

Step 8
After that, select the Text Tool (A) and enter another letter after the drawing. Select the text you just entered, go to the Properties Panel (Ctrl + F3) and change the font to 38.


Step 9
Again select the Pencil Tool (Y) and draw the following:

Step 10
Reselect the Text Tool (A) and enter another word. Then select the text you just entered, go to the Properties Panel (Ctrl + F3) and select the font of 28.

Repeat the process until the remaining word:

Step 11
Double click on layer 1 and rename it to text . After that, click on frame 125 and press F5.
Step 12
Create a new layer above the text layer and name it mask .

Step 13
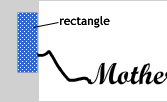
Lock the text layer, select the mask layer and select the Rectangle Tool (R). In the Colors section of the Tool Panel, lock the Stroke border color by clicking on the pencil icon and select the square with the red diagonal line. In Fill color choose any color, draw a rectangle about 20 x 60px and place the rectangle just as it appears in the following image.
Step 14
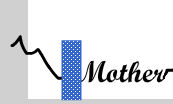
Click on frame 15 and press F6. After that, place the rectangle a little, like the following figure
Step 15
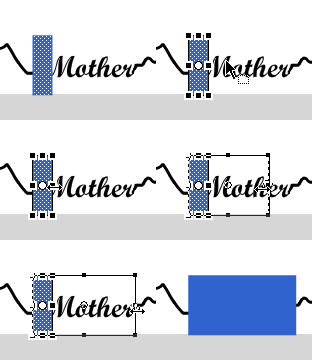
Click on frame 25 and press F6. Select the Free Transform Tool (Q), press and hold Shift and follow the steps below.
Step 16
Click on frame 35 and press F6. Select the Free Transform Tool (Q), press Shift key again and continue to do the following.
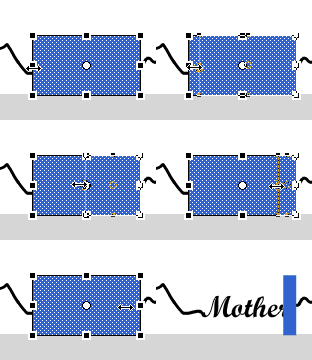
Step 17
Click on frame 45 and press F6. After that, place the rectangle in the position like the following image

Step 18
Click on frame 55 and press F6.
Step 19
After that, select the Free Transform Tool (Q) and enlarge the rectangle (similar to the way in step 13) to hide the text.

Repeat the above process until the last word.
Step 20
Select the layer mask and go to the Properties Panel (Ctrl + F3). In the section Tween choose Shape .

Step 21
Select the mask layer and convert it to a mask by right-clicking on the layer mask name and selecting Mask .
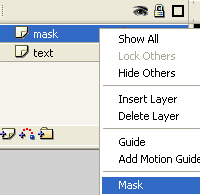
Check your work by pressing Ctrl + Enter. You can download the source file here.


 Steps to change Taskbar position on Windows 11
  Instructions to block ads on Smart TV
  How to change the image background color with the Paint 3D application
  How to install Bliss OS X86 on PC and VirtualBox
  Steps to fix printer not showing up in Windows Remote Desktop session
  How to install Nextcloud server on Windows 10