Macromedia Flash - Create menu effects
This lesson will show you how to create a flash menu with the effect when moving the mouse. To create this post, you will have to use the Action Script code.
This lesson will show you how to create a flash menu with the effect when moving the mouse. To create this post, you will have to use the Action Script code. In addition, menu design is very simple.
Step 1
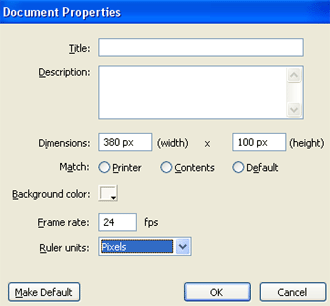
Create a new flash file. Go to Modify > Document (Ctrl + J). Set the width of the file to 380 px and the height to 100 px. Choose # f8f8f2 as background color and set the Frame rate to 24 fps . Completely click OK .

Step 2
Pick the Rectangle Tool (R). In the Colors section of the tool panel, lock the border color by clicking on the Stroke color (with a small pencil icon) then select a white square with a red diagonal. Set the background color to # 393939 and draw a square about 70 x 70px and place it in the position shown below.

Step 3
While the rectangle is still selected, take the Selection Tool (V), press and hold the Shift key while dragging and releasing the mouse to multiply the square by many shapes.

Step 4
Still select the Selection Tool (V), select the second square and change its color to # FF5400

Step 5
Select the third square and set its color to # 19A3CB .
Step 6
The fourth square is colored # FFA800 .
Step 7
And the last square has the color # 94CA1A . Completed we will have the following picture

Step 8
Grab the Text Tool (A) and go to the Properties Panel (Ctrl + F3) below the stage. Select the corresponding options as follows

Then create a series of text with content corresponding to each menu

Step 9
Take the Selection Tool (V) and select the first square with the text (in this example ' HOME PAGE '). Press F8 key (Convert to Symbol) to convert the rectangle and text into Movie Clip Symol format.

Step 10
While the new made Movie Clip is still selected, go to the Properties Panel (Ctrl + F3) below the stage. On the left side, you will find an Instance name input field. Rename the movie to be homepage_mc

Step 11
Pick the Selection Tool (V) and double-click the movie clip on the working screen.

Step 12
Still using the Selection Tool (V), select only the text and press Ctrl + X (Cut). Then create a new layer and name it text. Select the text layer and press Ctrl + Shift + V (Paste in place).
Step 13
Go back to layer 1, double click on it with Selection Tool (V) and change its name to rectangle.
Step 14
While still selected, press again F8 key (Convert to Symbol) to convert it into a Movie Clip Symbol.

Step 15
Click on frame 15 of layer rectangle and press F6
Step 16
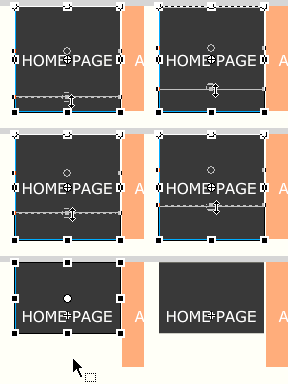
While you're still on frame 15, take the Free Transform Tool (Q), press and hold the Alt key and drag the rectangle down like this:

Step 17
Right-click anywhere in the gray area between the two keyframes on the timeline and choose Create Motion Tween from the menu that appears.

Step 18
Select the text layer and press F8 (Convert to Symbol) to convert the text into a Movie Clip Symbol.

Step 19
Click on frame 15 of the text layer and press F6
Step 20
Use the arrow keys or mouse to drag the text down a bit to enter the center of the rectangle as shown below

Step 21
Right-click anywhere in the gray area between the two keyframes and select Create Motion Tween from the menu that appears.
Step 22
Return to the main scene (Scene 1)
Step 23
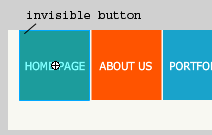
Create a new layer and name it Invisible Button. Then create an invisible button above the rectangle and text.

Step 24
Using the Selection Tool (V) click once on the invisible button created to select it, go to the Action Script panel (F9). Then put the following code into:
on (rollOver) {
_root.mouse_over_homepage_mc = true;
}
on (rollOut) {
_root.mouse_over_homepage_mc = fstartlse;
}
on (release) {
getURL (" https://quantrimang.com/ ");
}
Step 25
Create a new layer above the invisible button layer and name it action script.
Step 26
Click on the first frame of the action script layer, go to the Action Script Panel and enter the following code:
_root.homepage_mc.onEnterFrame = function () {
if (mouse_over_homepage_mc) {
_root.homepage_mc.nextFrame ();
} else {
_root.homepage_mc.prevFrame ();
}
};
So we've completed a button in the menu, your next job is to do the same on the next page. Note that in the Action Script code, there is a URL that needs to be changed accordingly on each menu. And don't forget to download the source file here.


 Steps to change Taskbar position on Windows 11
  Instructions to block ads on Smart TV
  How to change the image background color with the Paint 3D application
  How to install Bliss OS X86 on PC and VirtualBox
  Steps to fix printer not showing up in Windows Remote Desktop session
  How to install Nextcloud server on Windows 10