Macromedia Flash - Create flash menu with sound
In this flash tutorial, we will guide you to create a dynamic flash menu with sound. You can use this menu on any website.
In this flash tutorial, we will guide you to create a dynamic flash menu with sound. You can use this menu on any website. To create an effect in this lesson, we can use the Action Script code. After this lesson you will get the following menu:
Step 1
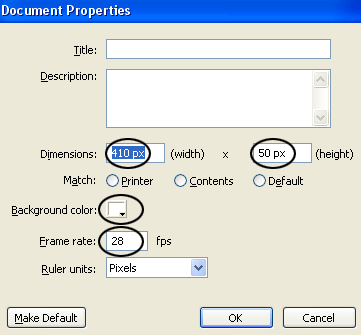
Create a new flash menu. Go to Modify > Document (Ctrl + J) and set the document width to 410 px, the height to 40 px. Select white as background color and frame rate at 28 fps. After setting up, click OK .
Step 2
Pick the Rectangle Tool (R). In the Colors section of the Tool Panel, remove the Stroke color by clicking on the small pencil icon and selecting the red diagonal square, in the Fill color choose # 3487B3 . Then draw a 100 x 30px rectangle.


Step 3
While still selecting the rectangle shape just draw, press Ctrl + D (multiply by 3 times). After that, put the rectangles just multiply up as follows:

Step 4
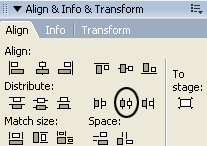
Select all the drawn rectangles, go to Align Panel (Ctrl + K) and click on Distribute horizontal center
Step 5
Still select 4 rectangles, press Ctrl + G (Group) on the keyboard to group the rectangles.
Step 6
Then click the Align Panel again and do the following:
1. Make sure the To stage button of Align / Distribute is selected
2. Click the Align horizontal center button
3. Click the Align vertical center button
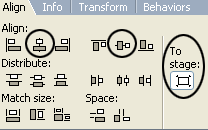
After alignment, you will see the following image

Step 7
Press Ctrl + B (Break apart) to tear down the Group created in step 5

Step 8
Pick the Text Tool (A), go to the Properties Panel below it and do the following:
1. Select Static Text
2. Select the font is Arial
3. Choose a font size of 14 and a bold type
4. Font color is white
5. In the option under the font section, select Use Anti-alias for readability in the drop-down menu.

Enter the letters into each menu item:

Step 9
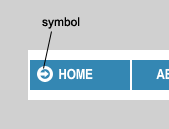
Use the flash tools to draw a small icon and place it at the top of the menu as shown below
Step 10
Create measurement icons for each menu item

Step 11
Take the Selection Tool (V) and select the shape of the first button (see picture below).
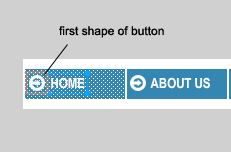
Step 12
Press F8 ( Convert to Symbol ) to convert that shape button into a Movie Clip Symbol .

Step 13
While the new made Movie Clip is still selected, go to the Properties Panel below the window. In the left section, at the Instance name section enter the field name ' home_mc ' here.

Step 14
Pick the Selection Tool (V), double click on the movie clip in the working window. You will edit the content inside the Movie Clip

Step 15
Pick the Selection Tool (V) and select the icon at the top of the menu. Press Ctrl + X (Cut). Create a new layer above the layer 1 (layer 2) and press Ctrl + Shift + V.
Step 16
Click on frame 15 of layer 2 and press F6. Then translate the menu icon to the right corner. See the following picture
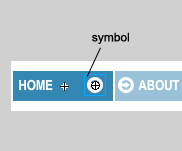
Step 17
Right-click anywhere on the gray area between the two Timeline keyframes and select Create Motion Tween from the menu that appears.
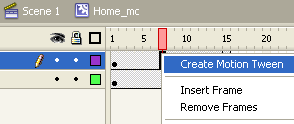
Step 18
Go back to layer 1, take the Selection Tool (V) and select only the word ( Home ). Press Ctrl + X (Cut) and create a new layer (layer 3) on top of layer 1. Select the newly created layer 3 and press Ctrl + Shift + V (Paste in Place)
Step 19
Select frame 15 of layer 3 and press F6. After that, move the Home text slightly to the left (see picture below).

Step 20
Right-click anywhere in the gray area between the two keyframes on the Timeline section and choose Create Motion Tween from the menu that appears.
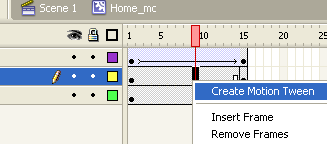
Step 21
Return to the main scene (Scene 1)
Step 22
Select the Selection Tool (V) and double click on layer 1 to rename its name into a menu
Step 23
Then create a new layer above the layer menu and name it invisible button
Step 24
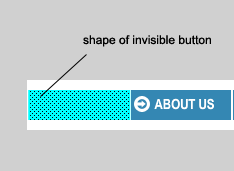
Select the invisible button layer and select the Rectangle Tool (R). In the Color section of Tool Panel, lock the Stroke color by clicking on the square with the red diagonal line. Fill color select any color, then draw a rectangle above the first button. See the following picture:
Step 25
While the rectangle is still selected, press F8 (Convert to Symbol) to convert the rectangle into a Button Symbol .

Step 26
Pick the Selection Tool (V) and double click on the newly created button

Step 27
Drag the keyframe from the Up to the Hit section.

Step 28
Create a new layer above the layer 1 (layer 2).
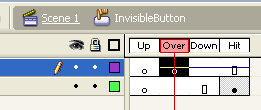
Step 29
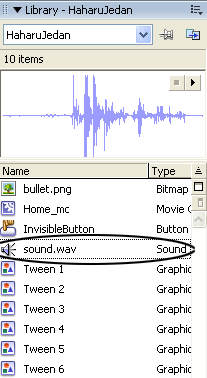
Click on the Over section on the Timeline and press F6. Then, find a sound track (.mp3 file) to use to access the menu. Import the audio file into the Flash Library ( File > Import > Import to Library ).
Step 30
After that, still select the Over frame, drag the audio file just imported from the library into the workspace.
Step 31
Return to the main scene (Scene 1)
Step 32
Using the Selection Tool (V), click the Invisible Button button on the working window, open the Action Script Panel (F9) and enter the following code:
on (rollOver) {
_root.mouse_over_home_mc = true;
}
on (rollOut) {
_root.mouse_over_home_mc = fstartlse;
}
on (release) {
getURL ("https://quantrimang.com/");
}
Step 33
Create a new layer above the invisible button layer and name it action. Then select the first frame of layer action and enter the following Action Script code
_root.home_mc.onEnterFrame = function () {
if (mouse_over_home_mc) {
_root.home_mc.nextFrame ();
} else {
_root.home_mc.prevFrame ();
}
};
After you have completed the above steps, you have created the first button. Repeat the above process (from step 11 onwards) for the rest of the menu buttons. Note that for each node you will have to change the button name (this example is home_mc) and the path in the Action Script code.
Action Script code for all buttons in the action layer:
_root.home_mc.onEnterFrame = function () {
if (mouse_over_home_mc) {
_root.home_mc.nextFrame ();
} else {
_root.home_mc.prevFrame ();
}
};
_root.about_us.onEnterFrame = function () {
if (mouse_over_about_us) {
_root.about_us.nextFrame ();
} else {
_root.about_us.prevFrame ();
}
};
_root.support.onEnterFrame = function () {
if (mouse_over_support) {
_root.support.nextFrame ();
} else {
_root.support.prevFrame ();
}
};
_root.contact.onEnterFrame = function () {
if (mouse_over_contact) {
_root.contact.nextFrame ();
} else {
_root.contact.prevFrame ();
}
};
You can download the source file here .


 Steps to change Taskbar position on Windows 11
  Instructions to block ads on Smart TV
  How to change the image background color with the Paint 3D application
  How to install Bliss OS X86 on PC and VirtualBox
  Steps to fix printer not showing up in Windows Remote Desktop session
  How to install Nextcloud server on Windows 10