Macromedia Flash - Text presentation in Flash
In this article, we will learn how to create a text presentation in flash using some special flash tips.
In this article, we will learn how to create a text presentation in flash using some special flash tips. With this text presentation you can also use for some web banner, header .
Step 1
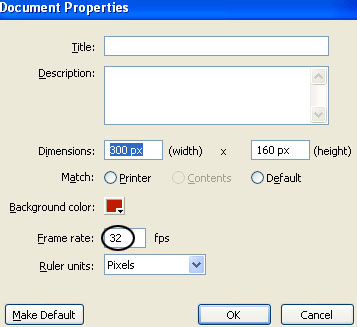
Create a new flash document. Press Ctrl + J key on the keyboard ( Document Properties ) and set the compatible document size. Choose any color as background color for the document. Set the frame rate of this Flash movie to 32 and click OK .

Step 2
Call the current layer txt1 . Double-click the default name (Layer 1) to change it. Press Enter when you have typed in the new name.
Step 3
Select the Text Tool ( A ), select the font and size as you like . and type any text on the flash file's workspace.
Step 4
While the text is still selected, press F8 on the keyboard ( Convert to Symbol ) to convert it into a Movie Clip Symbol.

Step 5
Now click on frame 15, 80 and 95 and press the F6 key on the keyboard in turn
Step 6
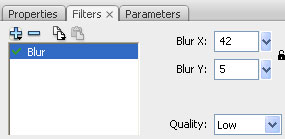
While you're still on frame 95, select the Selection Tool ( V ) and click once on the text to select it. Then go to the Properties Panel ( Ctrl + F3 ) below the stage. Then select Filters tab on the left side, click on the plus icon and select Blur . Make the following changes:

Then, select the Properties tab . On the right, you will see the Color menu. Select Alpha in it and set it to 0% .

Step 7
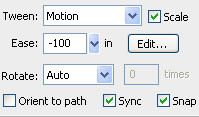
Now select frame 80 and go to the Properties Panel ( Ctrl + F3 ). Then, for Tween choose Motion and for Ease set to -100 . As the picture below:

Step 8
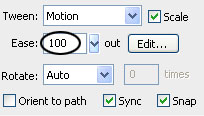
Now go back to the first frame and repeat steps 6, 7 and 8. The only difference is that you will set for frame 1 Ease to +100 . As shown below:

Step 9
Create a new layer above the layer txt1 and name it txt2
Step 10
Click frame 90, 105, 170 and 185 of layer txt2 and press F6 key in turn.
Step 11
While you're still on frame 185, repeat step 6.
Step 12
Now go back on frame 170 and repeat step 7.
Step 13
Now select frame 90 and repeat step 8.
All finished. Good luck!


 Steps to change Taskbar position on Windows 11
  Instructions to block ads on Smart TV
  How to change the image background color with the Paint 3D application
  How to install Bliss OS X86 on PC and VirtualBox
  Steps to fix printer not showing up in Windows Remote Desktop session
  How to install Nextcloud server on Windows 10