Instructions for recording with Audacity on computer
If you are looking for quality recording software, Audacity is a great choice. Not only does it help you record easily, but it also helps eliminate noise, providing clear and sharp recordings. Let's explore how to record audio using Audacity on your computer in the article below.
TipsMake has previously shown you how to extract lyrics, boost bass, or filter noise using Audacity. Today, we're introducing a new trick for you.
How to use Audacity to record audio on your computer
Step 1: Download and install Audacity software here
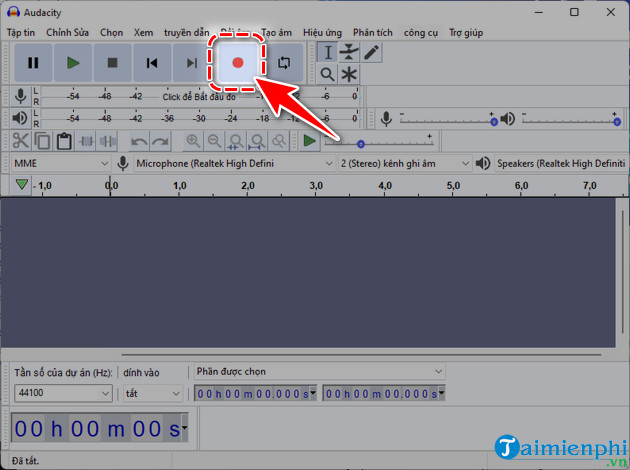
Step 2: Open Audacity software , click the Red Circle icon to start Recording

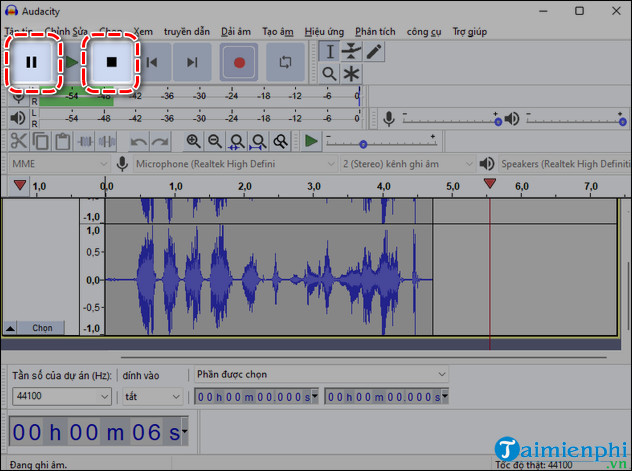
Step 3: During recording, you can pause by pressing Pause and end recording by pressing Stop .

- If you want to listen to the recording again, press the blue Play icon.
Step 4: Once done, select File => Export => Export Audio .
Step 5: Enter the recording file name , select the format => click Save .
Step 6: Enter the content for the audio file such as artist name , song name , album name ,. => click OK .
Step 7: Go to the Audacity folder at the default path C:UsersAdminDocumentsAudacity and you will see your recording file.
Hopefully, the above sharing of TipsMake on how to record with Audacity will help you use this software more easily. Recording sound from a microphone is now simple. If you find it useful, don't forget to Like & Share this article so that everyone knows how to record songs effectively with Audacity.
You should read it
- 10 alternatives to Audacity
- How to convert WAV format to MP3 using LAME with Audacity
- How to use Audacity to reverse audio in Windows
- How to Filter Unnecessary Sound with Audacity
- How to install GSnap audio on Audacity
- How to Manually Adjust Voice Using Audacity
- How to remove noise from audio files with Audacity
- How to record using Audacity on a computer
- Record on your computer with Audacity software
- How to Record Voice on Computer
- How to Speed Songs Up on PC or Mac
- 10 open source applications for Windows
Maybe you are interested
How to enable / disable network location indexing in Photos app on Windows 10 How to spell check in Linux Terminal The Scwcmd configure command in Windows How to turn off spell check mode in Windows 10? The top free tools for SEO people from Google Complete guide to Excel 2016 (Part 11): Check spelling in the worksheet
