How to use Virtual Desktop on Windows 10?
Virtual desktop on the computer helps users create multiple computer screens at the same time to use more applications.
Table of Contents
Features to use multiple virtual Windows Desktop computer screens have been provided on Windows 10 for a long time, enabling users to use multiple applications at the same time. We can create multiple computer screens according to user needs, with different programs used on each screen. And according to each version of Windows 10, the Multiple Desktop feature is more and more upgraded, more options among special screens are Windows 10 Timeline feature to save the history of opening files or accessing websites according to different times. The following article will guide you how to use the Virtual Desktop feature on previous versions of Windows 10 and from Windows 1706 or later.
- How to use 2 screens on a computer
- Two ways to pair the screen in Windows 7
- How to set the resolution for many Windows 10 screens
- 3 ways to set up different background images on each Windows 10 screen
Video tutorial for using Multiple Desktop Windows 10
1. How to use Virtual Desktop on Windows 10 (1706 and above)
Step 1:
In the Taskbar, click on the Task View icon as shown below or press the Windows + Tab key combination to open.

Step 2:
Display the current screen interface with open applications. To open a new screen, click on + NewDesktop .

Step 3:
Next, the new screen is created with sequential numbers. Users can open many different screens as needed, just click New desktop.

Step 4:
At the Task View interface, we can move any application to another screen, but you cannot switch back.

Or we can right-click the application you want to move and select Move to , select the screen you want to move in the current screen list or move to the new screen with New desktop.

Step 5:
In addition, when we right-click, we also have other options such as Snap right / Snap left that show the application window to the right / left of the screen interface, showing the application interface on all open screens.

Step 6:
In this Task View interface when clicking the magnifying glass icon , users enter the recently opened application or file name to search quickly, instead of having to turn off the currently open applications to search. Then the Timeline bar automatically switches the time bar to the most recent application opening time.

Step 7:
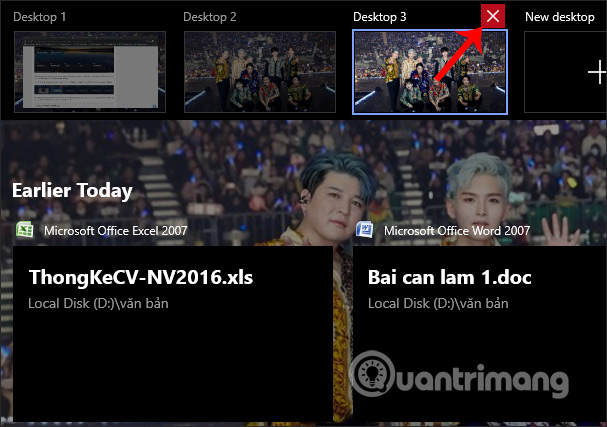
Finally, if you do not want to use the virtual screen anymore, you just need to click the X icon at the top of each screen to turn it off.
2. How to use Virtual Desktop on Windows 10
Step 1: Create a Desktop

To create a virtual Desktop, first open Task View by clicking on the Task View button in the Taskbar, or by pressing the Windows + Tab key combination .
On the Task View window, click New Desktop to add a virtual Desktop.
If you have 2 or more open Desktops, the Add a desktop button will display as a gray tile with a plus symbol (+).
In addition, you can easily add a new Desktop without having to access the Task View by pressing Windows + Ctrl + D.
Step 2: Switch between desktops
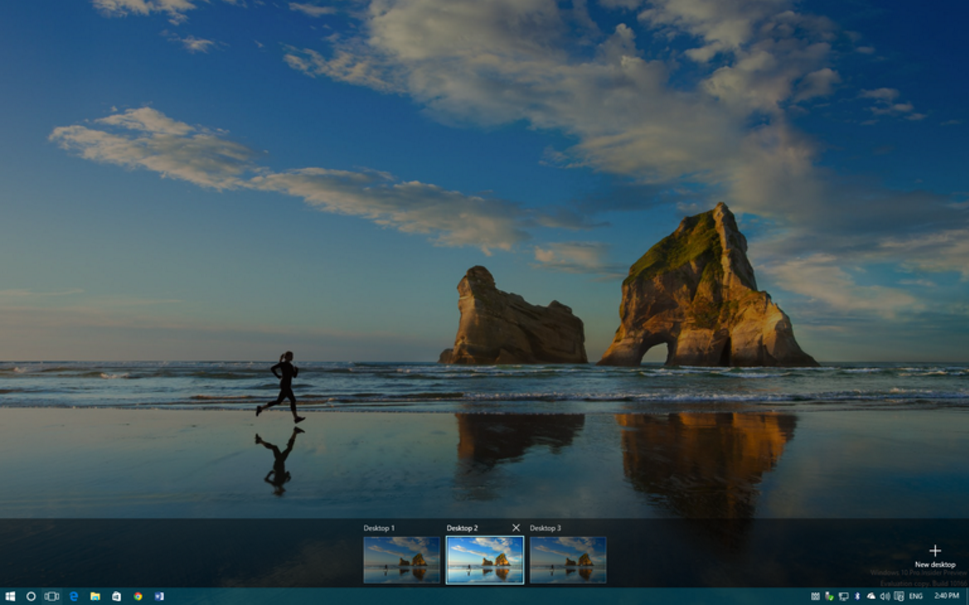
To switch between virtual desktops, open the Task View pane, then click the Desktop you want to open.
Also you can convert Desktops more easily and quickly without accessing Task View using Windows + Ctrl + left arrow and Windows + Ctrl + right arrows .
You can switch between virtual desktops unlimited number.
The Task View pane only displays 9 Desktops at the same time and no scrolling function.
Step 3: Move the window between Desktops

To move a window from one Desktop to another, first open the Task View pane, then move the mouse on the Desktop containing the window you want to move. At this time, a popup window will appear, find the window you want to move, right-click it, then select Move to and select the Desktop that you want to move that window to.
On Build 10166, Microsoft has integrated drag and drop functionality, you can keep and move the window you want to move, and then drop into the Desktop you want.
Step 4: Close a Desktop

To close a virtual Desktop, open the Task View pane, then hover over the Desktop that you want to close until the small X icon in the top right corner appears.
Click on the X icon to close the Desktop.
Alternatively, you can use Windows + Ctrl + F4 to close the Desktop without having to access the Task View pane.
Good luck!
Was this article helpful?
Your feedback helps us improve.
Related Articles
 How to rename virtual desktop in Windows 102 minutes read
 Already able to test Windows 11 on Azure Virtual Desktop2 minutes read
 How to use virtual desktop on Windows 115 minutes read
 How to open a file or an application on a virtual Windows 10 Desktop?5 minutes read
 How to use Windows Virtual Desktop effectively7 minutes read
 Google officially introduces the virtual desktop feature on Chrome OS3 minutes read
Reader Comments 0
Sign in with email or Google to join the discussion.