Table of Contents
This practical guide explains how to use virtual desktop on windows 11 with clear steps and useful context. It also covers common requirements, potential problems, and the details that can help you get better results.
What Is Virtual Desktop?
Usually, when we talk about the term "desktop" in Windows, we usually mean a special interactive, storage space, which is considered a background part behind all windows. This is also a special type of folder. You can assign the desktop a wallpaper you want, and store application and folder icons on it.
But according to the older layers of meaning in the history of user interface design, the term "desktop" also includes the specific arrangement of open application windows in front of that background. So if you imagine a table top covered with sheets of paper placed in different positions, the whole arrangement could be called a 'desktop'. That is the second definition to which the term 'virtual desktops' - 'Virtual Desktops' applies.
Thanks to a feature called Task View in Windows 11, you can have multiple 'virtual desktops' on the same PC and switch between them easily and flexibly. Each of these desktops has its own arrangement of open windows and applications, but basically the number of icons on them is still the same.
How to Create and Use Virtual Desktops
In Windows 11, creating and managing virtual desktops is generally very simple.
To get started, click the Task View button on the taskbar at the bottom of the screen. This button has an icon that looks like 2 squares 1 dark 1 light stacked on top of each other. Or you can also press the Windows + Tab key combination to quickly open Task View.

(If you don't see the Task View button on the taskbar, right-click the taskbar and select ' Taskbar Settings ', then click the switch next to the ' Task View ' option to toggle it to the ' On ' position.)
After opening Task View, you'll see a special screen that shows all your open application windows in one area near the top. You will also see a row of thumbnails appear at the bottom of the screen.
To add a new virtual desktop, click the ' New Desktop ' button with a plus sign (' + ') on it. Or you can press Windows + Ctrl + D on your keyboard.

A new desktop (with a specific number) will appear in the list. To switch between virtual desktops, you just click on its corresponding thumbnail in Task View.
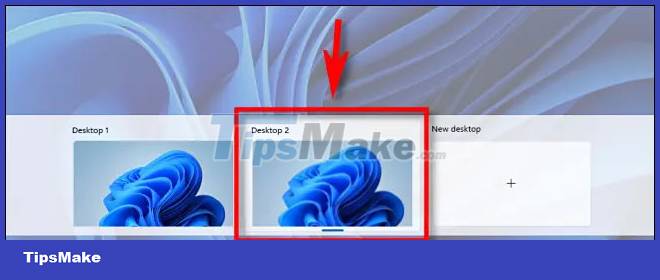
You can open applications and position their windows any way you want on the virtual desktop. The apps you open will also appear on the taskbar as usual.
When you switch to another virtual desktop, that arrangement is preserved and you can switch back later by clicking Task View again and selecting the corresponding virtual desktop thumbnail.
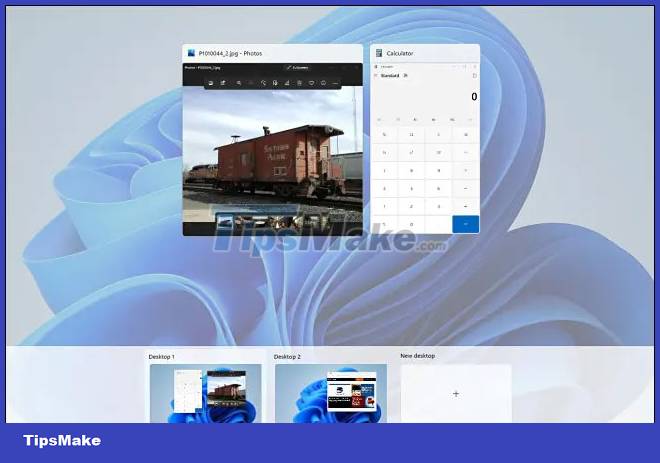
Alternatively, you can drag and drop applications between virtual desktops in Task View by clicking and dragging the application window thumbnail onto the virtual desktop thumbnail. More interestingly, you can also set a different wallpaper for each virtual desktop if you want.
How to Delete Virtual Desktops in Windows 11
To remove virtual desktops in Windows 11, first open Task View. Then hover your cursor over the thumbnail of the virtual desktop you want to close until you see an 'X' in the corner, then click or tap the ' X '.

Alternatively, you can open Task View ( Windows + Tab ), use the arrow keys on your keyboard to select the virtual desktop thumbnail, and then press the Delete key on your keyboard to delete the selected virtual desktop.
Shortcuts for Virtual Desktops
Windows 11 comes with a bunch of easy-to-use keyboard shortcuts that let you interact with the virtual desktop more efficiently without using a mouse. May be mentioned as:
- Windows + Tab: Open Task View
- Windows + Ctrl + Left or Right Arrow: Switch between desktops
- Windows + Ctrl + D: Create a new virtual desktop
- Arrow keys and Enter key: Use in Task View to select desktop
- Delete: Pressing this key while Task View is open will delete the selected virtual desktop.
- Escape: Close Task View
Wish you have a good experience with this feature!
Conclusion
Understanding Virtual Desktop makes it easier to compare options, avoid common mistakes, and apply the information in this guide more effectively. Review the relevant requirements before making changes or choosing a solution.
FAQ
How do you use virtual desktop on windows 11?
Follow the steps in this guide in order, confirm the required settings or tools, and verify the result before making additional changes.
Is it safe to use virtual desktop on windows 11?
It is generally safe when you follow the recommended instructions, use trusted tools, and avoid changing settings you do not understand.
What should you do if the process does not work?
Recheck the requirements, restart the device or application when appropriate, and review each step for missed settings or compatibility issues.
Related Articles
 How to Rename Virtual Desktop in Windows 102 minutes read
 How to Use Virtual Desktop on Windows 10?7 minutes read
 Already Able to Test Windows 11 on Azure Virtual Desktop3 minutes read
 How to Open a File or an Application on a Virtual Windows 106 minutes read
 How to Use Windows Virtual Desktop Effectively8 minutes read
 Google Officially Introduces the Virtual Desktop Feature on3 minutes read
Reader Comments 0
Sign in with email or Google to join the discussion.