How to fix IRQL NOT LESS OR EQUAL errors on Windows
IRQL NOT LESS OR error EQUAL is a memory-related error that usually occurs when the system process or driver tries to access the memory address without proper access.
- Ways to fix BSOD blue screen error
- How to fix Blue Machine Check Exception screen error on Windows 10
- Instructions to make blue screen death errors on Windows extremely simple to poke friends
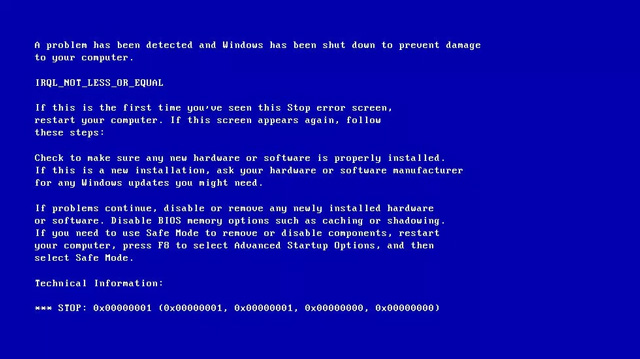
Below is an example of the IRQL NOT LESS OR EQUAL error screen.

How to fix IRQL NOT LESS OR EQUAL errors on Windows
- The cause of IRQL NOT LESS OR EQUAL error
- How to fix IRQL NOT LESS OR EQUAL error
- 1. Disable memory cache
- 2. Install the latest update
- 3. Clean Clean implementation
- 4. Remove unnecessary devices
The cause of IRQL NOT LESS OR EQUAL error
File system failed
The most common cause of this error is a corrupted system file. This is because the computer is infected with a virus, a power failure or a burning error.
Incompatible device driver
This is also one of the common causes of IRQL NOT LESS OR EQUAL errors. When installing a new device driver that fails, it will cause compatibility problems, you need to switch back to the old version to fix the problem.
- 5 basic ways to update, update drivers for computers
Hardware failed
This error may be caused by the motherboard or RAM.
Incorrect software installation
Sometimes, this error is also caused by incorrect Windows installation and configuration.
Downgrade Windows version
The last common cause is due to the old version of Windows installed on the new version. Sometimes, the file system is not in the right place, users need to back up the file and perform a new install (clean install) to prevent conflicts between versions.
- Here's how to uninstall Windows 10 to return to using Windows 7 or 8.1
How to fix IRQL NOT LESS OR EQUAL error
The following fixes apply to Windows 10, 8, 7, Windows Vista and XP.
1. Disable memory cache
To disable the memory cache on the system, you need to access the BIOS / UEFI menu. Refer to the article How to access BIOS on different computers. Once you have entered the BIOS / UEFI menu, follow these steps:
Step 1 . Access the Advanced menu. Depending on the BIOS / UEFI version, this menu will have different names.
Step 2 . Find the Cache Memory option.
Step 3 . Press Enter .
Step 4 . Select Disabled .
Step 5 . Press F10 to save changes and exit.
Step 6 . Restart the computer.
2. Install the latest update
In some cases, you need to make sure the latest version of Windows 8 / 8.1 is installed to fix IRQL NOT LESS OR EQUAL errors. You should turn on Automatic Updates option to update automatically.
Take the following steps:
Step 1 . Start Windows
Step 2 . With Windows Vista, Windows 7, users can type update in the search box to open Windows Updates.
On Windows 8, users can open Charm Bar by pressing Windows + C key and then Settings> Change PC Settings.
Step 3 . Click Update and Recovery .
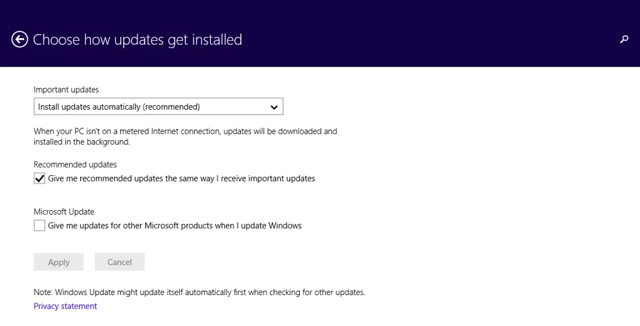
Step 4. Click Choose how updates updates get installed .
Step 5 . Select Install updates automatically .
Step 6 . Check the Give me recommended box for updates of the same way I receive important updates in the Recommended updates box.
Step 7 . Click OK .

3. Clean Clean implementation
If the RQL NOT LESS OR EQUAL error is caused by the running process, restart the Windows operating system by way of a Clean boot to fix the problem. With Clean boot, only the services or processes required for Windows operation will restart.
Follow these steps:
Step 1 . Open the Run dialog box.
Step 2 . Type msconfig and press Enter .
Step 3 . Go to the General tab > tab and select the Selective Startup option.
Step 4 . Uncheck Load startup items .
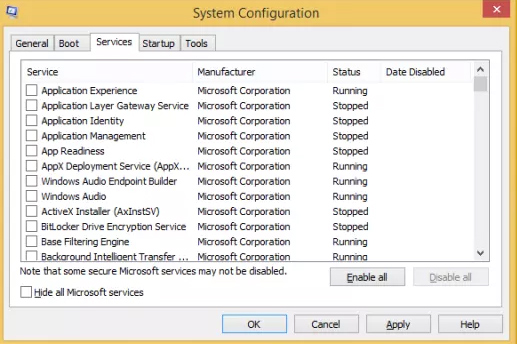
Step 5 . Access the Services tab.
Step 6 . Check the Hide all Microsoft services box in the lower left corner of the window.
Step 7 . Click Disable all> OK .
Step 8 . Restart Windows.
To reset these changes and start Windows normally, follow these steps:
Step 1 . Go to the General tab.
Step 2 . Check the Normal Startup option.
Step 3 . Click OK > restart.

4. Remove unnecessary devices
A simple but sometimes effective way to fix this is to remove all unnecessary hardware devices from the computer and see if the computer boots normally.
I wish you all success!
You should read it
- ★ Instructions on how to fix blue screen errors on computers running Windows
- ★ Instructions for quick fix of 'Inaccessible Boot Device' error on Windows 10/8/7 and Windows Vista
- ★ How to find the cause of blue screen death and Minidump errors?
- ★ Fix BSOD Dxgkrnl.sys error in Windows 10
- ★ How to create a blue screen of death (BSOD) to 'prank' friends