Table of Contents
This guide explains how to create and Use Virtual Desktop on Windows 10, with clear steps, practical tips, and important checks before you begin.

To create a new virtual Desktop you can do the following:
Step 1 : Open Task View by clicking the Task View icon under the Taskbar, in older versions of Windows 10, the icon will be slightly different. Or press Windows + Tab key combination

Step 2: In the Task View window, click the New desktop button to create a new Desktop, in the old version this button will be at the bottom of the screen.

In addition to creating a Desktop on you can use a faster way that is using Ctrl + Windows + D and you will be taken straight to the new Desktop. You can open Task View to see which Desktop you are on.
After creating you will see a list of desktops appear in horizontal lines, you can create as many desktops as you want. You can use your mouse to select the Desktop to switch between Desktop.
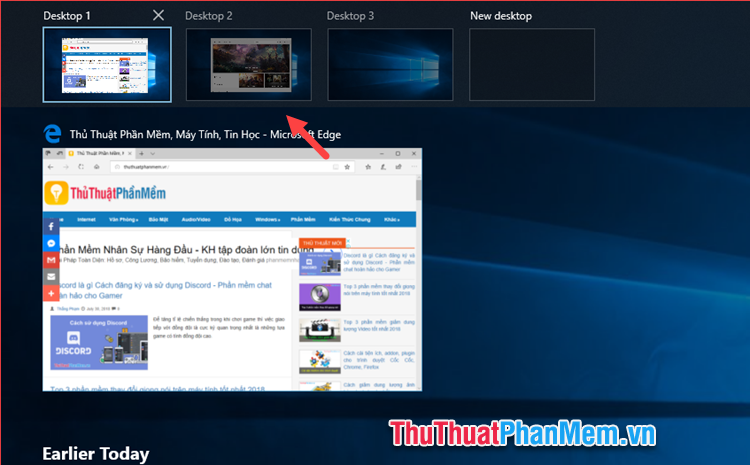
If you're on the Desktop, you can quickly switch to other desktops by pressing Ctrl + Windows + left and right arrows.
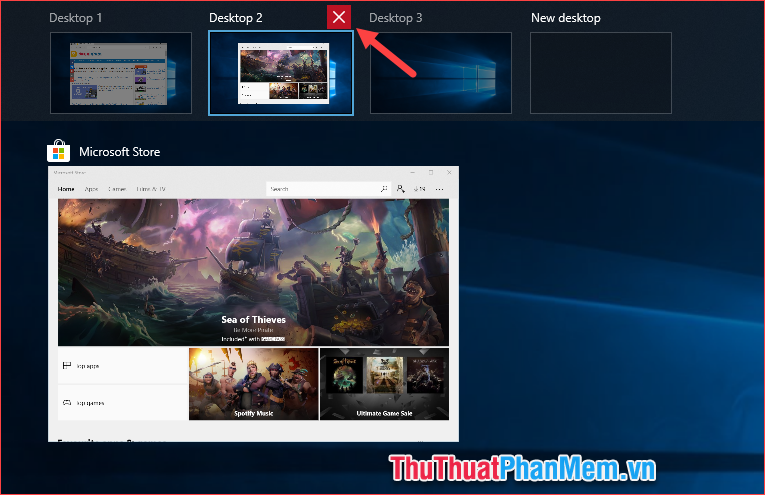
To close a virtual Desktop, you open Task View then click the x on the corner of that Desktop or press Ctrl + Windows + F4 to close the Desktop without opening Task View.
Above TipsMake. com has guided you how to create and use virtual Desktop on windows 10 with just a few simple steps. Good luck!
FAQ
What should I know about Create and Use Virtual Desktop on Windows 10?
Focus on the key features, requirements, limitations, and practical use cases explained in this guide.
How do I get the best results with Create and Use Virtual Desktop on Windows 10?
Follow the recommended steps, use current software or information, confirm compatibility, and review settings before major changes.
Are there any risks or limitations?
Potential limitations depend on compatibility, data quality, cost, privacy, support, and how the product or method is used.
Related Articles
 How to Use Virtual Desktop on Windows 10?7 minutes read
 How to Open a File or an Application on a Virtual Windows 106 minutes read
 How to Use Virtual Desktop on Windows 116 minutes read
 How to Rename Virtual Desktop in Windows 102 minutes read
 Already Able to Test Windows 11 on Azure Virtual Desktop3 minutes read
 How to Set Different Wallpapers on Windows 114 minutes read
Reader Comments 0
Sign in with email or Google to join the discussion.