How to convert Legacy BIOS to UEFI in Windows 10
In previous versions of Windows, you had to reinstall the entire operating system if you wanted to convert Legacy BIOS or Master Boot Record (MBR) to UEFI or GUID Partition Table (GPT).
Table of Contents
In previous versions of Windows, you had to reinstall the entire operating system if you wanted to convert Legacy BIOS or Master Boot Record (MBR) to UEFI or GUID Partition Table (GPT).However, in Windows 10, Microsoft introduced a very simple and new tool called MBR2GPT, which allows you to convert Legacy BIOS to UEFI easily with just two commands.
- How is GPT and MBR different when partitioning a drive?
Here's how you can convert Legacy BIOS to UEFI in Windows 10.

The information you need to understand
Although converting from Legacy BIOS to UEFI in Windows 10 is easy, there are a few things you should know and do before embarking on the process.
1. There will be no data loss during the conversion from Legacy BIOS to UEFI.However, as a precaution, please back up your system before proceeding.
2. You should use Windows 10 version from v1703 or higher.If you are unsure about what version of Windows you are using, press Win + R , enter the keyword winver and press Enter .On the second line, you will see version 1703 or higher.For example, when writing this article, the version of Windows 10 in use is v1809.
3. The drive you are trying to convert should not have more than three partitions.If your drive has more than three partitions on a Windows 10 installation drive, merge or delete the excess partitions.
- Partition to create the second hard drive on Windows
4. If you are using BitLocker to encrypt your system, decrypt the drive and turn off BitLocker protection before starting the conversion process.When BitLocker protection is enabled, Windows 10 cannot convert your drive from Legacy BIOS to UEFI.
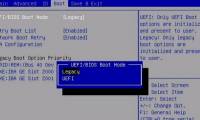
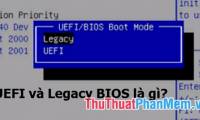
5. After the conversion process is complete, you may have to change the motherboard firmware settings from Legacy BIOS to UEFI.Depending on your motherboard manufacturer, the conversion process will be different.Find and refer to the manufacturer's instructions for using the motherboard to get the information you need.
Check if you are using Legacy BIOS
The last thing you need to check is to determine if you are using Legacy BIOS, because if you are using UEFI then the conversion is completely worthless.
To check, first, search for the keyword 'Create and format hard disk partitions' in the Start menu and press Enter to open the Disk Management integrated disk management tool. Now, right-click on the drive where you installed Windows and select Properties .
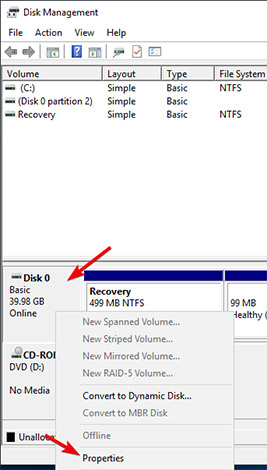
In the Properties window, go to the Volumes tab. Here, if you see Master Boot Record (MBR) next to Partition style , you are still using Legacy BIOS.
Convert Legacy BIOS to UEFI
After you have verified that your system is still using Legacy BIOS and have completed the system backup as mentioned above, now you can start to convert Legacy BIOS to UEFI. .
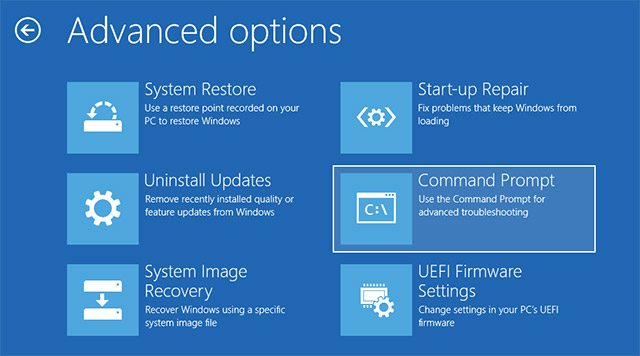
1. To start the conversion process, you need to access the Command Prompt from Windows start-up.To do so, press the Win + X key combination, click Shut down or sign out and hold the Shift key and click the Restart button to reboot your system into Advanced Start-up mode.

2. At the Advanced Start-up screen , navigate to Troubleshoot -> Advanced Options , and select the Command Prompt option.
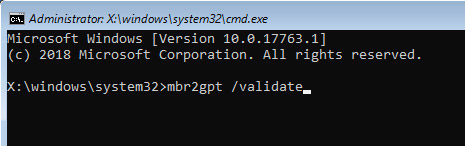
3. The first thing we need to do is determine the drive we are trying to convert.Enter the command below and press Enter .
mbr2gpt / validate
If you see that the message Validation completed successfully (authentication is successful), go to the next step.
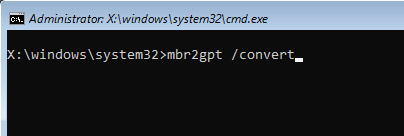
4. After the disk needs to be converted, execute the following command:
mbr2gpt / convert
As soon as the command is executed, Windows 10 will start the conversion process, ie it will automatically add all necessary UEFI boot files and GPT components, then update Boot Configuration Data (data boot configuration).
5. Now, reboot your system, launch the motherboard system installation screen and change it from Legacy BIOS to UEFI.The process of changing from Legacy BIOS to UEFI specifically depends on the motherboard manufacturer you are using.Please refer to the manufacturer's manual for the steps to be accurate.
6. After rebooting into Windows 10, you can verify if Legacy BIOS has been transferred to UEFI.Just like in the first steps, go to Disk Management Properties , navigate to the Volumes tab. Here, you will see the GUID partition table ( GPT ) appearing next to Google's partition type.
Above are the steps to convert Legacy BIOS to UEFI in Windows 10. Please share your thoughts and experiences on using this method to convert Legacy BIOS to UEFI on your system in the comments section. under!Good luck!
See more:
- The cause of the wrong time on Windows 10 and how to fix it
- What are the features of Windows 10 Windows Features?
- How to check the Bluetooth version in Windows 10
- 11 ways to start the Performance Monitor performance monitor in Windows
Was this article helpful?
Your feedback helps us improve.
Related Articles
 Steps to convert MRB to GPT drive structure in Windows 106 minutes read
 How to check the computer that supports EFI / UEFI or Legacy BIOS4 minutes read
 What is UEFI and Legacy standards? Differences between UEFI, Legacy, BIOS5 minutes read
 How to convert from Legacy to UEFI in BIOS2 minutes read
 How to switch from Legacy to UEFI in your computer's BIOS.6 minutes read
 Intel expects to end Legacy BIOS support by 20203 minutes read
Reader Comments 0
Sign in with email or Google to join the discussion.