How to turn off displaying recently visited items and locations in Windows 10
If you've ever right-clicked the application icon on the taskbar or in the Start menu, you might find that Windows will display a list of recent items that you have accessed on that application.In fact, Windows will also display recently opened files and locations that are frequently accessed in the File Explorer File menu.To be fair, this feature is quite useful for us in some cases, for example when you want quick access to a familiar item, for example.However, if you don't need to use this feature or simply don't want to display frequently accessed items and locations for security or privacy reasons, you can easily turn it off too. go.
Turn off displaying recently accessed items with Settings App
If you just want to turn off the display of frequently visited items and locations for your user account, use Settings App , very quickly and easily without using the registry or changing the system policy system.
1. To open the Settings App , click the Notifications icon that appears in the bottom right corner, then click the All Settings button.
2. Under Settings App , scroll to Personalization and then Start (appear on the left bar). On the right panel, switch the switch button to turn off the Show recently opened items option in Jump Lists on Start or the taskbar.

3. As soon as you switch the switch to the off position, recently accessed items and locations will be turned off immediately.If you want to re-enable this feature, just switch the switch to the On position.
Turn off the display of recent access items by using Group Policy (for all user accounts on the system)
As mentioned, the Settings App only allows you to disable this feature for a single user account. To turn off the display of recently accessed items for all user accounts on the system, you must use Group Policy . More specifically, you need to modify some policies in Group Policy Editor , available for all users from Pro to Enterprise.This method is also particularly useful for system administrators.
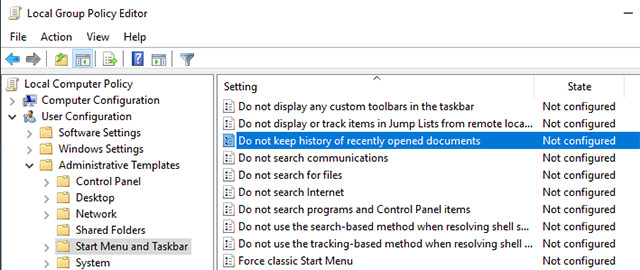
1. First, open the Start menu, search for the keyword 'gpedit.msc' and press Enter to open the Group Policy Editor . Next, move to the User Configuration section -> Administrative Templates -> Start Menu and Taskbar.
2. On the right panel, find and double-click the option Do not keep a history of recently opened documents .This is a policy that allows you to enable or disable the display of recently visited items and places.

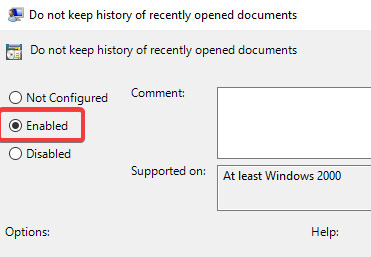
3. In this window, click Enabled to turn on the radio option and click the Apply button, then OK to save these changes.

4. Change the policy Group Group policy requires you to restart the system or update the system to apply the changes, so restart the system or execute the gpupdate / force command in the command prompt with administrator status.
To re-enable this feature, simply select the Disabled or Not Configured option.
Turn off displaying recent access items from the Registry
If you are using a Windows 10 Home version and want to turn off the display of recent access items for all user accounts on your system, you can use Registry Editor.
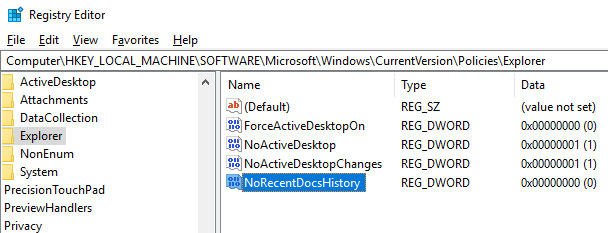
1. First, press the Win + R key combination, type the keyword regedit and press Enter to open the Windows Registry . Now, copy the link below and paste it into the search address bar and press Enter .
HKEY_LOCAL_MACHINESOFTWAREMicrosoftWindowsCurrentVersionPoliciesExplorer
2. On the right panel, you will see there is a value named NoRecentDocsHistory . If you have this value, go to the next step. If not, right-click the blank space and select New -> DWORD (32-bit) Value .Name the newly set value 'NoRecentDocsHistory'.

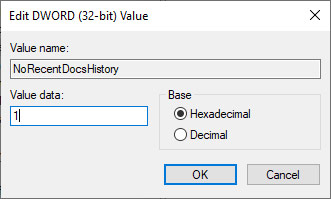
3. Double-click the newly created value and set the data to the value to '1'.

You have successfully disabled the feature that displays recently visited items and locations in Windows 10 with the Windows Registry .In order for the changes you make to take effect, restart the system.If you want to revert the changes, correct the data value to "0" to clear the value "NoRecentDocsHistory".
Good luck!
See more:
- Turn off Windows Defender on Windows 10
- How to turn off Windows Update on Windows 10
- How to do, customize in the article will help your Windows 10 "as fast as the wind"
- Ways to troubleshoot audio on Windows 10
You should read it
- ★ How to delete recent items in Search on Windows 10
- ★ How to turn off Recent Files and Quick Access on Windows 10
- ★ 8 ways to fix 'There Are No Startup Items to Display in the Task Manager' error on Windows
- ★ Access commonly used items in Windows 7 with Jump Lists
- ★ How to fix Quick Access Windows 11 error not showing recent files