How to attach and split VHD and VHDX files in Windows 10
Attach and split VHD and VHDX files in Windows 10
Table of Contents
General information
VHD (Virtual Hard Disk) is a file format that represents a virtual hard drive (HDD).It may contain everything that can be found on a physical hard drive, such as disk partitions and a file system, which can also contain files and folders in turn.It is often used as the hard disk of a virtual machine.
VHDX is Hyper-V virtual hard disk file format.VHDX has storage capacity of up to 64 TB, much larger than the 2TB limit on the older VHD format.It also provides data loss protection during power outages and optimizes the discrete disk architectures to prevent performance degradation on new and large physical drives. .
- Here's how to create a Virtual Hard Disk on Windows 10
When you mount .vhd or .vhdx files, these files will be added as drives in the PC.
This tutorial will show you different ways to attach and separate virtual hard disk files VHD and VHDX in Windows 10.
Attention:
- You must log in as an administrator to be able to attach or split VHD and VHDX files.
- Cannot attach VHD and VHDX files from media that are not formatted with NTFS file systems or ReFS.
EXAMPLE: The VHDX file is attached to a computer named This PC:

Attach VHD or VHDX files directly
Do one of the following:
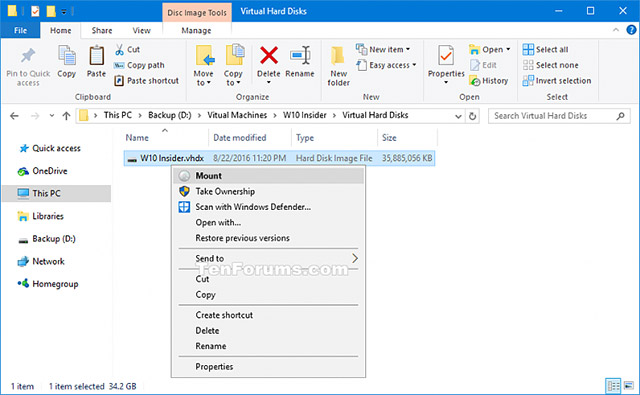
1. Double click the .vhd or .vhdx file.Need to attach.
2. Right-click or click and hold the .vhd or .vhdx file and click Mount (see screenshot below).
Attach VHD or VHDX files in Disk Management
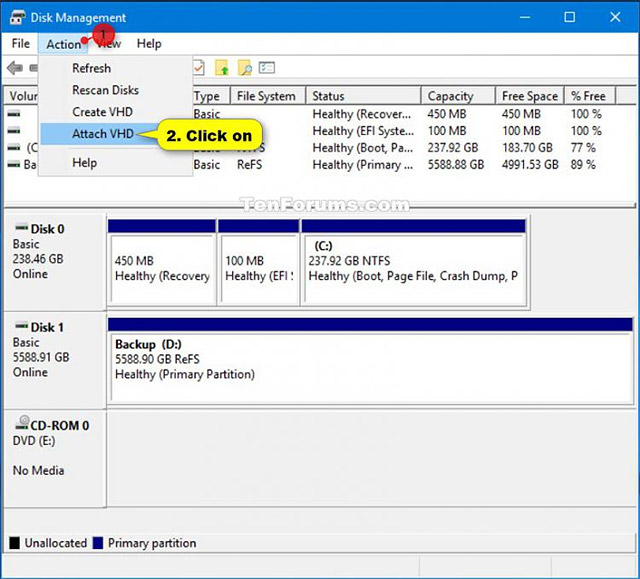
1. Open Disk Management (diskmgmt.msc).
2. Click or tap the Action tab in the menu bar and click / click Attach VHD.(see screenshot below)
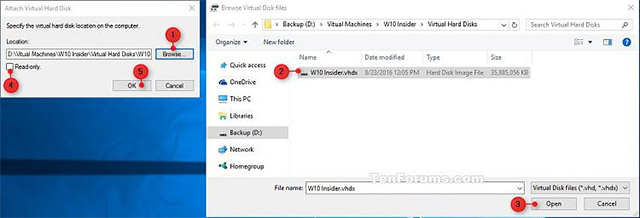
3. Click Browse, navigate to and select the .vhd or .vhdx file, then click Open, select or deselect Read-only and click OK (see screenshot below).
4. Now you can close Disk Management if you want.
Attach VHD or VHDX files in Windows PowerShell
Attention:
- For more details and options for Mount-VHD cmdlet, see: Microsoft Documents: Mount-VHD
- This command is only available after installing the Hyper-V feature.
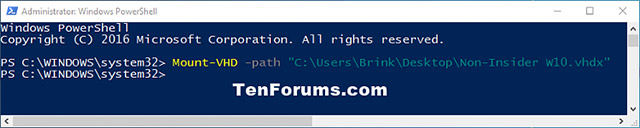
1. Open Windows PowerShell.
2. Enter the following command into Windows PowerShell and press Enter (see screenshot below).
Mount-VHD -Path "full path of file.vhd or .vhdx"
Attention:
- Replace the full path of file.vhd or .vhdx in the sample command with the actual full path of the .vhd or .vhdx file you want to attach.
3. You can now close Windows PowerShell if you want.
Use Eject to separate VHD or VHDX files
1. Open File Explorer on the device.
2. Right-click or click and hold on the drive where you have attached the .vhd file or.Click Eject (see screenshot below).

Split VHD and VHDX files by restarting the computer
Restart the computer to automatically split at the same time all attached VHD and VHDX files.
Separate VHD and VHDX files in Disk Management
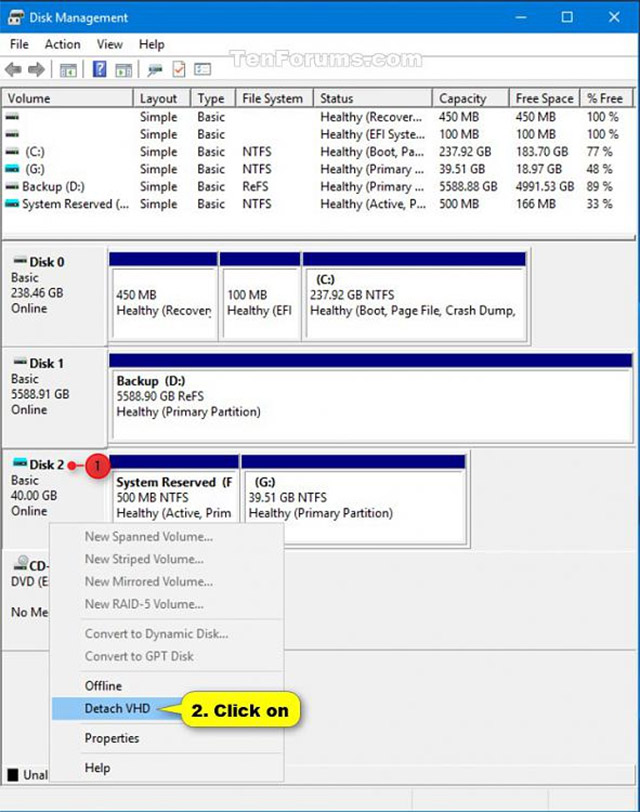
1. Open Disk Management (diskmgmt.msc).
2. Right-click or click and hold on disc # for .vhd or .vhdx files attached and click on Detach VHD (see screenshot below).
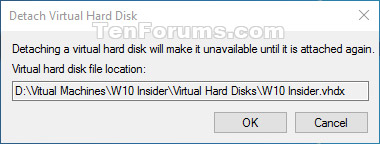
3. Click OK to confirm (see screenshot below).
4. Now you can close Disk Management if you want.
Separate VHD or VHDX files in Windows PowerShell
Attention:
- For more details and options for the Dismount-VHD command, see: Microsoft Documents: Dismount-VHD
- This command is only available after installing the Hyper-V feature.
1. Open Windows PowerShell.
2. Enter the commands below into Windows PowerShell and press Enter after each command.Make a note of the drive file # or file of the .vhd or .vhdx file that you want to disconnect (see screenshot below).
  Diskpart

  vdisk list

  exit

3. Perform step 4 (drive #) or step 5 (path) to know how to split the file .vhd or .vhdx.
4. Use drive # in PowerShell to separate VHD or VHDX files
Type the following command into Windows PowerShell, press Enter and go to step 6 below (see screenshot below).
Dismount-VHD -DiskNumber #
Note:
Replace # in the above command by the number of the actual drive (example: 2) from step 2 above.
For example:
Dismount-VHD -DiskNumber 2

5. Use the file path in PowerShell to extract VHD or VHDX files
Type the following command into Windows PowerShell, press Enter and go to step 6 below (see screenshot below).
Dismount-VHD -Path "full path of file .vhd or .vhdx"
Note
Replace the full path of the .vhd or .vhdx file in the above command with the actual file path from step 2 above.
For example:
Dismount-VHD -Path "C: UsersBrinkDesktopNon-InsiderW10.vhdx"

6. You can now close Windows PowerShell if you want.
See more:
- Turn off Windows Defender on Windows 10
- 7 ways to turn off Windows 10 laptop screen
- How to turn off the history of opening applications in Windows 10
- How to reset Touchpad settings on Windows 10?
Was this article helpful?
Your feedback helps us improve.
Related Articles
 What is the difference between VHD and VHDX? When should they be used?5 minutes read
 How to split, split, split PDF files into multiple files6 minutes read
 10 ways to split files, cut large files into several small files6 minutes read
 The fastest and most effective way to split compressed files with WinRAR3 minutes read
 How to Split PDF Files10 minutes read
 Tips for Handling When Your Computer Cannot Attach Files5 minutes read
Reader Comments 0
Sign in with email or Google to join the discussion.