How to Trace an Image Using Inkscape
Method 1 of 2:
Tracing Automatically
-
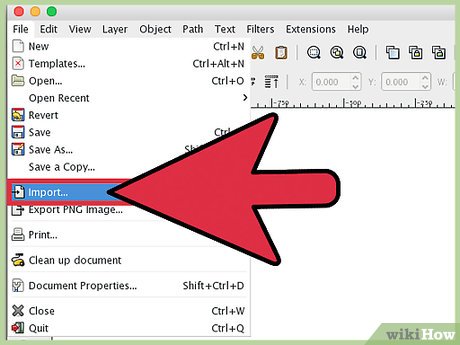
 Import your image. Click 'File' on the menu bar, and then select 'Import.'
 -
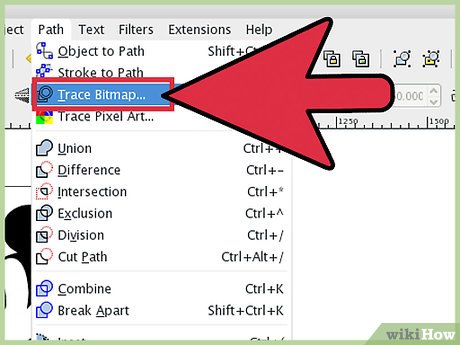
 Open the tracing tool. To open Inkscape's tracing engine, click 'Path' on the menu bar, then select 'Trace Bitmap.' [1]
 - Choose between single and multiple scans. Select 'single' if you'd like to create a single path from the image, or 'multiple' if you'd prefer many overlapping paths. [1]
- Choosing single scan options:
- Brightness cutoff uses the shade of a pixel to decide whether it should become black or white. The higher the threshold setting, the darker the image will become. [1]
- Edge detection will create a path based on differences in the brightness of pixels. The threshold settings adjust the darkness of the output. Again, a higher threshold will produce darker output.
- Color quantization produces a path based on differences in color. The 'number of colors' setting gives you the opportunity to specify how many colors you'd want in your output were it possible to output in color. An algorithm is then used to turn those theoretical colors black or white.
- Choosing multiple scan options:
- Brightness steps allows you to specify the total number of scans. [2]
- Colours uses the number in the 'Scans' box to determine how many colors to output.
- Grays is like colors, but with shades on the grayscale.
- Extra options: The "Smooth" option will apply a Gaussian blur before tracing, and 'Stack scans' gets rid of holes in path coverage. [2] Check 'Remove background' to get rid of background, which usually has the lightest color.
- More options:
- Suppress speckles will eliminate any spots, dust, distortion, and other unwanted bits. [2]
- Optimize paths merges Bezier curves.
- Choosing single scan options:
- Click 'Update' to see a preview. If your lines appear too thick or not prominent enough, you likely selected a trace mode that's better suited for a different type of image. Inkscape recommends running the tracer tool three times in order to determine which of the three options best suits your personal needs. [1]
- Click OK to create the paths. The bitmap image will be preserved in the SVG file.
- Edit and fine-tune your results. Click on the "Edit paths by nodes" button to the left (or F2) to adjust nodes and curves.
Method 2 of 2:
Tracing Manually
- Import your image. Click 'File' on the menu bar, and then select 'Import.'
- Open the Layers dialog. While tracing on a new layer is technically optional, it will help you see what you are doing by giving you the option to play with the opacity settings on your image (or the tracing layer). Click 'Layer' on the menu bar, then select 'Layers.' [3]
- Add a new layer. Click the '+' button to add a new layer. Type a name for the layer (like 'tracing layer') and switch to 'Above current' for the position. Click 'Add.' [4]
- Select a tracing tool. There are different tools available to suit different needs.
- Press the F6 key on your keyboard (or click on the pencil icon on the tool menu) to select the pencil/freehand tool. This tool will allow you to freely draw anywhere on your image. If you're using a drawing tablet, have a steady hand or not much to trace, this tool may suit your needs.
- Press Shift+F6 simultaneously (or click on the pen icon on the tool menu) to open the pen/Bezier tool. This tool allows you to click at the ends of lines you want to trace, which will create small, easy-to-manipulate segments. If you have several lines to trace and/or are using a mouse, this tool will give you the most precise results. Double-click at the end of each line to end the path.
- Using your drawing tablet or mouse, trace every line in your image. If you're using the pen tool, try using shorter lines instead of a single continuous line. This will make your trace easier to edit, as you won't have to start a long line all over again if you make a tiny mistake at the end.
- You can switch between your layers in the layer dialog box. Just double click on the layer name you want to work with and you'll be switched to that view.
- It may help to make your bitmap more (or less) opaque as you draw your paths. With the layer selected in the dialog box, move the slider bar beneath 'Opacity' to see which settings works best for you.
- Open the 'Edit Node' tool. On the tool menu, click the second arrow button from the top (the 'edit' arrow) to active edit mode. In this mode, you'll be able to click and drag nodes for fine-tuning.
- If you have too many nodes and it's taking you forever to move them all where they need to be, you can simplify your nodes. This may change the shape of your line just slightly, but it may not be noticeable. Use Ctrl+L (⌘ Cmd+L on a Mac) to reduce the amount of nodes.[5]
- View your trace without the bottom layer. To make sure you traced every line you want in your vector image, click on the first layer (the raster image) and reduce the opacity until all that's visible are the lines you drew. If you find you left out a line, return to the layer tool and increase the opacity so the lines you need to trace are visible.
- Remove the bottom layer and save your image. In the layer tool, click on the first layer (the layer containing the original artwork) and delete it by clicking the subtraction symbol. To save your trace, click File and then Save As.
Update 05 March 2020
You should read it
- How to scale layer, scale image in Photoshop
- How to change the layer size in GIMP
- How to Create Icons
- How to Create a Gradient in Photoshop
- How to rotate a layer in Photoshop
- The most beautiful female layer hairstyles 2020
- How to Recolor Anything on Gimp
- How to use Photoshop CS5 - Part 10: Use Layer Mask and Vector Mask to delete the background image
- Photoshop CS: Cutting edges and creating frames (Last part)
- What is Application Layer Attack?
- How to Unlock Layers in Photoshop
- Instructions for creating Instacard photos, new trends on social networks
Maybe you are interested
What is VoodooShield? How can it protect you from malware? iPhone 12, SE 2 and interesting series of products Apple will launch in 2020 Actual photo of iPhone 11, 11 Pro and 11 Pro Max, expected price in Vietnam from 21.99 million iPhone 11 can support Apple Pencil touch pen? 3 reasons to upgrade Firefox 6 AirBattery, the free Android app that helps check the remaining battery on AirPods
