Photoshop CS: Cutting edges and creating frames (Last part)
The end of the lesson cuts out the edges and creates a photo frame. I will introduce a simple way to create a photo frame for any image using layer style effects. I will practice a specific example, you practice following this example, then you will try to create other photo frames just change some specifications on the layer style.
The end of the lesson cuts out the edges and creates a photo frame. I will introduce a simple way to create a photo frame for any image using layer style effects. I will practice a specific example, you practice following this example, then you will try to create other photo frames just change some specifications on the layer style.
II. Frame photos
Open any image file you want to create a frame.
- Press D key on keyboard: Default Background before and after Black - White
- Open the layer palette: Window> layer (or press F7 )
- Duplicate this background layer: Layer> New> Layer via copy (Ctrl + J) : Name the new layer " layer 1 "
- Click again to select the background layer

- Then go to Image> Canvas Size . Add width and height of about 30 px - 50px , depending on the size of the image.
In this example, I want the frame to be about 40px wide. So I added 40px on each side, and you noticed the four corners of the image are aligned.

- After clicking Ok, you will get a border around the image with the background color (white).

- Use Magic Wand
 and click on the white area around the image. It will create a selection around the white area.
- Copy the selection (ctrl + J) : Layer named " layer 2 "
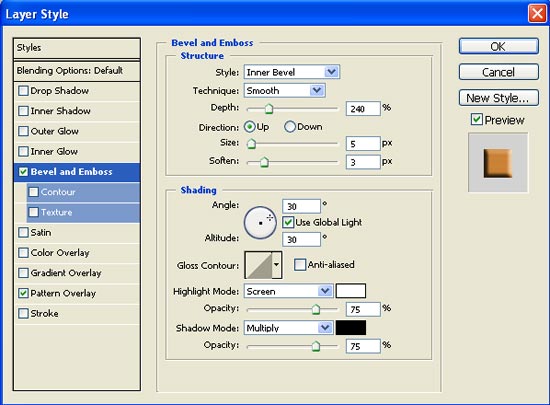
- Right click on " layer 2 " > Blending options
In the Layer style window select bevel and Emboss and Pattlern overley with the following parameters
+ bevel and Emboss
+ Pattlern overley
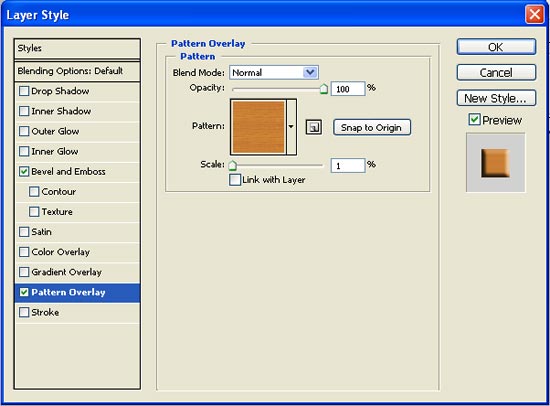
Particularly Pattlern overley: you can choose wood (like my photo frame) or any bubbles, wrinkles that you like. Dragging the % Scale slider will also make changes to the pattern frame.
- Return to your photo layer ( Layer 1 ): Right-click "layer 1"> Blending options
In the layer style window select Inner Shadow > keep the default or resize the size to 1-5 px
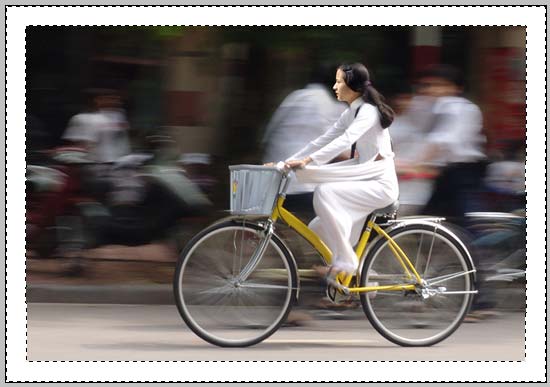
And finally you will have an art framed photo

I wish you all success in this exercise.
Was this article helpful?
Your feedback helps us improve.
Related Articles
 Photoshop CS: Cutting edges and creating photo frames (Part I)3 minutes read
 How to smooth edges in Photoshop4 minutes read
 How to crop photos in Photoshop8 minutes read
 10 Photoshop beginner skills need to know16 minutes read
 Instructions for cutting and stitching photos in Photoshop3 minutes read
 How to create stunning 3D pop-out effects in Photoshop8 minutes read
Reader Comments 0
Sign in with email or Google to join the discussion.