How to Repair Defective or Missing System Files in Windows
Many Windows problems are caused by damaged or missing system files. Damaged or missing system files may stem from malware, failed updates, botched installations, and more. System File Checker is a component of Windows which can...
Table of Contents
Part 1 of 4:
Starting and Using System File Checker
-
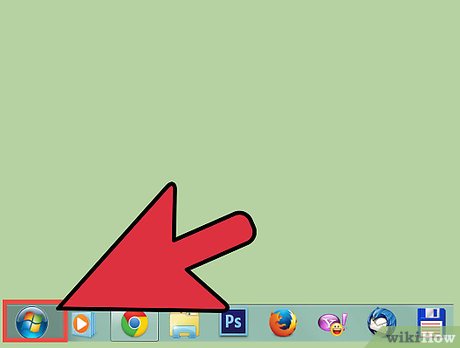 Open the Start menu. Click the Start button.
 -
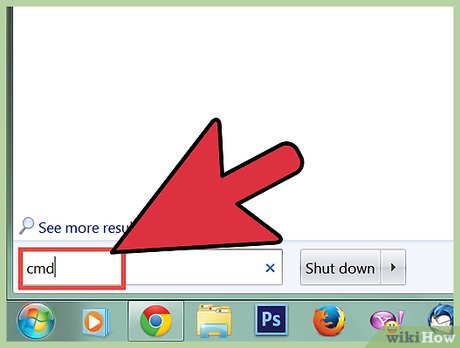 Search for Command Prompt. Type cmd.exe.
- Users of Windows XP must click All Programs then the Accessories subcategory.
-
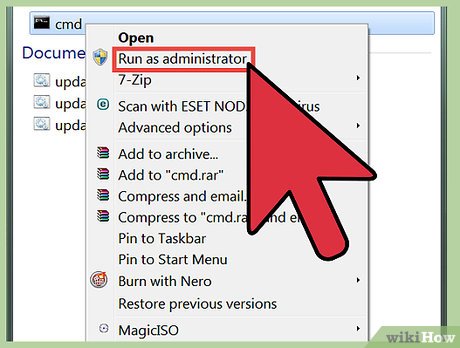 Start Command Prompt as an administrator. Right click cmd.exe to open the context menu and click Run as administrator.
- Users of Windows XP must hold the ⇧ Shift key while right clicking Command Prompt, click Run As to open a dialog window, select the The following user radio button, type Administrator as the user name and the password of the account (usually blank), and click OK.
- Click Yes on the User Account Control dialog if it appears.
-
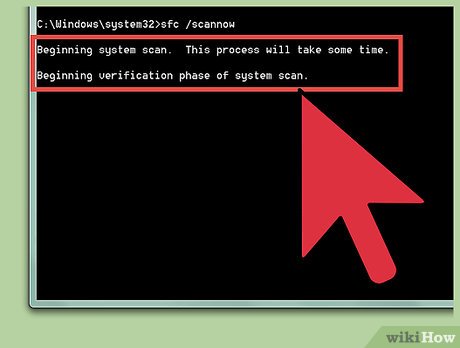
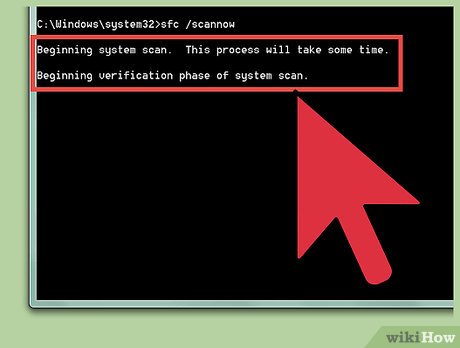
 Start System File Checker. In Command Prompt, type sfc /scannow and press the ↵ Enter key on your keyboard.
 -
 Wait until System File Checker finishes checking and fixing your system.
Part 2 of 4:
Starting and Using System File Checker Via Safe Mode
-
 Start Windows in Safe Mode with Command Prompt.
 -
 Start System File Checker. In Command Prompt, type sfc /scannow and press the ↵ Enter key on your keyboard.
 -
 Wait until System File Checker finishes checking and fixing your system.
 -
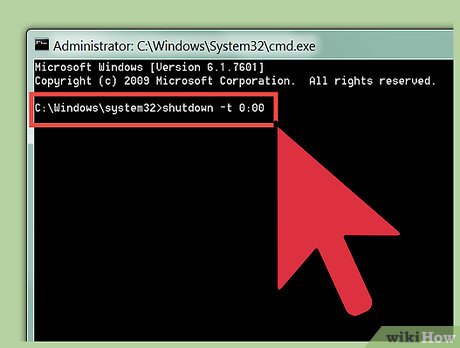
 Shut down your computer by typing shutdown -t 0:00 into Command Prompt and pressing the ↵ Enter key on your keyboard.
Part 3 of 4:
If You Experience an Error While Trying to Start System File Checker
Start the Trusted Installer and Windows Module Installer Services
-
 Open the Start menu. Click the Start button.
 -
 Search for Command Prompt. Type cmd.exe.
- Users of Windows XP must click All Programs then the Accessories subcategory.
-
 Start Command Prompt as an administrator. Right click cmd.exe to open the context menu and click Run as administrator.
- Users of Windows XP must hold the ⇧ Shift key while right clicking Command Prompt, click Run As to open a dialog window, select the The following user radio button, type Administrator as the user name and the password of the account (usually blank), and click OK.
- Click Yes on the User Account Control dialog if it appears.
-
 Start the Trusted Installer service. Type net start "trustedinstaller" into Command Prompt and press ↵ Enter.
 -
 Start the Windows Modules Installer service. Type net start "windows modules installer" into Command Prompt and press ↵ Enter.
 -
 Follow the Steps of Part 1.
If Starting the Services Does Not Resolve the Error
- Follow the steps of Part 2 to resolve the problem.
- Make sure you aren't attempting to start System File Checker in the 64-bit version of Command Prompt.
- The title of the Command Prompt window should not say C:WindowsSysWOW64cmd.exe.

- The title of the Command Prompt window should not say C:WindowsSysWOW64cmd.exe.
Part 4 of 4:
Interpreting the System File Checker Results
After System File Checker finishes checking your system for errors, it will present you with a message. The following are the messages and what they mean.
Windows Resource Protection did not find any integrity violations.
- This means that no damaged or missing system files were found.

Windows Resource Protection could not perform the requested operation.
- This means that System File Checker failed to work correctly, but it does not necessarily mean that problems were detected.
- To fix this error:
- Make sure that folders called PendingDeletes and PendingRenames exist under %WinDir%WinSxSTemp.
- Press the ⊞ Win+R keys simultaneously on your keyboard to open the Run dialog.
- Type %WinDir%WinSxSTemp into the Run dialog and click OK to open Windows Explorer.
- Search for folders called PendingDeletes and PendingRenames in Windows Explorer.
- If the folders are missing, copy them into the Windows Explorer window from another computer running the same operating system from the same location.
- Follow the steps of Part 2.

- Make sure that folders called PendingDeletes and PendingRenames exist under %WinDir%WinSxSTemp.
Windows Resource Protection found corrupt files and successfully repaired them. Details are included in the CBS.Log %WinDir%LogsCBSCBS.log.
- System File Checker found and fixed problematic system files and a log, which is a summary of the repairs made, has been created.
- To view the log (optional):
- Press the ⊞ Win+R keys simultaneously on your keyboard to open the Run dialog.
- Type %WinDir%LogsCBSCBS.log into the Run dialog and click OK.
- The log will be displayed.

Windows Resource Protection found corrupt files but was unable to fix some of them. Details are included in the CBS.Log %WinDir%LogsCBSCBS.log.
- Problematic files were found, but System File Checker failed to repair some of them.
- To fix the files automatically (may not always work):
- Boot into Safe Mode.
- Open Command Prompt as an administrator. Click the Start button, type cmd, right click the first search result, then click Run as administrator.
- Type Dism /Online /Cleanup-Image /RestoreHealth and press ↵ Enter.
- To fix the files manually (advanced):
- Determine the files that need to be repaired.
- Open the Start menu. Click the Start button.
- Click All Programs in the Start menu.
- Expand the Accessories folder in the Start menu.
- Start Command Prompt. Click Command Prompt under the Accessories folder.
- Type findstr /c:"[SR]" %windir%LogsCBSCBS.log >"%userprofile%Desktopsfcdetails.txt" into Command Prompt and press the ↵ Enter key on your keyboard.
- Double click the 'sfcdetails.txt file from your desktop to open Notepad.
- Navigate through Notepad to look for any corrupted files which System File Checker failed to correct, and note the file names.
- Find a working version of the file(s).
- On another computer that is running the same edition of Windows as the computer you are trying to repair, locate the file that was not successfully repaired and copy it onto a removable drive.
- Search for the file online if it is not available on another computer, and download it from a safe source.
- Be sure to check the downloads for viruses before using them to repair the computer.
- Take full control of the corrupted system file on the computer you are trying to repair.
- On the computer that needs to be repaired, open the Start menu. Click the Start button.
- Click All Programs in the Start menu.
- Expand the Accessories folder in the Start menu.
- Start Command Prompt as an administrator. Right click Command Prompt under the Accessories folder to open the context menu and click Run as administrator.
- Click Yes on the User Account Control dialog.
- Type takeown /f "" into Command Prompt and press ↵ Enter on your keyboard.
- should be replaced with the path of the corrupted file that you want to replace. (E.G. Takeown /f "C:WindowsSystem32notepad.exe")
- Type icacls "" /GRANT ADMINISTRATORS:F into Command Prompt and press ↵ Enter on your keyboard.
- should be replaced with the path of the corrupted file that you want to replace. (E.G. icacls "C:WindowsSystem32notepad.exe" /GRANT ADMINISTRATORS:F)
- Replace the corrupted file.
- Open the Start menu. Click the Start button.
- Click All Programs in the Start menu.
- Expand the Accessories folder in the Start menu.
- Start Command Prompt as an administrator. Right click Command Prompt under the Accessories folder to open the context menu and click Run as administrator.
- Click Yes on the User Account Control dialog.
- In Command Prompt, type Copy "" "" and press ↵ Enter on your keyboard.
- should be replaced with the path of the good copy of the file (depending on where you stored the good version of the problematic file).
- should be replaced with the path of the bad version of the file.
- (E.G. Copy "F:notepad.exe" "C:WindowsSystem32notepad.exe")
- Determine the files that need to be repaired.
Was this article helpful?
Your feedback helps us improve.
Related Articles
 How to use the Startup Repair tool to fix problems in Windows 76 minutes read
 4 tips to fix hidden Windows errors and quickly recover corrupted files.5 minutes read
 Fixed an issue with missing MFReadWrite.DLL and Windows 88.1N MFPlat.dll3 minutes read
 10 Best Tools to Repair Corrupted Windows Files12 minutes read
 How to fix missing file gdi32full.dll on Windows 10, 115 minutes read
 How to Repair Windows 76 minutes read
Reader Comments 0
Sign in with email or Google to join the discussion.