How to Remove Power Lines in Photoshop
Find out how to remove power lines in Photoshop so that they no longer spoil your picture. Learn about 4 methods how to remove power lines on photo in Photoshop.
Table of Contents
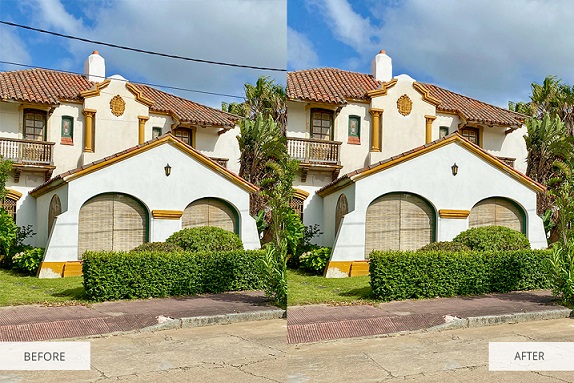
Power lines crossing the composition may ruin any photo. A spectacular gothic temple, picturesque mountain scenery, or a breathtaking night city view cut by wires hanging in the air is frustrating. You are unlikely to haveanother opportunity to visit these places again to reshoot and often we simply can't find the best perspective to make distractions unnoticeable.
This tutorial dwells on how to remove power lines in Photoshop fast and easily. There are 4 ways to do it, following which, you can also erase any other distracting object in an image.
If you don't want to spend a lot of time trying to master Photoshop, or if you don't feel like paying for an Adobe subscription, refer to an online photo editing service (FixThePhoto Online Photo Editing Service), to get an improved photo in a quick way.
Method №1.Content-Aware Fill
Content-Aware Fill is a powerful tool that you can use to remove power lines in Photoshop in several mouse clicks. This is the easiest method to cope with such a task.
STEP 1. Select an Object
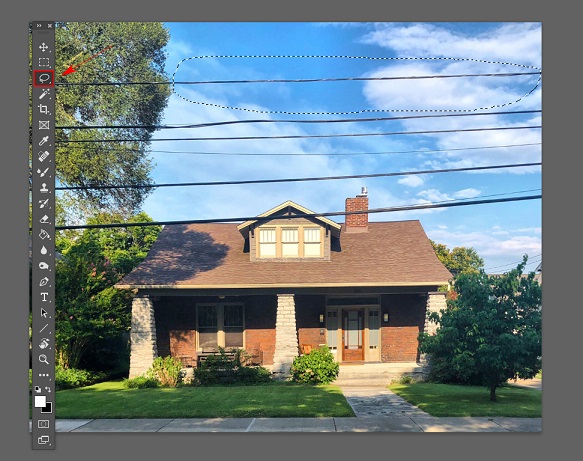
Load your image to the program and select the object you want to remove from it. The handiest instrument for the task is Lasso. Find it on the toolbar or use "L" hotkey.
Firstly, draw a selection around the powerline that you need to erase. Make sure you perform selection with some small margin for the best results.
STEP 2. Open Content-Aware Fill
After you've selected the necessary area, go to the Edit menu in the Menu Bar. Choose "Content-Aware Fill". The center of its workspace is vertically split into two parts. On the left, there is the work area; the right part is occupied by the Preview panel.

STEP 3. Adjust Content-Aware Fill
In the work area, you will see the green overlay, which covers most of the picture. It's a sampling area overlay. This is an area, from which Photoshop can sample picture details. To fix the selection, use the Sampling Brush tool on the toolbar and drag it over the objects that don't make up the background.

STEP 4. Done! Enjoy Your Picture Without Power Lines
Click OK, wait a few seconds and Photoshop will do everything for you. You will get a perfect image without power lines.

Method №2. UsePatch Tool
This is one of the most popular waysof how to remove power lines in Photoshop since you get more control if comparedto the methods that involve an automatic Content-Aware Fill. Using the Patch Tool, you "tell"the software which part of the image you want to use while replacing unwanted areas.
STEP 1. Open a Photo and Adjust the Patch Tool
Open your image and find this tool on the toolbar or use the "J" hotkey. Also, don't forget to click on "Content-Aware" in the top menu.

STEP 2. Select the AreaYou Want to Remove
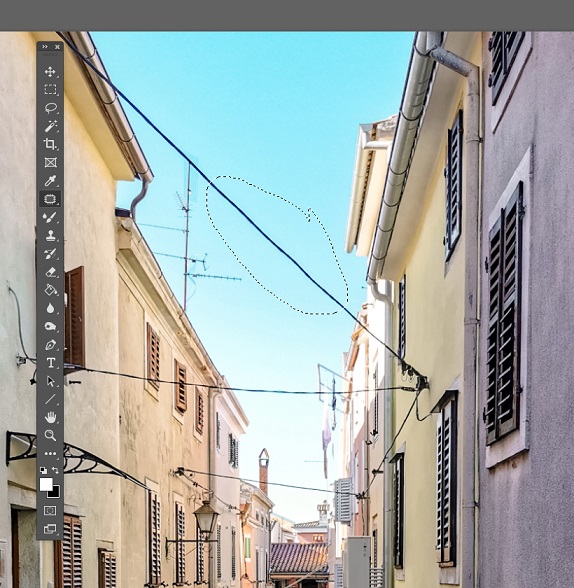
Circle the Power Line that you need to remove. Once you're done, release the mouse button and you will see the marching ants (dotted lines).
STEP 3. Clear the Space
Click in the center of the drawn shape and drag the cursor to the closest empty area. The original shape will become "filled" with similar content from the new area. There is no power line anymore. To remove the marching ants, press Ctrl + D (Cmd + D).

STEP 4. Done!
This way, you can select all the objects that are out of place. This method requires more detailed manual work, but the results are more accurate and cleaner than with automatic removal.

Method №3. Use the Clone Stamp Tool
Currently, this is the oldest tool on this list, which can be used to remove power lines in Photoshop. Like the Patch Tool, here you need to select the area of the image that you want to use as a basis.
The disadvantage here is that you may need to spend more time to achieve the desired effect. However, if you want a precise outcome, then the time and effort are worth it.
STEP 1. Open an Image and Create a New Layer
Open your picture and create a new layer by pressing Ctrl + Shift + Alt + N (Command + Shift + Option + N) above the background layer. You can also click on the new layer icon in the Layers window at the bottom. It looks like a sheet of paper.

STEP 2. Adjust the Clone Stamp Tool
Choose the Clone Stamp Tool (S) on the toolbar. To get a better result while using this instrument, select the cloning source. Do it by pressing the Alt (Option) + the left button of a mouse. This means that you will paint with the pixels you have chosen as the source. Make sure Aligned is unchecked in the tool settings and Current & Below is selected.

STEP 3. Start Erasing the Object
Now select the appropriate clone sources around the power lines and paint over them with the Clone Stamp tool. This is quite painstaking and time-consuming work, but the result is 100% perfect.
Method №4. Healing Brush Tool
The Healing Brush Tool is similar to Content-Aware Fill,with the shape of a brush being the only difference. By clicking and dragging it, you can paint around any object that has to be removed.
STEP 1. Open the Image and Create a New Layer
Open a picture and go to the Layers panel. There, you will see this photo as the background layer. Add a new blank layer above the background layer by holding Ctrl + Shift + Alt + N (Command + Shift + Option + N).
STEP 2. Choose Healing Brush Tool
Choose the Healing Brush Tool from the toolbox. By default, it's located behind the Spot Healing Brush Tool. Click on it and choose "Healing Brush" from the drop-down menu that will open.

STEP 3. Adjust the Healing Brush Tool
For further work, you need to adjust the Healing Brush Tool. In the "Sample" window, choose "All Layers". Leave the "Alignment" option disabled.

STEP 4. Start Erasing the Object
Using the Healing Brush is similar to howthe Stamp Tool works. That's why you should select the part with good texture in an accurate way. To take a sample (an area with good texture), hold down the Alt key on your keyboard. This temporarily turns the cursor into a small circle with a cross. Place this symbol over the needed area, then left-click to take this sample.
After selecting the texture sample, release the Alt key. The cursor will switch to a standard brush cursor. Now you can move it over the power lines and Photoshop will blend the desired background texture with the object texture and replace it with the background.

STEP 5. Done!
This way you can removeall power lines from the photo.

Was this article helpful?
Your feedback helps us improve.
Related Articles
 How to draw straight lines, curves in Photoshop3 minutes read
 How to delete tattoos in Photoshop3 minutes read
 How to remove stains on a shirt in Photoshop2 minutes read
 How to remove acne with Photoshop2 minutes read
 Remove objects in photos with Photoshop's new AI-powered Remove Tool4 minutes read
 Why is the power line always sagging?3 minutes read
Reader Comments 0
Sign in with email or Google to join the discussion.