How to Protect Your Privacy in Windows 10
Privacy is different to different people. There's no single approach. Some people want to leak nothing. Others figure they don't have anything to hide. Most people don't mind sharing information if they know what's being kept and how it's...
Table of Contents
Part 1 of 6:
Use a Local Account
- Stop privacy tracking with a local ('Offline') account.
- These wiki articles will guide you on how to create an Offline account in Windows 10 and Windows Vista and 7.
- Use this newly created Offline account for all your daily tasks.
Part 2 of 6:
Change your Privacy Options
-
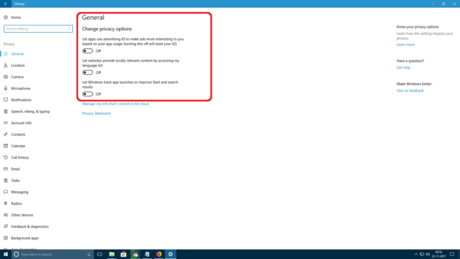 Turn off General Privacy Options.
- Click Start > Settings > Privacy.
- Click General option on the left.
- Turn off Advertising ID. A tracking ID which operates independently of your Microsoft Account.
- Turn off Language list.
- Turn off App launches, which allows Cortana to look you type or say.
-
 Stop location tracking of your phone.
- Go to Start > Settings > Privacy.
- Click Location option on the left.
- Slide Location service to OFF.
-
 Only enable tracking for specific apps if needed.
- Click Start > Settings > Privacy.
- Click Location option on the left.
- Slide Location service to ON.
- Scroll down to the app list.
- Turn off tracking individually for all except necessary apps.
-
 Set a Default location if you need the service. Windows will automatically give the default location to any app which requests location tracking.
- Scroll down.
- Click on the Set default.
- Go through the Maps app to specify any location.
-
 Clear Location history.
- Scroll down.
- Click on Clear.
- Turn off app access to camera.
- Click on Camera on the left pane.
- Slide the Let apps use my camera to OFF.

- To turn off camera individually for each app, scroll down and slide to Off.

- Turn off app access to microphone.
- Click on Microphone on the left pane.
- Slide Let apps use my microphone to OFF.

- Turn off microphone individually by sliding app setting to Off.

- The Camera and Microphone settings here only apply to Store apps and have no effect on other Windows programs, Cortana, Windows Hello or the face-scanning logon program.
- Turn off app access to Notifications. This stops looking and changing your Notifications pane (Action Center) on the right side of the Windows desktop.

- Click Notifications on the left pane.
- Slide the Let apps use my notifications to OFF.
-
 Turn off the cloud-based service of Speech, inking & typing.
- Turn it off to stop Windows from storing and analyzing your voice and handwriting.
- Turn off speech services and typing suggestions.
- Click the link to manage cloud, and get rid of your speech info in their cloud.
-
 Turn off Let App access my name, picture, and other account info.
- Click Account Info.
- Move the slider to OFF.
- You'll never find a definitive, official list of what 'other info" is.
- Turn off Let App access my contacts (xbox, twitter, etc.). Mail, Calendar, People and Phone have access to Contacts regardless of the setting.
- Choose Contacts.

- Move the slider to OFF.
- Turn off contact access individually for each app down on the list.

- Choose Contacts.
- Turn off Let App access to Call History. The Phone app always has access.
- Choose Call History.
- Move the slider to OFF.

- Turn off call history access individually for each app down on the list.

- Turn off Let App access and send email. The Mail and Calendar apps always have access to view and send email, but by default People does as well.
- Click Email.
- Move the slider to OFF.

- Turn off email access individually for each app, scroll down on the list and slide each app's setting to Off.

- Turn off Tasks. Mail and Calendar also always get access. Other apps that you install may get on the list.
- Click Tasks.
- Move the slider to OFF.

- Turn off Let App read and send messages (text or MMS). You can block all apps except Messaging, from reading/sending text or MMS messages.
- Click Messaging.
- Move the slider to OFF.

- Turn off messages access individually for each app, scroll down on the list and slide each app's setting to Off.

-
 Turn Off let apps control radios. Same idea, but for Bluetooth.
- Click Radios.
- Move the slider to OFF.
- Turn off messages access individually for each app.
- Turn Off Sync with Devices. More of the same, this time for beacons and Xbox, some TVs and projectors.
- Click Other devices.
- Move the slider to OFF.

- Send only Basic data and telemetry.
- Click on Feedback and Diagnostics in left pane.
- Select Basic which includes 1,966 separate data fields sent to Microsoft every day. There is no proper info on how much data is sent with Full.

- Marisa Rogers in this windows blog told that '71 percent of customers are selecting Full diagnostics data".
- Turn Off "Let Microsoft provide more tailored experiences with relevant tips and recommendations".
-
 Stop apps from using data and processing power in the background.
- Click on Background Apps in left pane.
- Leave Background apps On and turn Off for all apps except Windows Defender Security Center.

- Desktop apps don't appear in the list, and won't be affected by the setting.
-
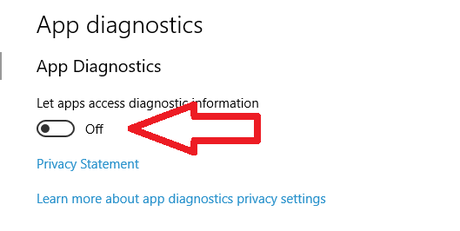 Stop apps from running diagnostics on other apps and from looking at details about other apps, like their internal names, package names, username, and memory usage.
- Turn App Diagnostics Off.
- This setting doesn't affect desktop apps.
Part 3 of 6:
Change Microsoft Browser and Bing Search Engine Settings
- Change the default Bing search engine in Edge Browser. Unlike other browsers, you must first visit the actual site of the search engine before you do changes in the settings.
- Open Edge and type the search engine site's URL in the address bar.

- Click on the three-dot menu in the upper right.
- Choose Settings.

- Scroll Down
- Click View advanced settings.

- Scroll Down.
- Turn Have Cortana assist me in Microsoft Edge slider to off.

- Click on Change Search Engine.

- Choose your Search Engine.
- Click on Set as default.

- Restart the browser and type in your search bar. Edge will now use the search engine you specified as default.
- Open Edge and type the search engine site's URL in the address bar.
Part 4 of 6:
Limit using Cortana
- Limit Cortana searches.
- Click on the Cortana icon on the left of the Search box.
- Click the 'gear' Settings icon on the left. You see the Cortana Settings pane.
- Go through the list and take a look at what Cortana's doing.
- Slide all of those settings Off.

- Go down near the bottom.
- Click the link to clear your Maps saved places
- Clear your Map Search history
- Cut off the notebook connected services.
- Clear your Device history.

- Remove accumulated personal data stored on your machine.
- Click the Cortana icon.
- Choose Notebook on the left, then About me.
- Click on your email address, then click Sign out
-
 Hide Cortana search box.
- Right-click on the Taskbar.
- Choose Cortana > Hidden, yet Cortana will appear and send a record of all of your searches to Bing, " for safe storage ".
- Remove Cortana permanently using the Registry.
- Click Windows key + r. Type regedit and press Enter. Go through whatever warning may appear.

- Navigate to HKEY_LOCAL_MACHINE > SOFTWARE > Policies > Microsoft > Windows > Windows Search.

- If there's no 'Windows Search' key, you have to create it. Click once on Windows, then right-click and choose New > Key.

- Type " Windows Search " (note the space) and press Enter.
- Navigate to Windows Search then.
- Right-click on the right side and choose New > DWORD (32-bit) Value.

- Type AllowCortana (without space) and push Enter. That will leave you with a new value called AllowCortana with a 'value data' setting of zero.
- Restart Windows.
- Perform a Search using the Start icon. You'll get a local search, not a web search, and the search terms won't be sent to Bing.
- Click Windows key + r. Type regedit and press Enter. Go through whatever warning may appear.
Part 5 of 6:
Change Lock Screen and Login Screen Settings
- Know the difference between the lock screen and login screen.
- The lock screen is what shows before you're offered a chance to log in.
- The login screen has a place for you to choose your username and type your password.
- By default, the lock screen shows a thumbnail of your latest email.
- The lock screen may be rigged so Cortana or Windows Hello are listening to everything you say, or watching everything you do, even when your machine is logged out.
- By default, the login screen shows valid email addresses for every Microsoft account authorized to use the machine.
- Keep your emails from appearing on the lock screen.
- Click Start > Settings > Personalization.

- Choose Lock screen. You'll see a pane.
- Click on the 'Mail' icon and choose None.

- Click Start > Settings > Personalization.
- Stop Cortana now from listening to your conversations while logged off
- Click the icon on the left side of the Cortana search box
- Choose Settings
- Slide "Use Cortana even when my device is locked" to Off.
- Turn off Windows Hello scanning while you're logged off.
- Click Start > Settings > Accounts.
- Choose Sign-in options.
- Scroll down a bit and, on the right, slide "Automatically unlock the screen if we recognize your face" to Off.
-
 Hide your email address on the log-in screen.
- Click Start > Settings > Accounts.
- Choose Sign-in options.
- Scroll way down on the right and under Privacy / Show account details (e.g. email address) on sign-in screen, move the slider Off.
Part 6 of 6:
Clear last bit of data from Microsoft's Cloud
- Remove your data from Microsoft's database. Microsoft has information about you tied to your online account if you've been using it for any time at all.
- To remove, you need to go through these sub-pages in three locations. They are:
- Microsoft advertising opt-out page
- Microsoft account privacy page, which is also called the Bing account personalization page. It has five sub-pages, marked Overview, Browse, Search, Location, and Cortana's Notebook. Make sure to remove any or all of your information from those pages.
- Office Trust Center if you use Office.
Was this article helpful?
Your feedback helps us improve.
Related Articles
 A tool to help you control your privacy in Windows 104 minutes read
 8 ways to protect your privacy on ChatGPT8 minutes read
 Facebook has just updated its privacy checker, here are four things you need to know to protect your account2 minutes read
 How to tighten privacy on Chromebooks6 minutes read
 These 5 browser privacy misconceptions won't protect you6 minutes read
 Instructions for enabling iPhone Mail privacy protection2 minutes read
Reader Comments 0
Sign in with email or Google to join the discussion.